Cooking requires tremendous focus and patience; some dishes require more patience than others to prepare and japchae is definitely one of them. The most time-consuming part is the food preparation and final assembly.
Preparing this dish certainly presents a perfect opportunity to work on your own knife skills; all ingredients must be cut finely, cook and seasoned separately, and in the end mix together by hand.
Yes you heard it right, it is by hand and this is exactly what I’ve learnt at the Korean cooking school in Seoul back in 2007. The final assembly requires the cook to mix, taste and adjust seasoning at the same time. The dish is not supposed to be oily, too sweet or heavily “doused” with sesame oil.
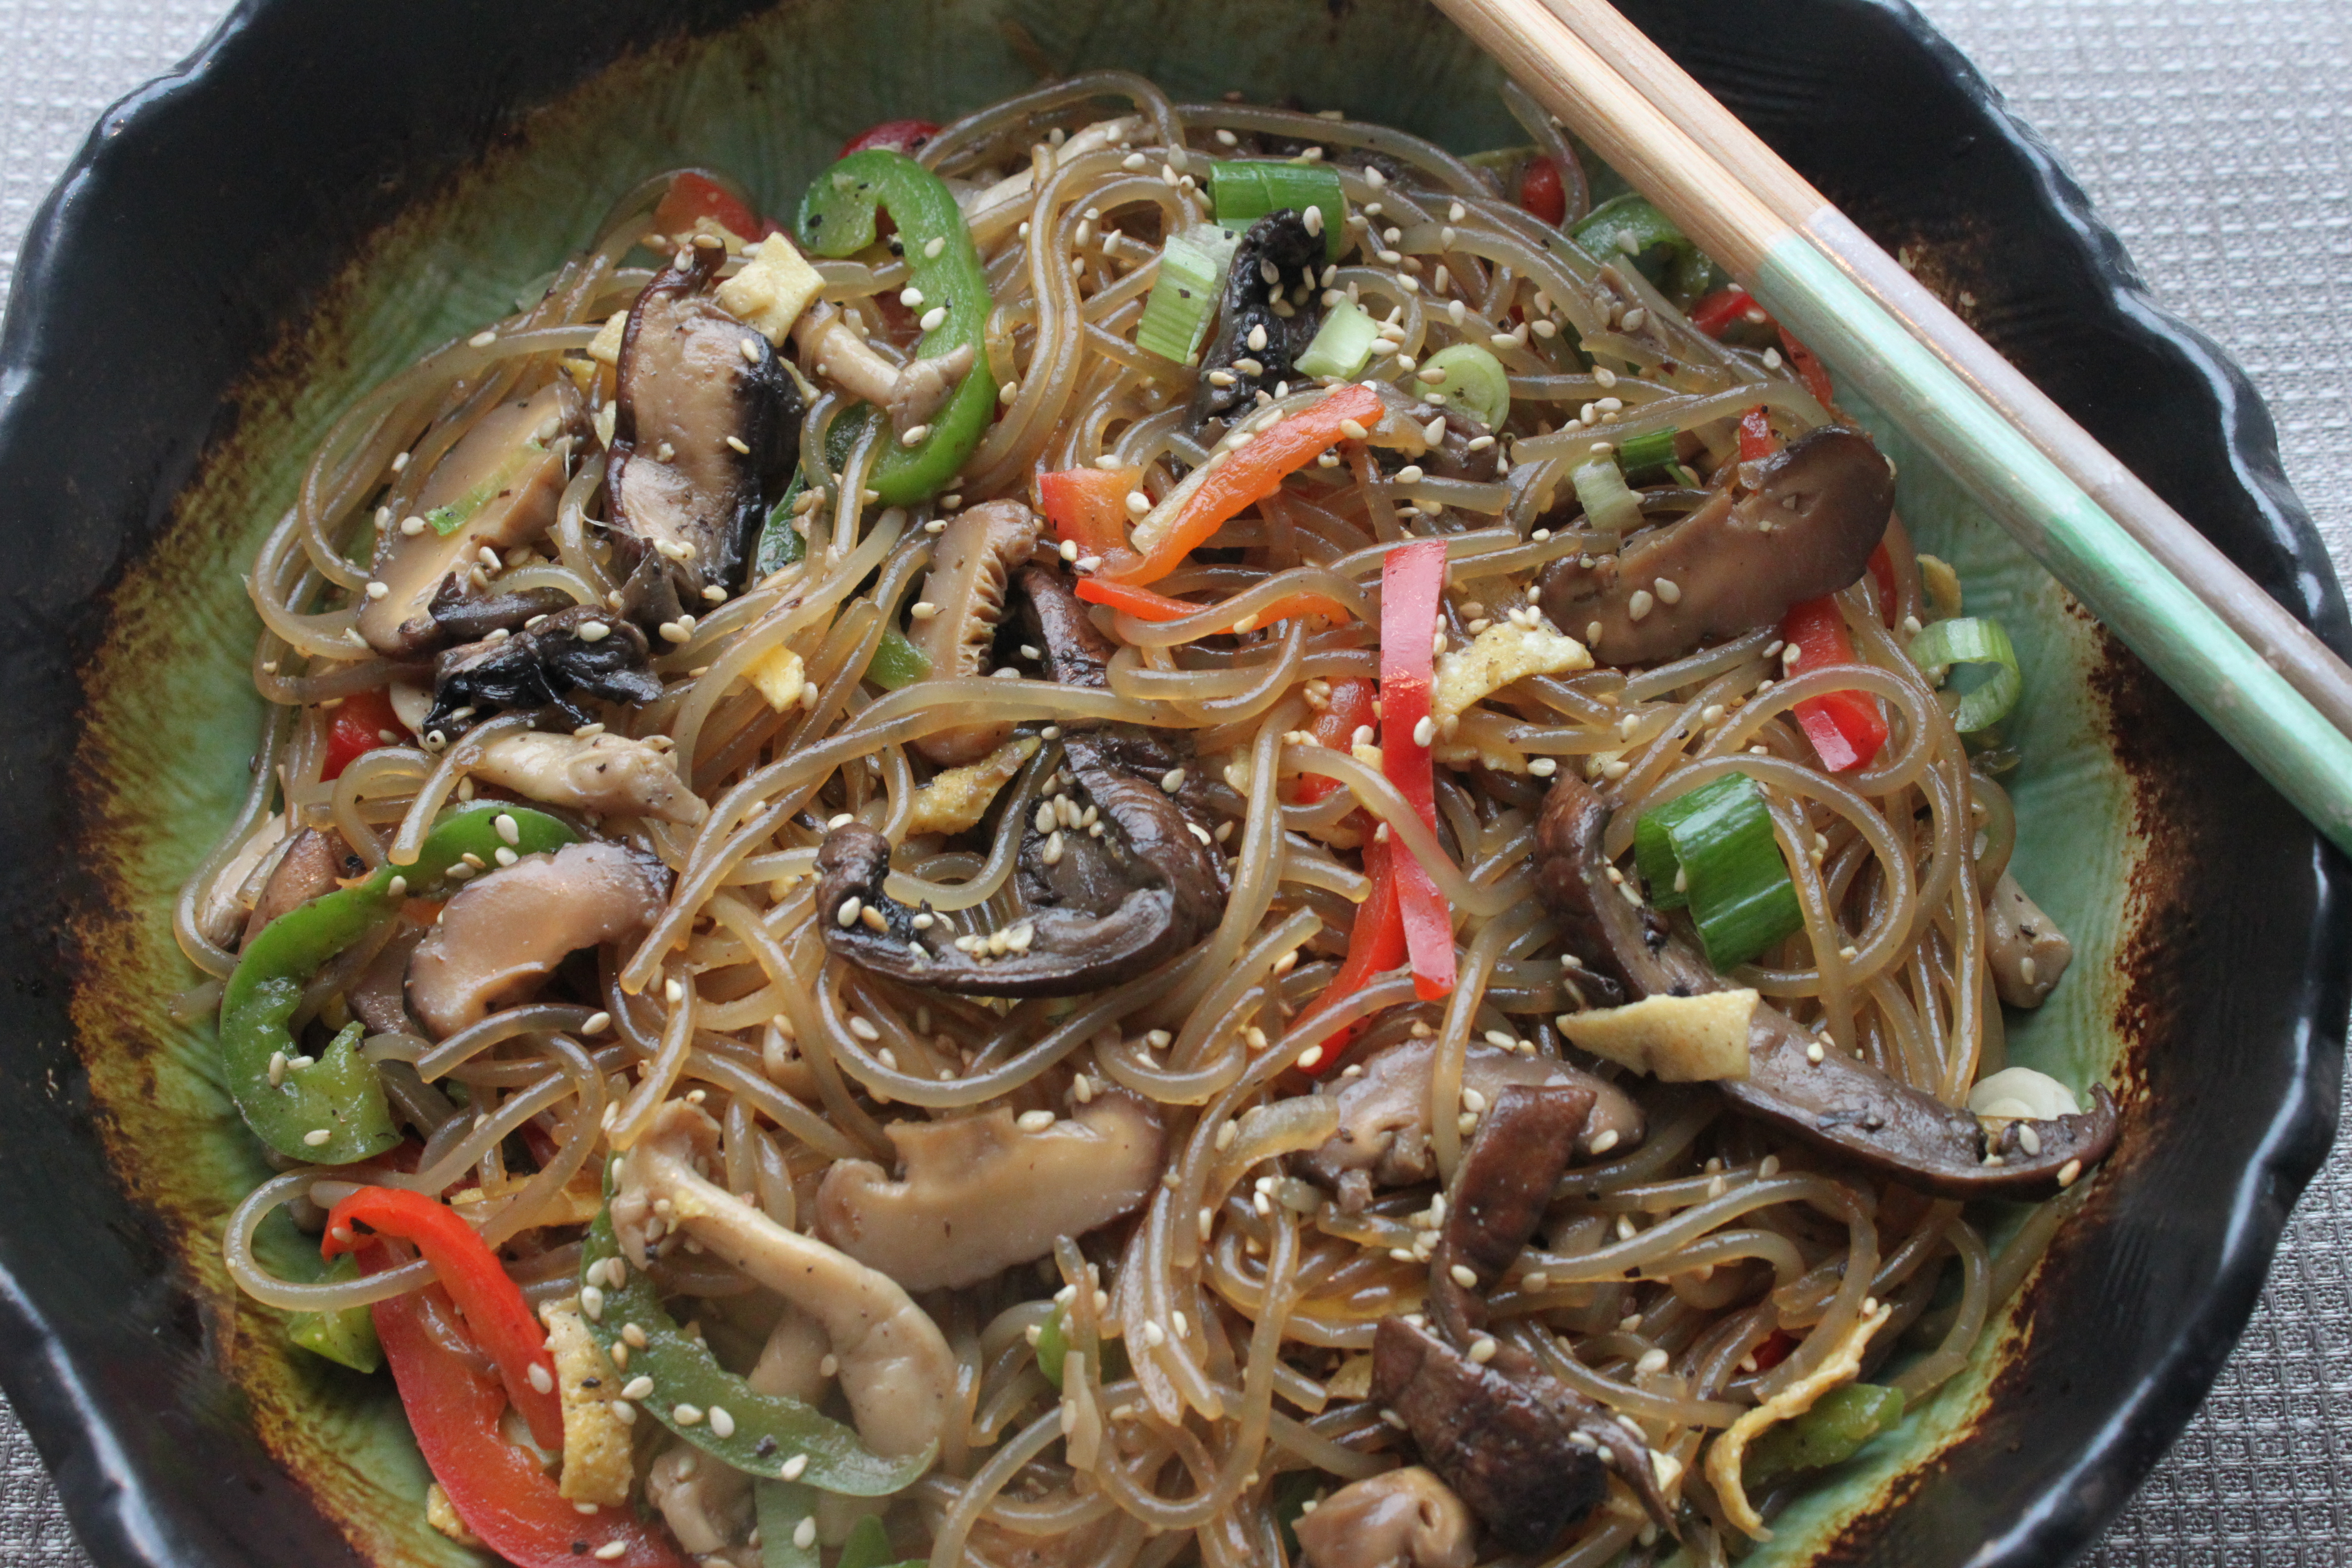
Most of the traditional recipes consist of shiitake mushrooms, onions, carrots (cut into matchstick strips), cucumber peel (skin only finely sliced), egg, scallions and sometimes beef, garnish with sesame seeds and slivers of chilli. Seasonal vegetables are added and the colours are chosen very carefully to make the dish pleasing to the eye.
My vegetarian version uses less noodles, three different kinds of mushrooms, red pepper, green pepper (Thanks Sofei for your own organic produce), yellow onion and green scallions.
So what is your combination then? (OO)
Ingredients: (Serves 2 to 4)
4 ounces of korean sweet potato noodle (dangmyeon), 1 large Portobello mushroom (gills removed, thinly sliced), 1 package of white shimeji mushrooms (ends cut off, separate each stem), 10 dried shiitake mushrooms (rehydrated, thinly sliced), 2 garlic cloves (finely minced), 1/2 red bell pepper (cut into thin strips), 1/2 green bell pepper (cut into thin strips), 1 small yellow onion (thinly sliced), 1 egg (egg yolk only), 1 to 2 green onions (cut crosswise into 1 inch long pieces), grapeseed oil, roasted white sesame seeds, organic Japanese (or Korean) soy sauce, sesame oil, salt, maple syrup, fresh ground black pepper for season to taste.
**Note: quantity of oil used is provided below, keep in mind it’s not supposed to be greasy! As for the sweetener, as I do not use refined sugar at home, maple syrup is my preference. As it has a different flavour, please use sparingly or you can substitute with brown sugar. You can always adjust the quantity of vegetables used according to your own preference.
Preparation:
– In large bowl filled with hot boiling water, completely submerge sweet potato noodles, cover and soak until they soften; stir a little to keep them from sticking together, drain thoroughly. This process takes less than 10 minutes, do not over soaked the noodles as they must remain firm and chewy. The noodles are quite long; using scissors cut them a few times, set aside.
– In small frying pan, add 1 teaspoon of vegetable oil, swirl it around and wipe off the excess with paper towel (not over the stove!) so you can see a very thin layer of oil on the pan. Return pan to heat, add beaten egg yolk mixture into the pan. Tilt it around so it spreads thinly, let it cook using residual heat in the pan for 1 minutes, then flip it over and cook for another minute. Let it cook and slice into thin strips.
– Using a skillet, heat 1 teaspoon of grapeseed oil over medium high heat, add onions and scallions and pinch of kosher salt. Saute until onions become translucent, it takes approximately 2 to 3 minutes. Remove from skillet and set aside.
– Using the same skillet, heat another teaspoon of grapeseed oil, add red pepper strips and saute for 30 seconds, then add green pepper strips, mix well and saute for another minute, remove from skillet and set aside. The pepper strips should remain crunchy.
– Using medium high heat, heat the same skillet with another 1 to 2 teaspoons (mushrooms absorb oil) grapeseed oil, add Portobello, shiitake and shimeji mushroom mixture, add minced garlic, saute for a few minutes until the mushrooms are softened and lightly browned (You will also hear a squeaky sound when cooking the mushroom). Remove from skillet and set aside.
– In a big mixing bowl, prepare the seasoning mix: add 1 to 2 Tablespoon soy sauce, 1 Tablespoon maple syrup, 1 teaspoon of sesame oil, and fresh ground pepper (a couple of grinds). Add all the ingredients to bowl and mix together by hand (please wear disposable gloves). Taste and adjust the seasoning accordingly.
– Add the egg strips and toasted sesame seeds, mix all ingredients thoroughly; garnish with more scallions if desired. Transfer to plate and serve.
I really do spend much of my free time watching cooking shows, reading and researching about food and recipes; collecting a lot of information and “tuck them away” (as my hub Andy would put it) into my little “memory drawers”. Besides my IPHONE and IPAD, I always carry an old fashion notebook with me. Hey you just never know whenever an idea hits and what you need to find in order “connect” the missing “food links”…
This was one of those times when an idea hit so quickly!
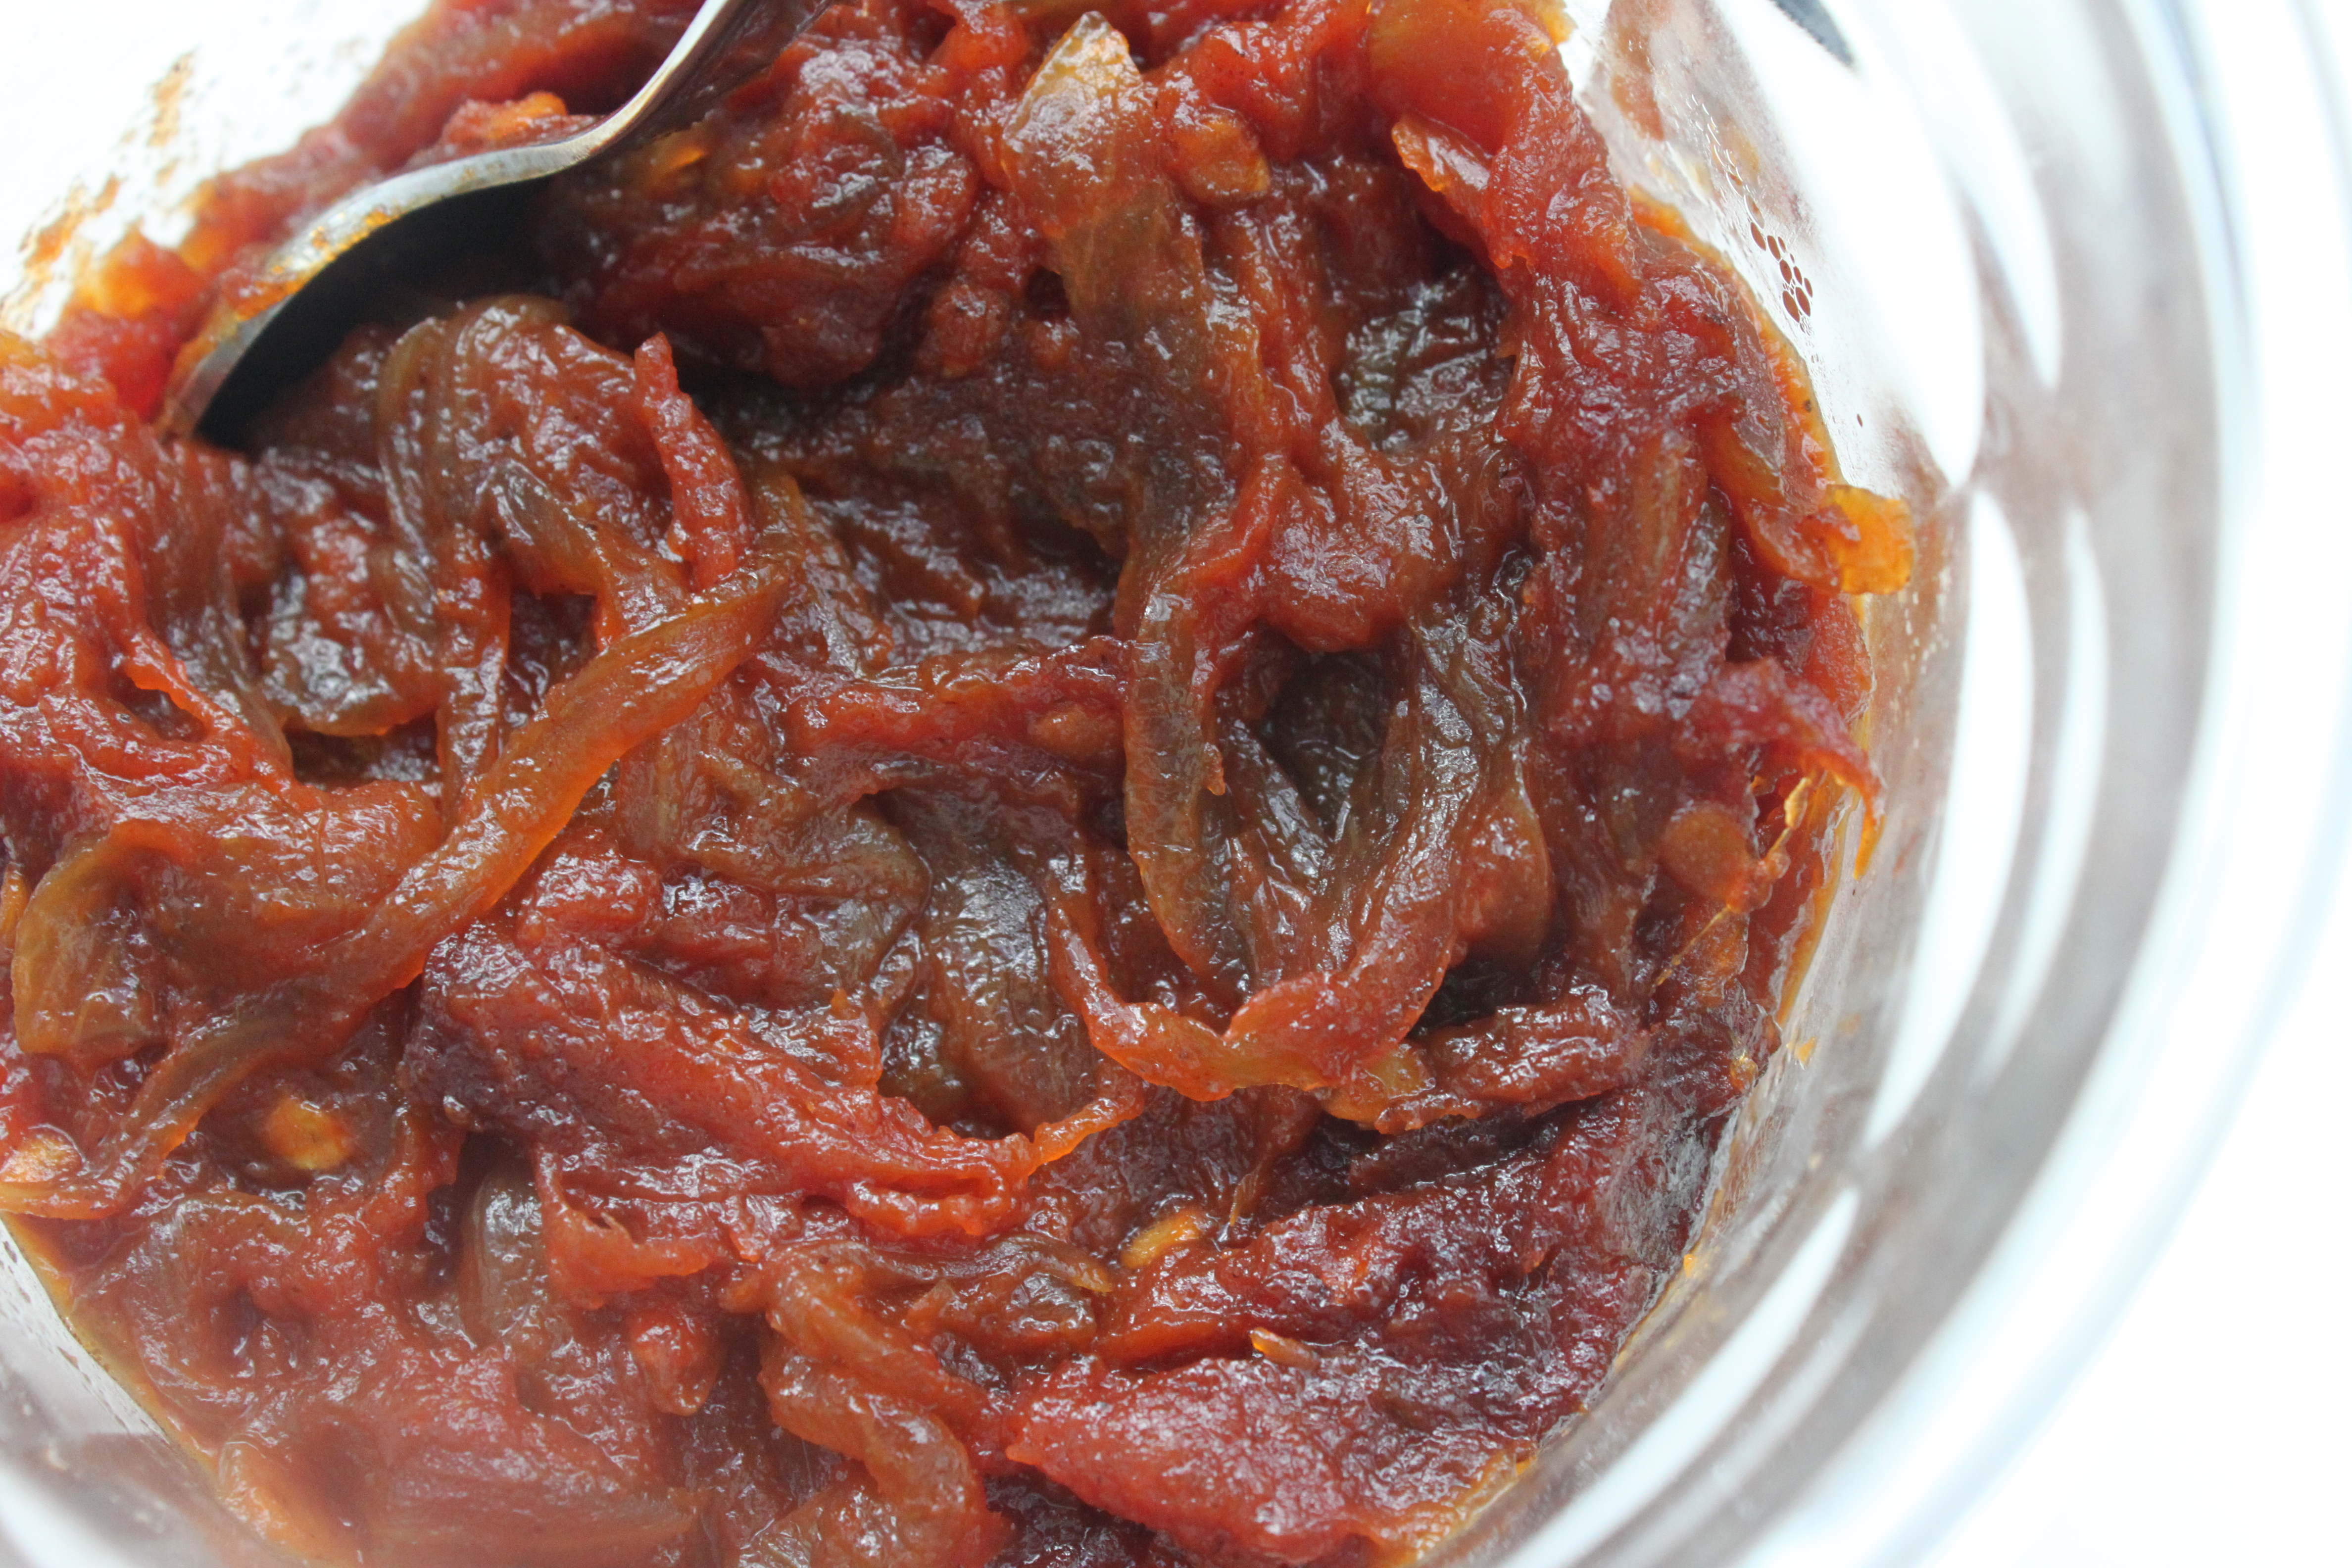
As I was “conceptualizing” my faux “omurice”dish, I was looking for a “ketchup” replacement – Besides the fact we rarely use ketchup at our household, I knew ketchup will not work as a seasoning to the “cauliflower rice”, it will make it mushy. I needed something more “adult” and sophisticated to “elevate” the dish! Through my weekend experiment, my “jam-chup” (Andy came up with this name) complimented the final dish beautifully, it was my own “Top Chef” moment (LOL)
The recipe is adapted from a great posting by Joshua Bousel (the caramelized onion method by J.Kenji Lopez-Alt), published on Serious Eats, one of my favourite online food communities. The difference is I’ve used Japanese dashi stock instead of water to “deglaze” and also add another subtle layer of flavor; I made the “switch” specifically to make it “Japanese” in order to go with my faux-“omurice” (Omelet Rice) dish. If this doesn’t work for you, please feel free to switch back and stay true to the original recipe.
I have used an organic coconut palm sugar (an absolute personal preference, I don’t use any refined white sugar), reduced the quantity and it worked just as well. I just love using fresh ingredients and watch all the flavours blend together harmoniously. It is through experimentation you will improve your kills, understand your tastes and put your own signature on any dishes.
My “jam-chup” is long-term keeper ..now what else can I use it for? (OO)
Ingredients: (yields approximately 1 cup)
1 pound yellow onions (finely sliced), 1 Tablespoon grapeseed oil, 2 pounds organic roma tomatoes (peeled, cored, seeded and finely chopped), 1/2 cup organic coconut palm sugar, juice from 1 lemon, 2 Tablespoon apple cider vinegar, 6 to 8 Tablespoon Japanese dashi (homemade, or you can use packaged stock powder), 1 teaspoon kosher salt, 1/2 teaspoon red chilli pepper flakes
Remember, always adjust your seasoning according to your liking and dietary needs.
Preparation:
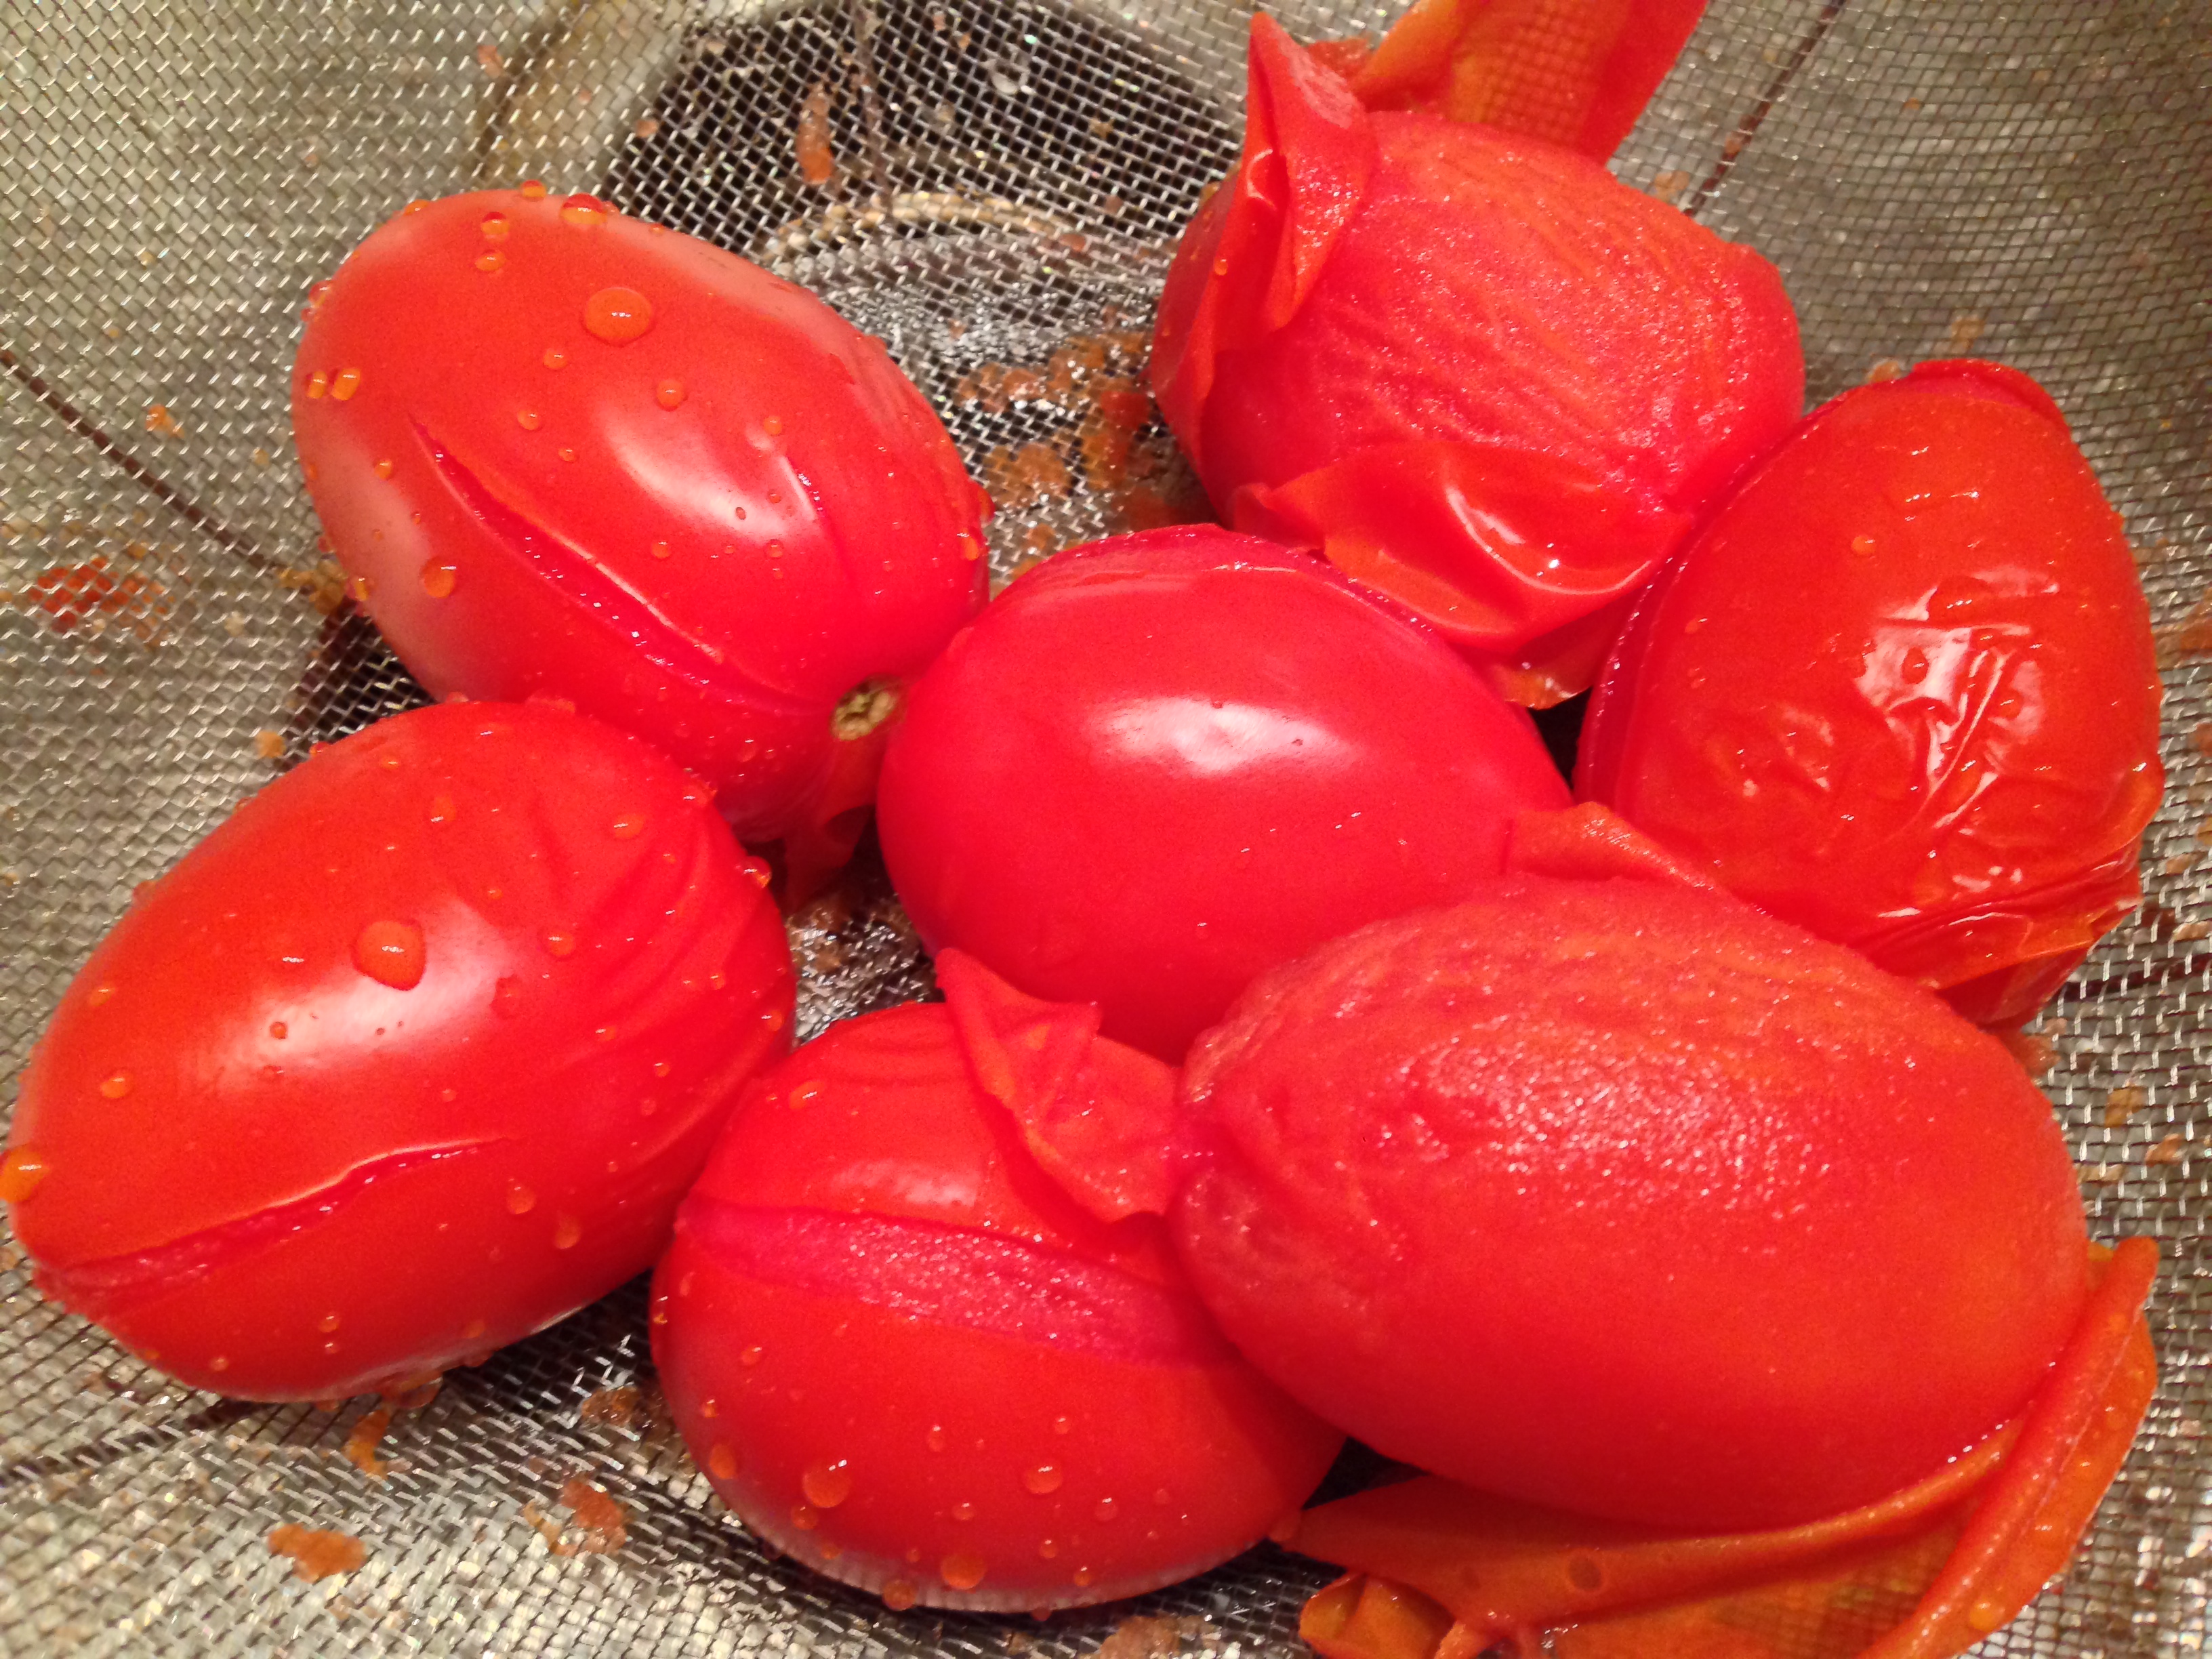
– Peel, core, seed and finely chop the tomatoes (see picture with below for peeling method). Set aside.
Use a sharp knife and slice a shallow “X” into the bottom of the tomato (opposite to stem side); place them in boiling water, you will see the “X” split open, it’s very quick (only 20-25 seconds). Remove them from hot water and place them in “ice” bath to cool off.
– Add grapeseed oil to large heavy bottomed stainless steel saucepan over high heat. Add onions and cook, stirring frequently, until bottom of the saucepan is glazed in a pale brown fond (takes approximately 5 minutes – you will see it).
– Add 2 Tablespoons of dashi stock and scrape up fond with wooden spoon or spatula. Continue to cook, and keep stirring frequently, until fond has built up again (that’s another 2 minutes). Add another 2 Tablespoons of stock and scrape up the browned bits. Repeat cooking, add stock, and scraping until the onions are completely softened and caramelized (a deep dark brown colour), approximately 15 minutes in total.
– Add tomatoes, coconut palm sugar, lemon juice, apple cider vinegar, salt and chilli red pepper flakes to the sauce pan, stir to combine with the onions.
– Bring mixture to a boil, then reduce to low heat and simmer, stirring occasionally, until tomatoes have broken down and “jam” has thickened and developed a “jam” like consistency, this takes 1 to 1 1/2 hours.
– Remove from heat, transfer to an airtight container, let it cool completely and refrigerate (according to original recipe, this can store in refrigerator up to two weeks, for an extended period, ladle into sterilized jars and process in a hot water bath for 10 minutes to seal for self storage.
Korean Food Wave Revisited: Two weeks ago on the Thanksgiving long weekend, I went “work-clothes shopping” with my friend “Mui Mui”, a fairly level-headed “youngster” who recently got a new job and need a little assistance with wardrobe selections.
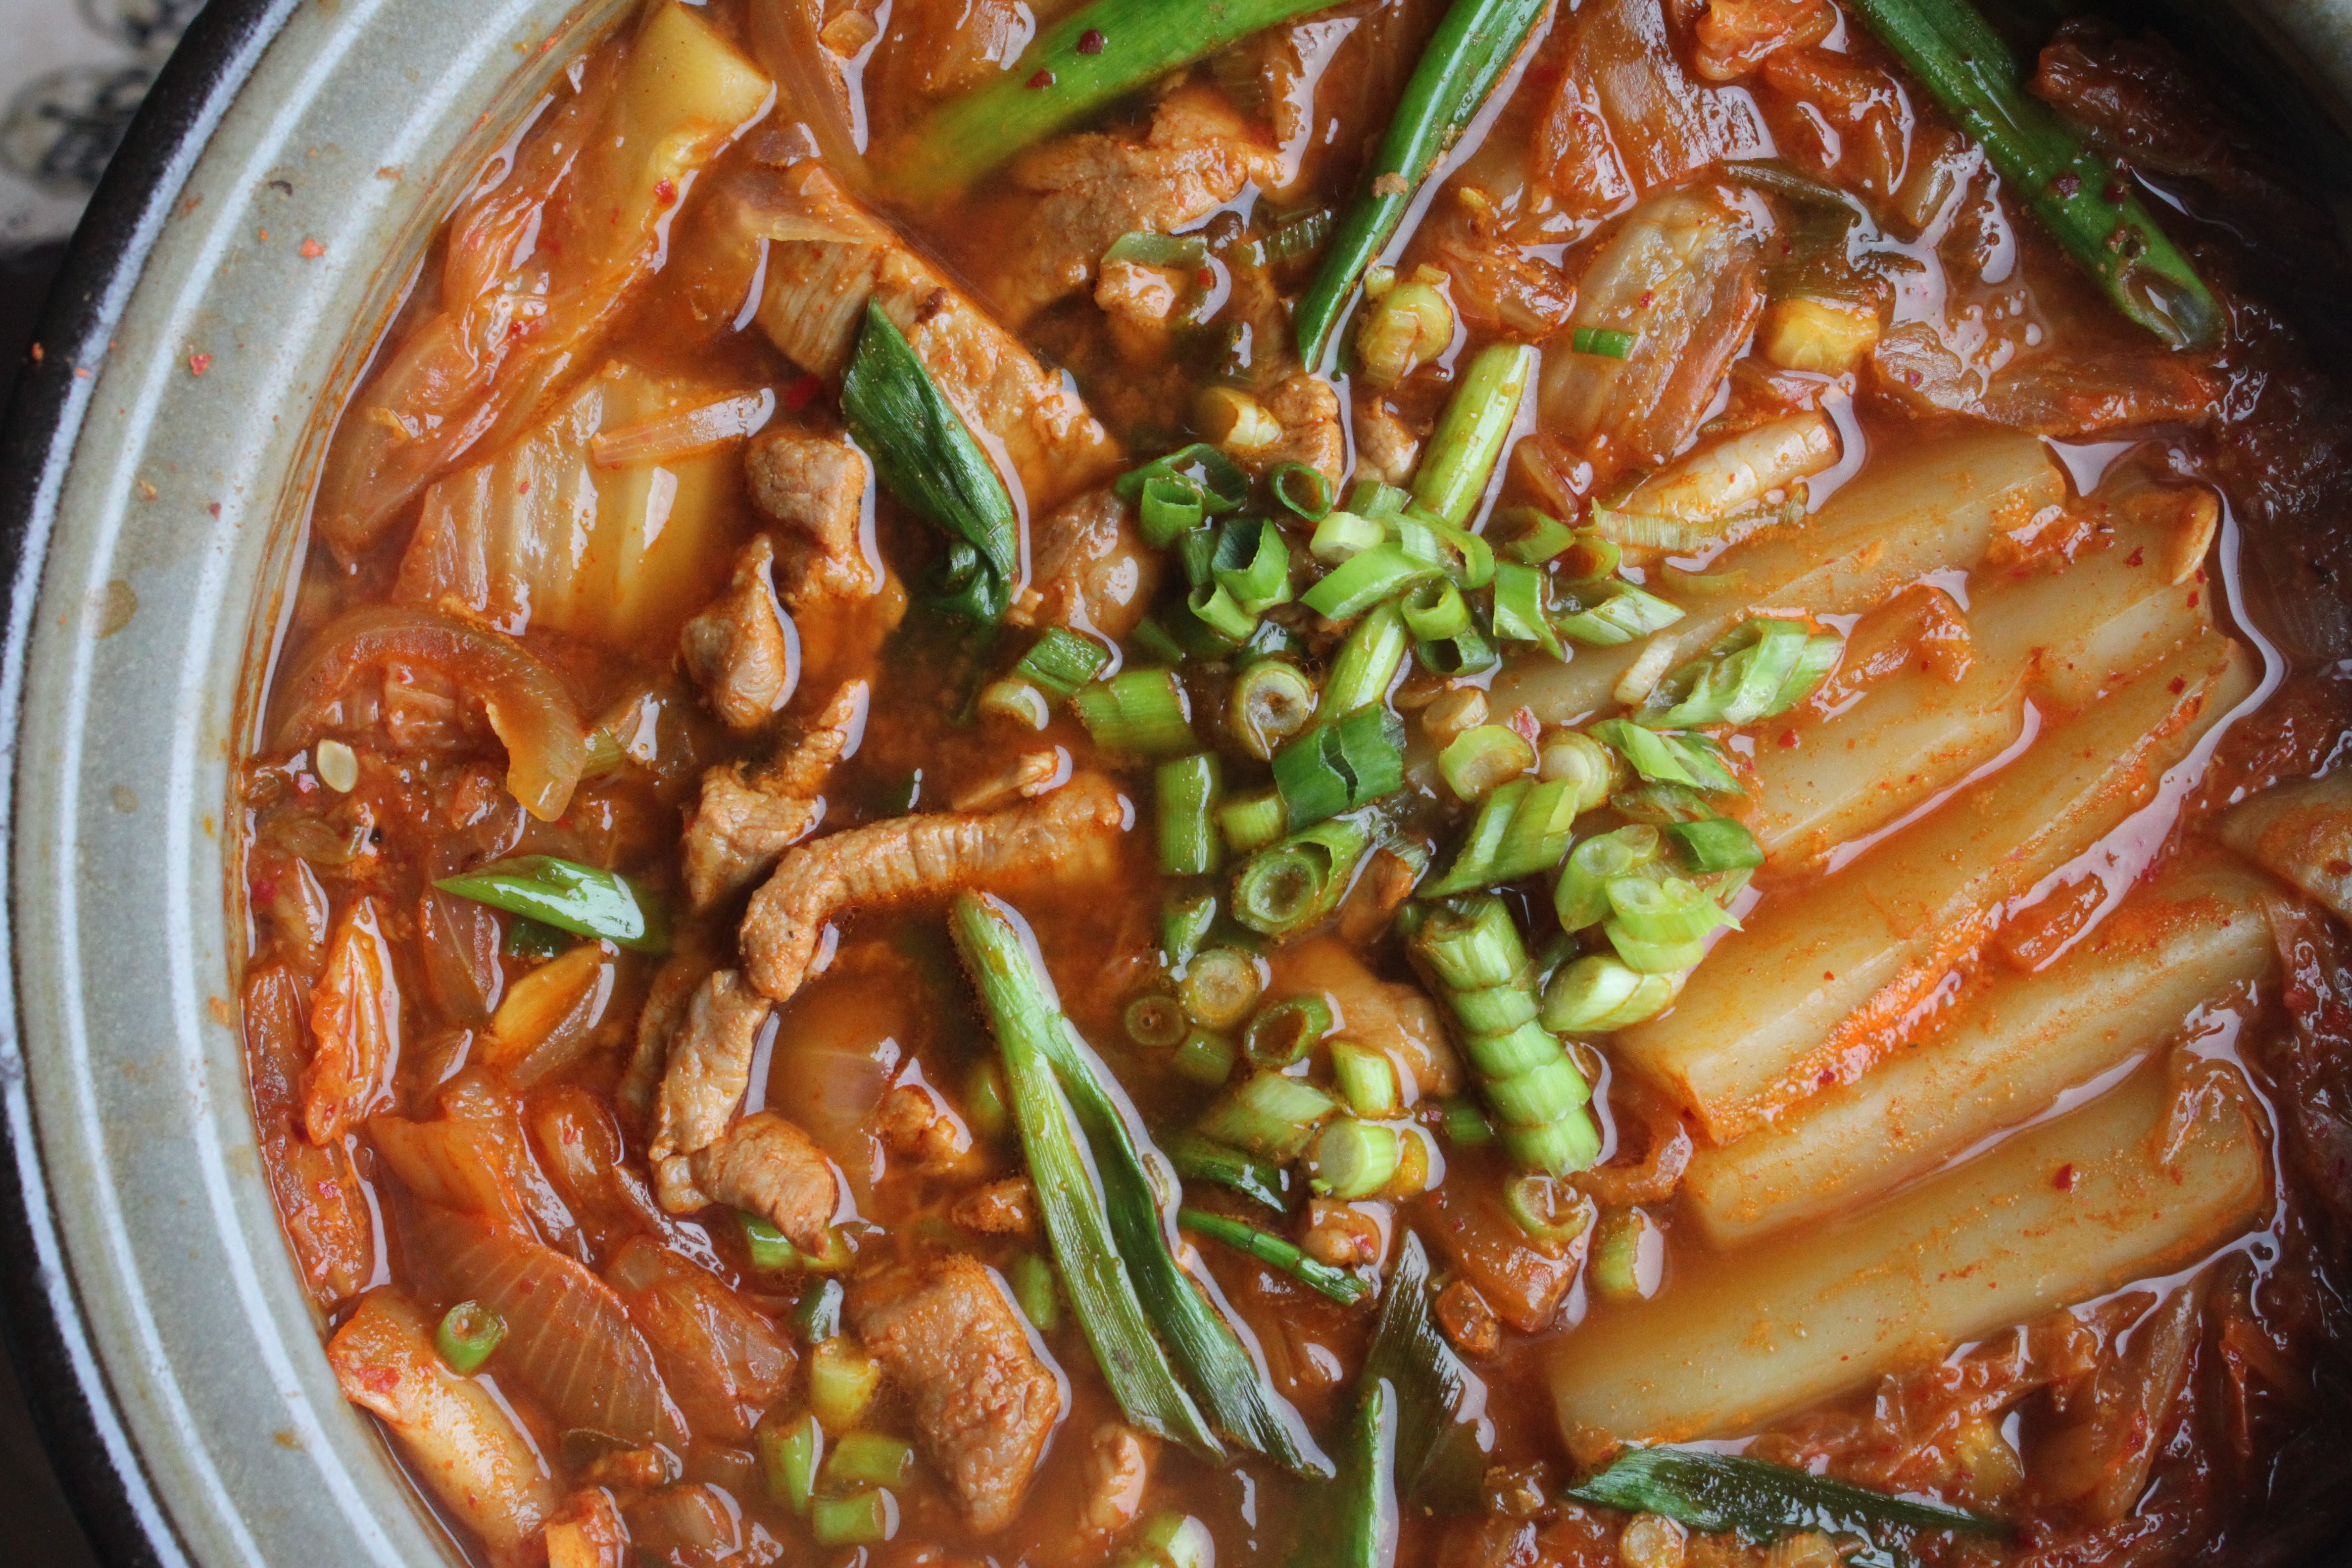
She can only have soup or congee (braces!!); we popped into H-Martfood court (on Robson Street) for a casual dinner (shopping is just about the only time I’m willing to forgo a proper “sit down” meal, taste is important still); it was great to revisit Wang Ga Ma food stand, where I had one of my all time favourite Korean dish, Kimchi jjigae. It was absolutely delicious, just “hit the spot”, perfect dinner on a rainy Friday night.
I like Jjigae for its simplicity and heartiness, it is what it is. Unlike SoonDuBu (Tofu soup), this dish is not readily available anywhere. Whenever I have a sudden craving, I must make my own at home. It’s my “go-to” dish during the gloomy Vancouver winter months.
The taste brought back many fond memories, the years (since 2005) of my absolute fascination with my third “adopted” culture (behind Japanese/French)…Korean language classes (at SFU Continuing Education)…My three trips to Seoul, especially travelling with my language class schoolmates (who remained in touch as good friends until this day)…dinner outings to different establishments with our wonderful teacher Anne…Korean cooking classes…
Upon returning home, I “dug out” an old cookbook – “Korean cooking” by Han Chung Hae; In 2005 and 2007, I was very fortunate to have had the opportunities (yes twice!) to attend her cooking school while I travelled to Seoul for leisure! I’ve learnt some interesting basic dishes – kimchi jjigae (by special request), Japchae, Bulgoogi (secret marinade), seafood pancake, just to name a few! The cookbook and a few copies of recipes written in Korean (yay have not forgotten everything entirely!) are prized souvenirs, I treasured most the experiences and friendships, they will always remain very dear to my heart.
Last night on the way home we made a quick stop at T & T (Asian supermarket) to pick up the pork and konnyaku (kimchi is always in our fridge!)…Here you go!
2 cups (packed) kimchi (readily available at most supermarkets, chopped in bite size), 150 grams organic pork shoulder (thinly sliced or bite size, trim excess fat), 1 small onion (thinly sliced), 3 teaspoons grated ginger, 1 teaspoon finely minced garlic (can always add a little more), 1/2 cup kimchi juice (squeezed from kimchi), 2 to 2 1/2 cups of anchovy stock (*similar to Japanese dashi made of dried kelp and dry anchovies boiled in water), 2-3 teaspoons of gochujang (Korean chili paste), 150 grams konnyaku, 2 scallions (thinly sliced for garnish), 2 teaspoon grapeseed oil, 1-2 teaspoon of soy sauce (preferably Korean, Japanese soy will work also) for marinade and season to taste; 2 teaspoon Japanese sake (rice wine).
*You can use water if you do not have any stock handy, the anchovy stock adds more depth and flavour to the soup. I always have Japanese dashi stock (kelp/bonito) ready at home and it works just as well.
It’s my personal preference to use mostly organic products, the pork shoulder (it’s less fatty) and konnyaku (a Japanese zero calorie product made of plant from taro family) instead of the usual tofu (OO). For other versions, skip the meat and add other vegetables for vegetarian, or use canned tuna for chamchi jjigae.
Preparation:
– Slice onions, grate ginger, mince garlic and chop scallions, set aside.
– Trim excess fat off pork shoulder, slice thinly or bite size; marinade with 1 teaspoon of soy sauce, 1 teaspoon rice wine, 1 teaspoon of Korean chilli paste (gochujang), 1 teaspoon grated ginger and a smidgen of garlic at least for 30 minutes.
– Prepare the kimchi juice: Remove 2 cups (fully packed) kimchi from jar, squeezed hard into a bowl to obtain “juice” (approximately 1/2 cup), set aside.
– Bring a small pot of water to boil, add the whole block of konnyaku to parboil for approximately 10 minutes. This will get rid of the “smell”, slice konnyaku into 1/2 inch thick.
– Using medium high heat, heat a hot-pot (nabe – remember to follow instructions if you using one) or 5 quart heavy bottom stock pot, heat 1 teaspoon of grapeseed oil, when hot add the pork slices. Saute for approximately 2 to 3 minutes (do not cook pork entirely) and allow the fat to render. Remove pork from pot.
– Using the same pot (add a little more oil only if necessary) over medium high heat, add the onions, saute for 2 to 3 minutes until translucent, add remaining ginger and garlic and 1 teaspoon of gochujang, saute until the mixture is very fragrant. Add the kimchi juice and a splash of Japanese sake to “deglaze” (you will hear it sizzling) and scrape off the little brown bits (don’t burn) from the bottom.
– Add kimchi, konnyaku and soup stock (or water) to the pot, stirring everything together to combine.
– Bring to a boil and taste for spiciness, adjust with gochujang (Korean chilli paste) if you want to increase the spiciness, season to taste with soy only if necessary.
– Turn the heat down to a low simmer and let the soup cook for at least 15 minutes. Let the flavours develop further.
– Return the half-cooked pork slices to the mixture, cook until meat is tender.
– Add the scallions and quickly stir to incorporate. Turn off and remove from heat, serve immediately straight out of the pot with rice. Enjoy!
The pie I made for Thanksgiving Dinner – this picture was selected and made it to this week’s Vancouver Sun Gastropost.
My sister-in-law Marcia is a pescatarian/vegetarian and a serious dessert/chocolate connoisseur; for almost every Festive family dinner gatherings when a “meat” dish is usually the main event, our mother-in-law would happily make our family’s favourite “Not real sushi – California rolls” (recipe already posted) or baked a salmon fillet for her, changing the sauce (Teriyaki, beurre blanc) each time. Although she enjoyed them always, it became a routine…
I decided to change things up just a bit after revisiting the classic recipe: I know it’s not major or “life defining” culinary moment, the thought process behind the thinner crispy potato crust (instead of usual mashed potatoes) was very simple; the “pie’ idea was inspired by Marcia’s past lovely desserts and believe my entire extended family will find this more enjoyable, it’s less carbs (haha) and less fat (from the sauce to the filling). Over time, I find myself putting even more consideration and thought into the food which I cooked for family and friends, a lot of times it is for health reasons and their preference; this is my way to express my love to those close and dear to me.
This dish, along with the juiciest turkey I’ve ever cooked together with my mother-in-law, and the sides and salads (Thanks Barb and Gina) and desserts (thanks Marcia! The chocolate truffle cake and apple galette were divine) prepared by my sisters-in-law were devoured in no time.
That was another happy busy day in the kitchen, happy meal, happy gathering, happy family moment together…I have so much to be thankful for.
On another happy note: I submitted the “pie” picture to Vancouver Gastropost for last week’s “Pie Oh My” Mission, it was selected and featured in Saturday’s weekend paper! Thank you Vancouver Sun for the acknowledgement (OO).
Ingredients: (For 9 1/2 inch pie plate)
500 g wild sockeye salmon fillet, 2 leeks (white part only, finely sliced), 4 to 6 Yukon gold potatoes (peeled and grated into strips), Japanese panko (handful), fresh juice of 1 lemon, 1 Tablespoon fresh dill (chopped), 1-2 Tablespoon grapeseed oil, sea salt and white pepper (for seasoning), grated cheddar (as you like and it is optional)
For Lemon dill infused bechamel: 4 cups of “tempered” unsweetened almond milk, 3 to 4 sprigs of fresh dill, peel of 1 lemon (strips), 1 bay leaf, 1/4 teaspoon kosher or sea salt (or to taste), 1/4 cup (approximately) of all-purpose flour, 3 to 4 Tablespoon grapeseed oil (traditional roux calls for butter, fat and flour is usually 1-1 ratio, I’ve used less than 3 Tablespoon of grapeseed oil). **Using grapeseed oil and unsweetened almond milk is my personal choice.
Preparation:
One Day Ahead: Prepare Lemon dill infused Bechamel Sauce
– In 4 quart Sauce pan, start “tempering” and flavouring of almond milk: (this is an important step as cold milk will result in lumpy and grainy sauce)
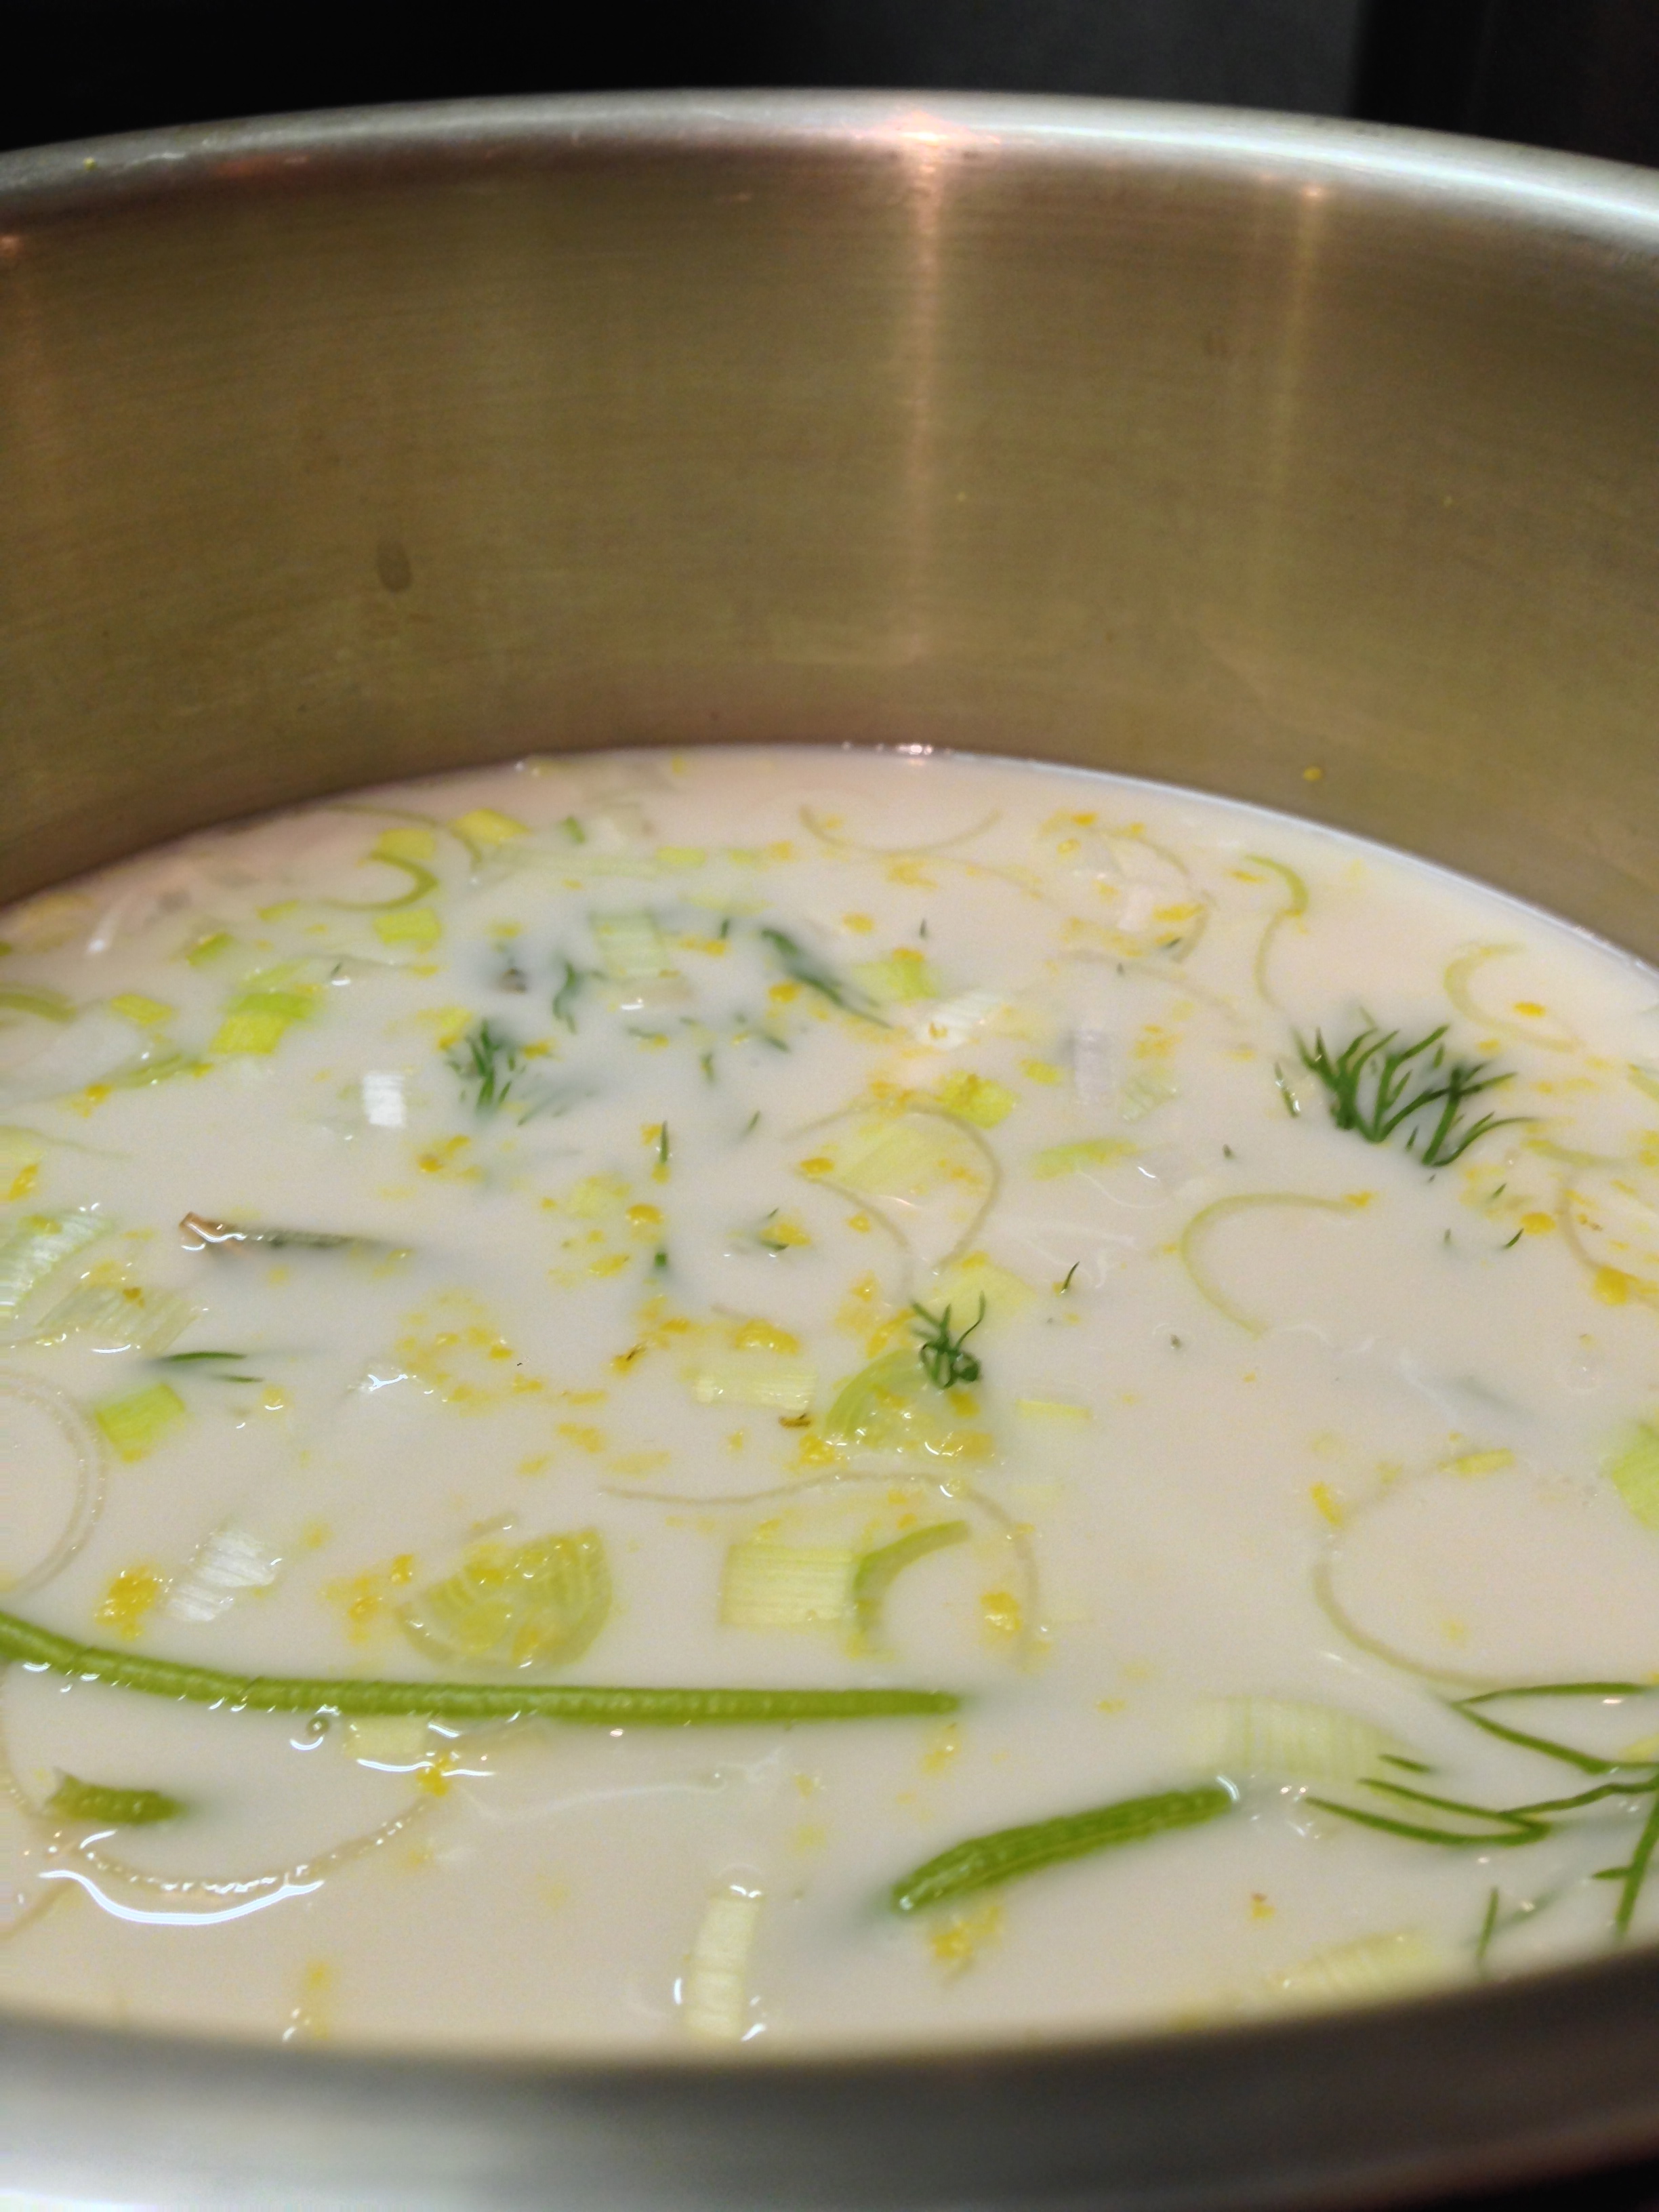
– Rinse saucepan with cold water (do not wipe dry – this will prevent the fats and protein from scorching the bottom of the saucepan), add unsweetened almond milk, then the aromatics – sprigs of fresh dill, lemon peel, bay leaf.
Flavours are steeping and simmering away!
– Using medium low heat, bring liquid to a simmer (Do not bring to a boil), turn off the heat, cover with lid and let the flavours steep for at least 15 minutes (I did for 20 minutes).
– The hot milk should now be ready; it can now be strained into a measuring cup. Discard all flavouring ingredients.
– Wipe the saucepan clean, over medium low heat, start making the white roux (combining fat and starch together): add olive oil to saucepan, when oil begins to bubble, begin adding flour, keep stirring to form a smooth thin paste. The flour should be incorporated into the olive oil fully, continue to cook the roux by stirring constantly over medium low heat in order to prevent scorching (burning), the process should be no longer than 2 minutes (white roux does not take on colour), you are looking for a smooth and thin consistency (not thick and lumpy).
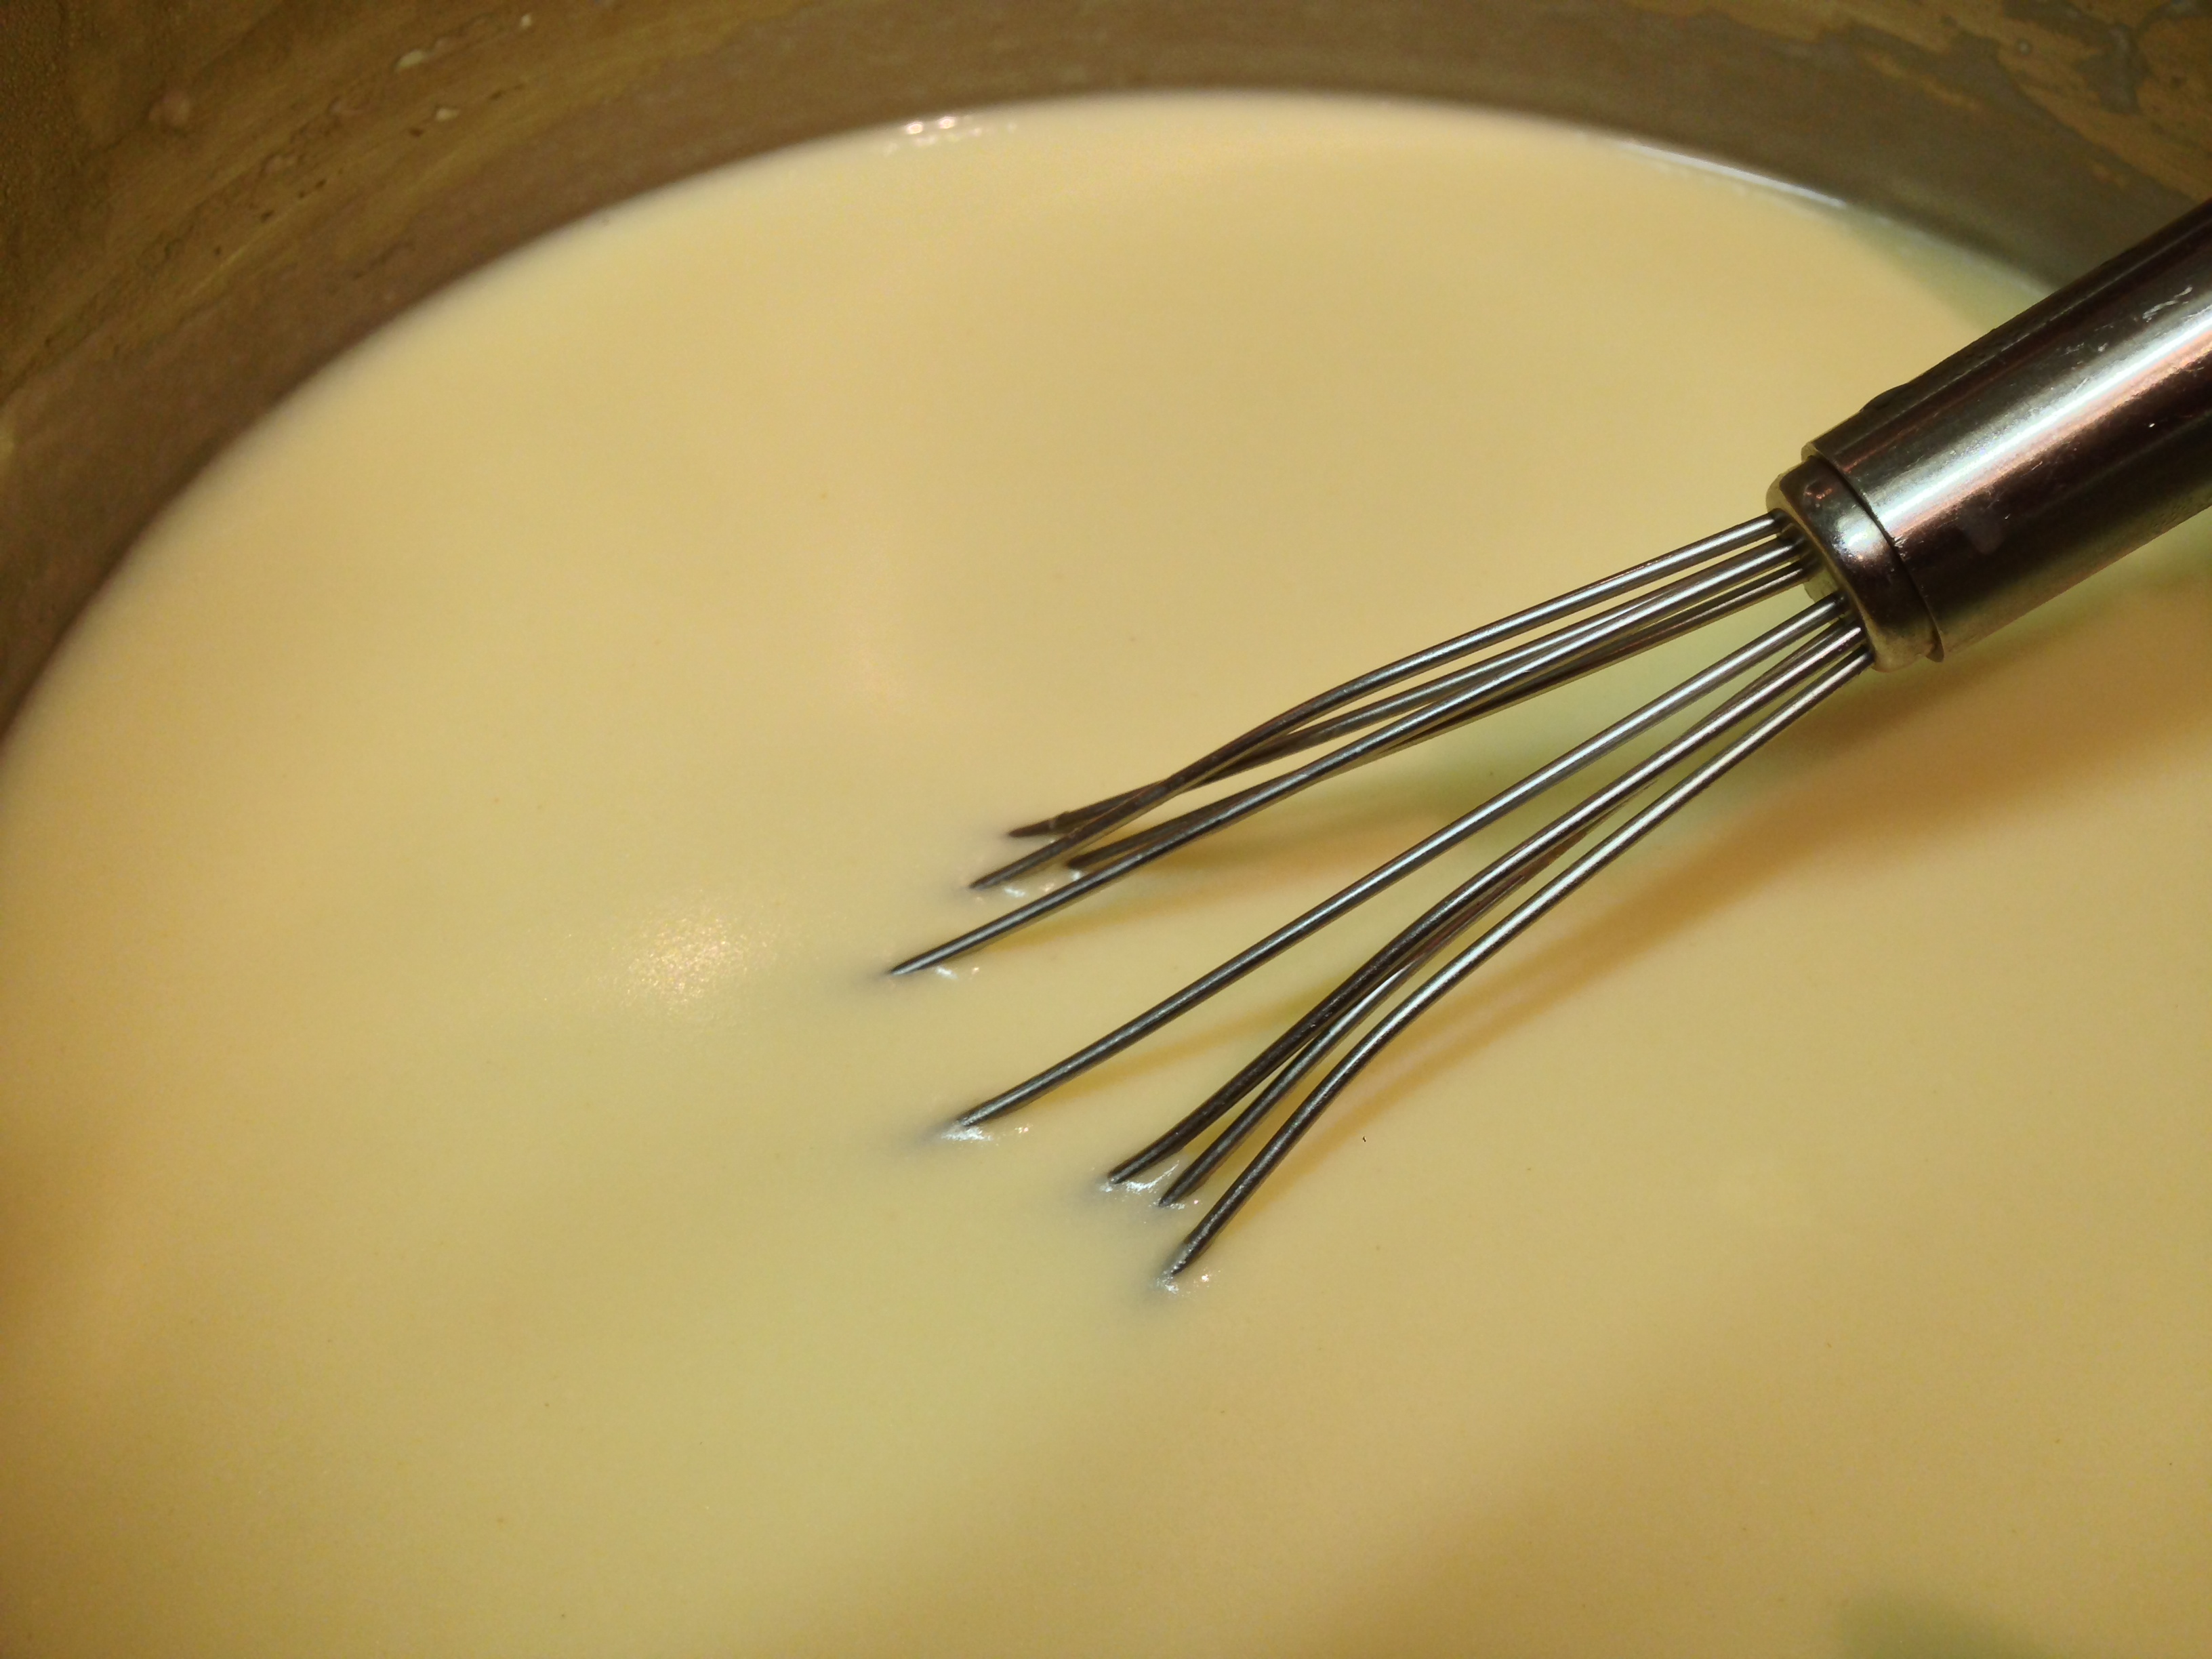
– Once the roux is ready, add hot milk to hot roux a bit a time while constantly whisking (easy to use a flat whisk) or stirring (spatula), let the mixture come back to a simmer each time before adding more hot milk. Once all the milk has been added, bring it to a gentle simmer while stirring. Lower The heat and simmer gently for 10 to 15 minutes, pot uncovered (important), in order to cook out the starch flavour. Be careful not to bring to a boil as sauce will burn or split. Using a whisk, stir occasionally, make sure you scrape the bottom edges of the pot. The sauce should coat the back of a spoon nicely, once it finishes cooking, turn off heat, season to taste with sea salt and white pepper (optional). Strain the sauce into one more time for a silky smooth texture.
Whisking Away!
– To store properly, pour sauce into a glass bowl and place a plastic wrap over the hot bechamel, when cooled completely, refrigerate. The sauce will thicken considerably; to reheat the next day, add a little water (or stock) to the cold bechamel, stir and bring to a simmer.
Preparation on The Day Of:
– Pre heat oven to 350 degrees F (to bake the salmon).
– Clean and pat dry salmon fillet with paper towel, using tweezers (I keep one for cooking) remove pin bones.
– Place salmon fillet (skin side down) in baking tray. Mix 1 Tablespoon grapeseed oil and lemon juice in a small bowl, and drizzle over the salmon. Season by evenly with chopped dill, sea salt and fresh ground pepper (optional) to taste. Bake approximately 20 to 25 minutes in the preheated oven, or until salmon is easily flaked with a fork; the salmon should still be pinkish and moist.
– While salmon is baking, peel and grate (or using a knife to slice) the potatoes into thin strips, place in a sieve, add 1 teaspoon of salt. Squeeze out as much liquid as you can with your hands; leave to drain for 10 to 15 minutes. Repeat the process again with another teaspoon of salt, leave for another 10 minutes and again squeeze hard to remove as much moisture as possible. Pat dry with paper towel, cover and set aside.
– Once salmon is cooled considerably (don’t burn yourself!), start “flaking” the salmon by using a fork, the flakes should come off the skin easily. Flake them in “bite-size” (not large chunks), do not include salmon skin, make sure all bones have been removed. Set aside
– In saucepan reheat the bechamel sauce by adding a little water to the cold sauce, stir and bring to a simmer. Turn off the heat when ready.
– In separate 6 quart pot, add drizzle of grapeseed oil over medium heat. Add the leek and cook, stirring often, for 4 to 5 minutes, or until soft but not browned, then add salmon flakes. Turn off and remove from heat, using a spatula, slowly and gently “fold in” bechamel sauce (a few spoonfuls at a time) with salmon mixture. the filling should not appear runny (Do not stir)
– Pre heat oven to 375 degrees F.
– Mix the grated potato strips with a handful of Japanese panko. Lightly brush the bottom of the 9 1/2 inch pie plate (mine is my Mom’s “vintage” Pyrex) with grapeseed oil, then sprinkle with chopped dill. Then pour the salmon filling, and top with the grated potatoes in an even layer, lightly brush the potatoes with just a little grapeseed oil, the crust should brown nicely.
Depend on your liking, you can put more potatoes. Remember to layer them evenly!
– Place on a baking tray in the oven and cook for 40 to 45 minutes, or until heated through and bubbling, the potato crust should be golden brown and crispy. Serve immediately.
Notes:
– Bechamel sauceand salmon flakes can be made one day ahead; just remember to let all prepared foods cooled down, store in proper containers before refrigerate.
I actually prepared this salmon flakes and the bechamel the day before our family’s Thanksgiving gathering; it’s all about “mise en place” – getting organized and give yourself some breathing room on the day of!
If you choose to make the bechamel sauce at the same time, prepare it while the salmon is baking in the oven. Have to work pretty quickly!
– Bechamel sauce, also known as white sauce, is made from roux (butter/flour) and milk. It is a “mother sauce” in French and Italian cuisines, and used as a base for other sauces (for example French Mornay sauce – add cheese to bechamel), so it’s handy to learn how to make the base properly. The choice of herbs to flavour the milk can be changed according to recipe.
The bechamel sauce cooking method is something I’ve learnt through the online cooking school Rouxbe; I am a life-time registered student/member for amateur programs. Their instructional videos are very informative, the instructions I’ve written are based on the narration. For serious home cooks, it may be worthwhile to register (http://rouxbe.com/); they also have professional programs available.
– Be mindful with the seasoning as salt is used to season all ingredients separately (especially the potatoes, salt was needed to “draw” the water), you don’t want to end up with a very salty pie!
– Always adjust all seasoning according to your taste and dietary needs.
– As I’m only a home cook, I’ve tried my best to record the measurements while I was preparing this dish, please feel free to adjust if necessary.
– Adding cheese (grated cheddar) is optional as it makes the dish “heavier”: I did when I made this pie (see main picture) for Thanksgiving dinner, I skipped when I made our smaller home pot-pies for dinner, which I served with peas for dinner. Enjoy (OO)!