I recently made this refreshing and nutritious Japanese soup for a light Sunday night supper; the recipe is adapted from a Japanese soup cookbook which focuses on using fresh simple ingredients and features different combination of Japanese flavours.
Ingredients: (serves 2)
1 cup chopped napa cabbage, 4 fresh shiitake mushroom, 8 cherry tomatoes, 1 cup water, 1 cup dashi, 1-2 teaspoon organic soy sauce, pinch of salt and pepper to taste, dried shrimp (optional).
Notes on preparing the dashi:
Dashi is a fundamental ingredient to many Japanese dishes; it is used in miso soups, noodle soup, stews (oden) and sauces.
For your convenience, you can purchase the instant bonito stock packages which are readily available at Japanese food stores, and follow the instructions.
I actually made my own awase dashi (basic stock), it is a combination of kombu (kelp) and katsuobushi (bonito flakes) and I have been using this recipe from Practical Japanese Cooking (by Shizuo Tsuji and Koichiro Hata) ; you can also find recipes available online.
Preparation:
– Cut cabbage into bite size pieces, remove the stems from shiitake mushrooms and sliced them into quarters; remove the skin from the cherry tomatoes
– In large saucepan, add water, dashi, Napa cabbage, shiitake mushroom and cherry tomatoes, cover with lid.
– Bring to boil, reduce heat to medium-low and simmer for 15 to 20 minutes
– Add soy sauce, salt and pepper to taste, garnish with dried shrimp (optional).
Caesar salad has always been my father’s favourite; I researched and came up with a lighter version and definitely will try to make this for him on my next visit back home. You can always add a protein (grilled chicken or salmon) to turn this first course into a substantial main course; the recipe is inspired by Canadian Living Magazine and Epicurious.
Ingredients: (serves 2-4)
Caesar Dressing – 1/2 cup 2% plain Greek yogurt, 2 Tablespoon olive oil, 2 Tablespoon freshly squeezed lemon juice, 2 cloves of garlic (pressed), 1/4 cup freshly grated parmigiano-reggiano cheese, 6 anchovies (drained and mashed), 1 Tablespoon Dijon mustard, 1 Tablespoon Worcestershire sauce, finely grated lemon zest (1 lemon), pinch of salt and cracked black pepper, season to taste.
3 cups Tuscan kale (tough stems removed, cut into ribbons), 3 cups Green kale (tough stems removed, quickly blanched in boiling water, cut into ribbons), half loaf day old sourdough bread (cut into 3/4 inch cubes), 1-2 Tablespoon olive oil.
2 hard-boiled egg, peeled and grated
To prepare croutons:
– Pre heat the oven to 350 degrees F.
– Hand tear (or cut) the bread into 3/4 inch cubes and put them in a bowl. Add olive oil, lightly sprinkle some parmigiano-reggiano, season with salt and pepper. Toss well and make sure the pieces are coated evenly. Spread the cubes out evenly on a baking sheet and bake until golden brown, about 15-20 minutes. Let them cool down before tossing into the salad.
To prepare dressing:
In bowl, whisk the yogurt, with the anchovies, garlic, Dijon mustard, Worcestershire sauce and lemon juice. Slowly whisk in the olive oil until combined; then add half the cheese, season with salt (if necessary) and pepper.
To assemble the salad:
In large bowl, combine the Tuscan kale and green kale with enough salad dressing to your liking, add the grated egg, croutons and some extra parmigiano-reggiano and toss salad well. Serve immediately, the remaining dressing can be passed around the table.
Notes:
I used very little salt for this recipe as we are using anchovies and parmigiano-reggiano cheese, do not over dress the salad. Remember always adjust the flavors according to your taste and dietary needs (OO).
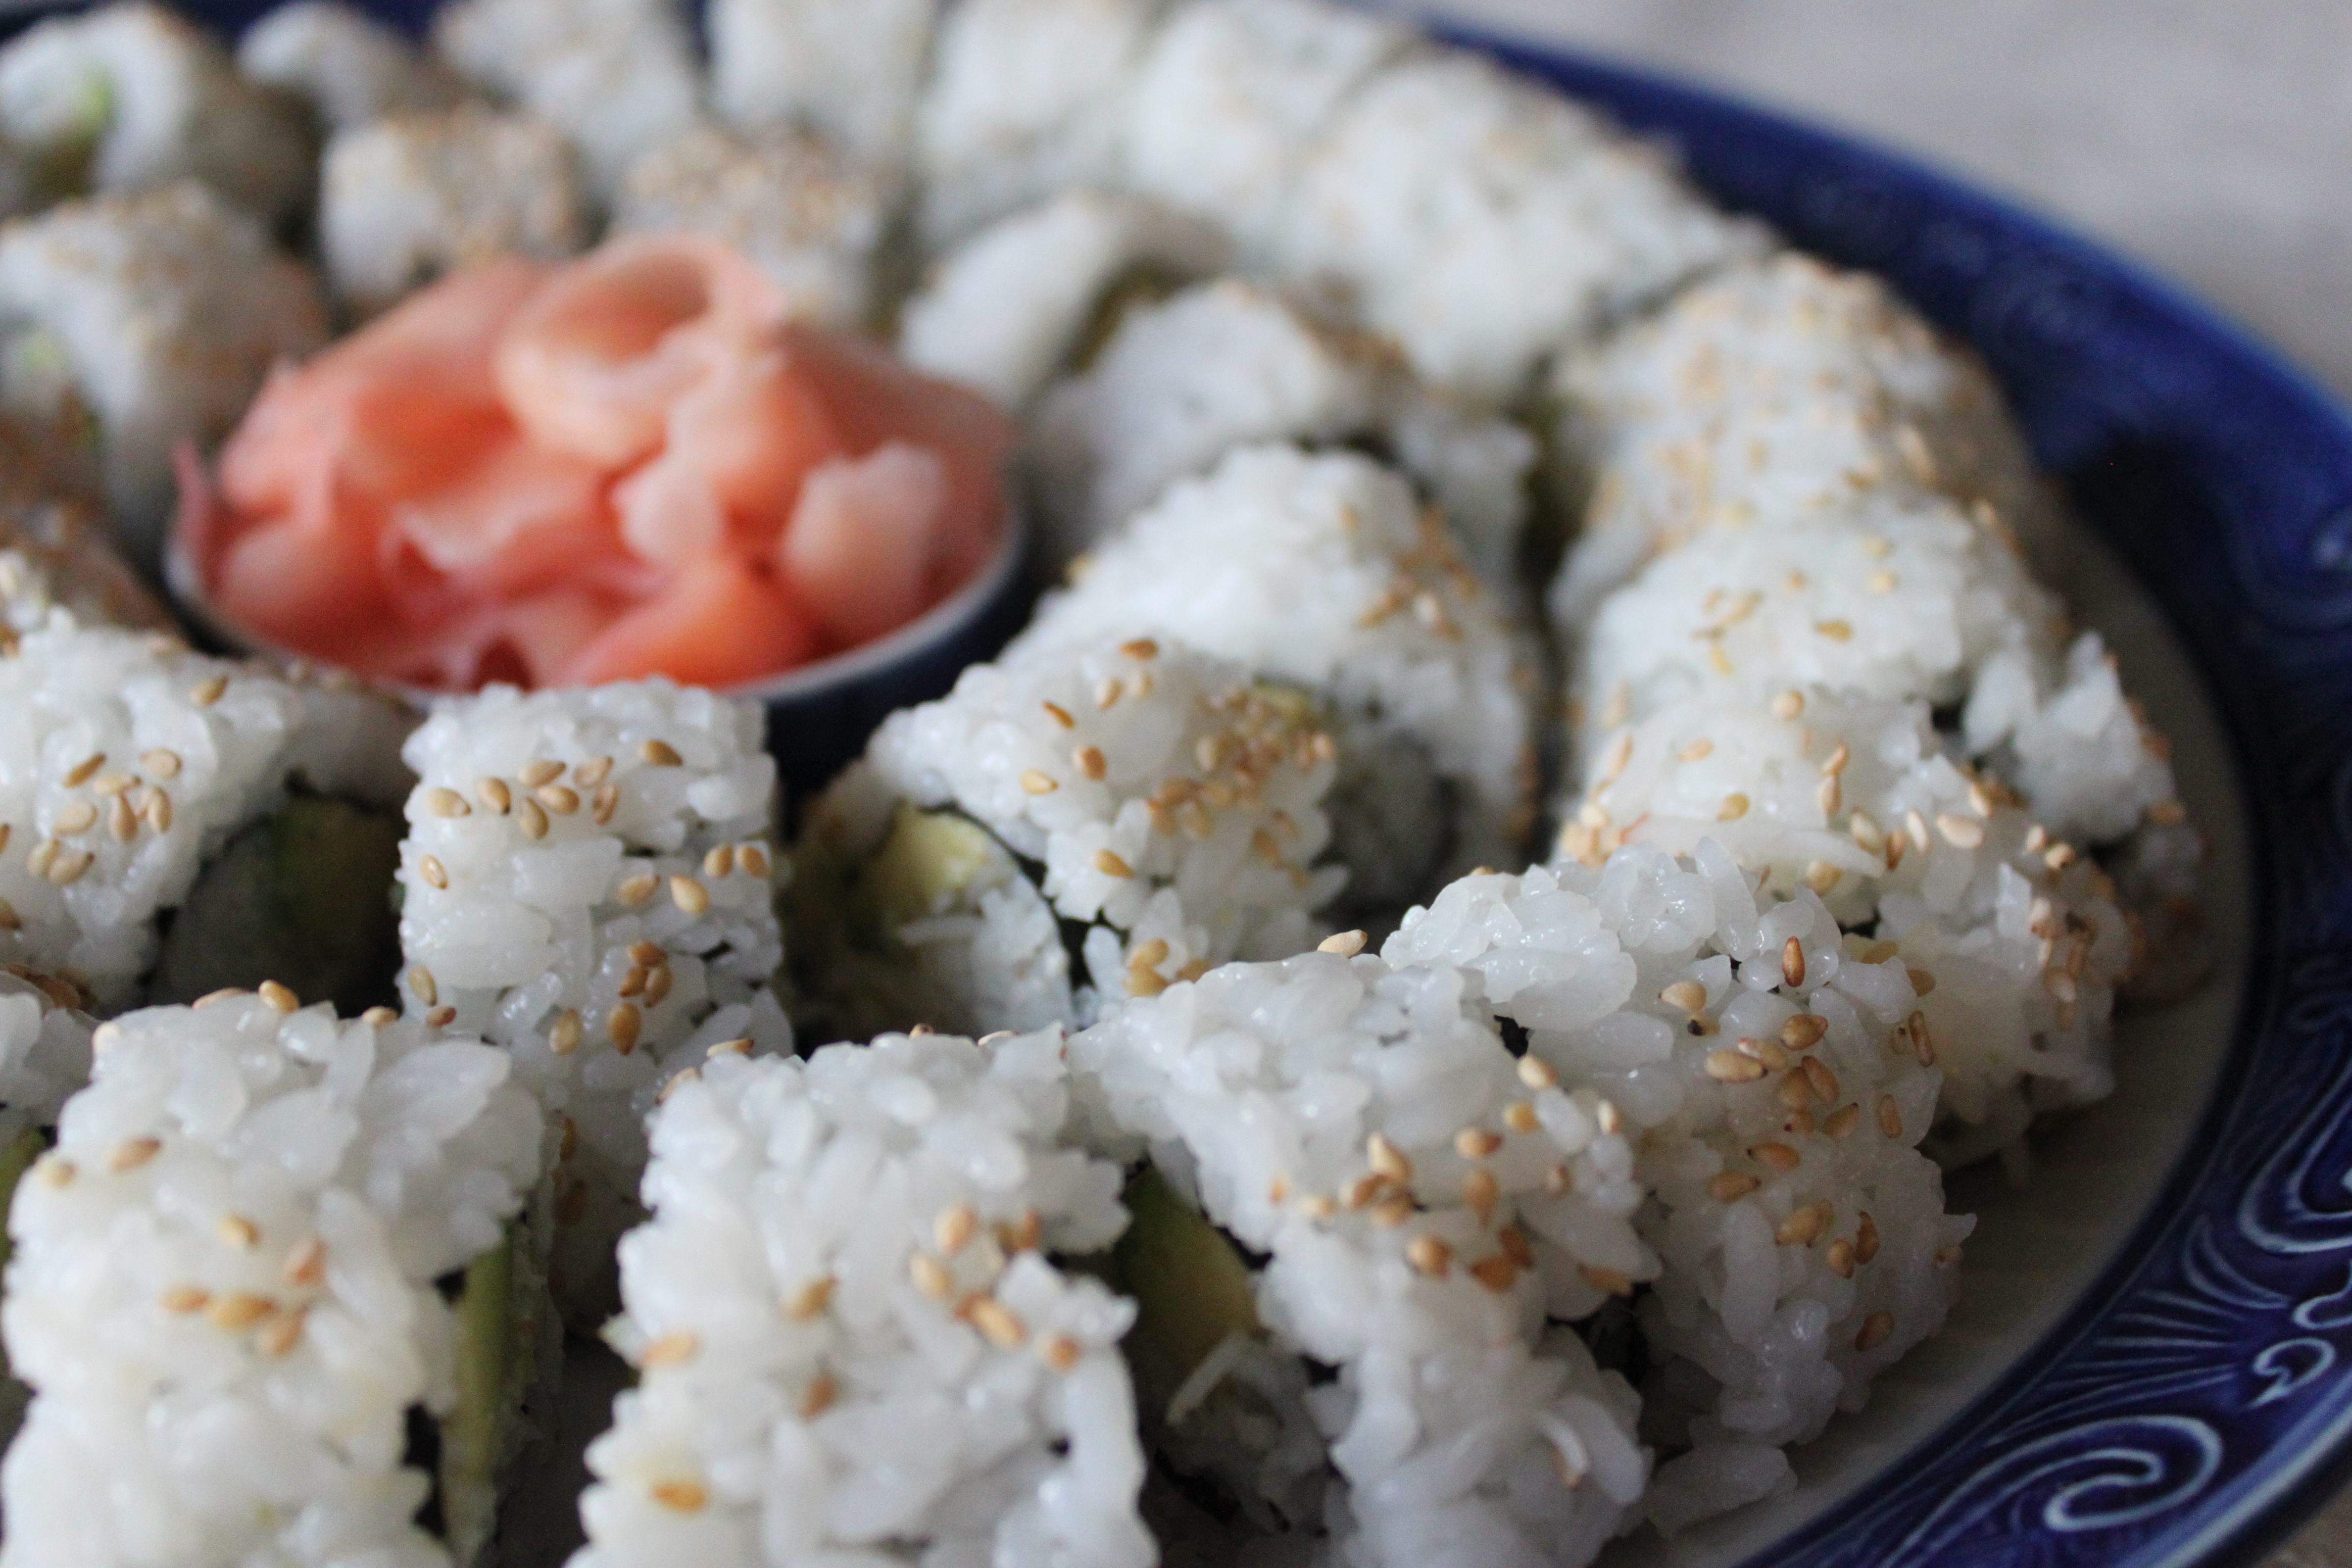
Our family’s “Not Real” Sushi – California Roll, served on traditional Japanese platter
Every family has their dining traditions and at my in-laws there are no exceptions; whether its New Year’s, Easteror birthday dinners, we always have this dish on the menu. My mother in law has mastered the art in making this “iconic” Americanized sushi, which my father in law lovingly refers to as “Not Real Sushi”. Finally as promised, I’m posting her recipe and pictures (with her demonstrating the process)…Nothing tastes better than Mom’s food, prepared with love and care…Enjoy (OO).
Ingredients: (Yields 6 cups)3 “rice cooker” cups of uncooked premium sushi or short grain rice, water, 1/3 cup (measuring cup) Japanese rice vinegar, 1 teaspoon of salt, 3 Tablespoon of sugar, Imitation crab meat (200 g, purchased from Japanese food store), 3-4 avocado (ripen, sliced), Japanese “kewpie” mayonnaise, 1/2 to 1 cup (approximately) toasted white sesame (prepackaged can be purchased at Asian food store), six to eight full sheets of seaweed (nori), juice of 1/2 lemon, pickled ginger (for serving only, store-bought), soy sauce and wasabi (optional) for serving.
Equipment:Bamboo mat, plastic cling wrap
Preparation:
To prepare sushi rice:
– Put rice in large glass or stainless steel mixing bowl (I preferred to use the Japanese rice washing bowl with side and bottom drainers), pour water over until fully covers rice. Discard the water immediately to get rid of the particles, repeat 1 to 2 times.
– Using your fingers wash and clean the rice in circular motion; pour clean water over the rice and quickly discard again. Please repeat the process for 4 to 5 times until water becomes almost clear (translucent).
– Let the rice soak in clean water for at least 30 minutes; drain and strain the rice then transfer to rice cooker bowl.
– Add cold water to just under the 3 cup line; if your rice cooker has “sushi rice” options, please follow and add water just below the 3 cup line “sushi rice”, start cooking.
– While rice is cooking, prepare the sushi vinegar: combine rice vinegar, sugar, salt into a saucepan. Over medium heat, bring it to a boil until sugar is completely dissolved; remove from heat, set aside and let it cool.
– When rice is cooked, using a moistened (with little water to ensure rice doesn’t stick) large bowl (sushi wooden bowl if you have one), transfer the rice and spread it out evenly so the rice will cool faster. While rice is still hot, pour approximately 85% of the sushi vinegar mixture over the rice; leave some behind as you will need this when rolling the sushi.
– Using a wet rice paddle (at 45 degrees angle) and apply the “slicing and flipping” motion, separate the grains (do not mix), gently flip the rice in between “slices”; repeat the process until the rice is cooled.
– Cover the cooled rice with a damp cloth until you are ready to roll.
Ready to Roll the Sushi:
– Prepare the avocado; peel and cut into 1/4″ slices, a squeeze of lemon juice will keep the avocados from turning brown.
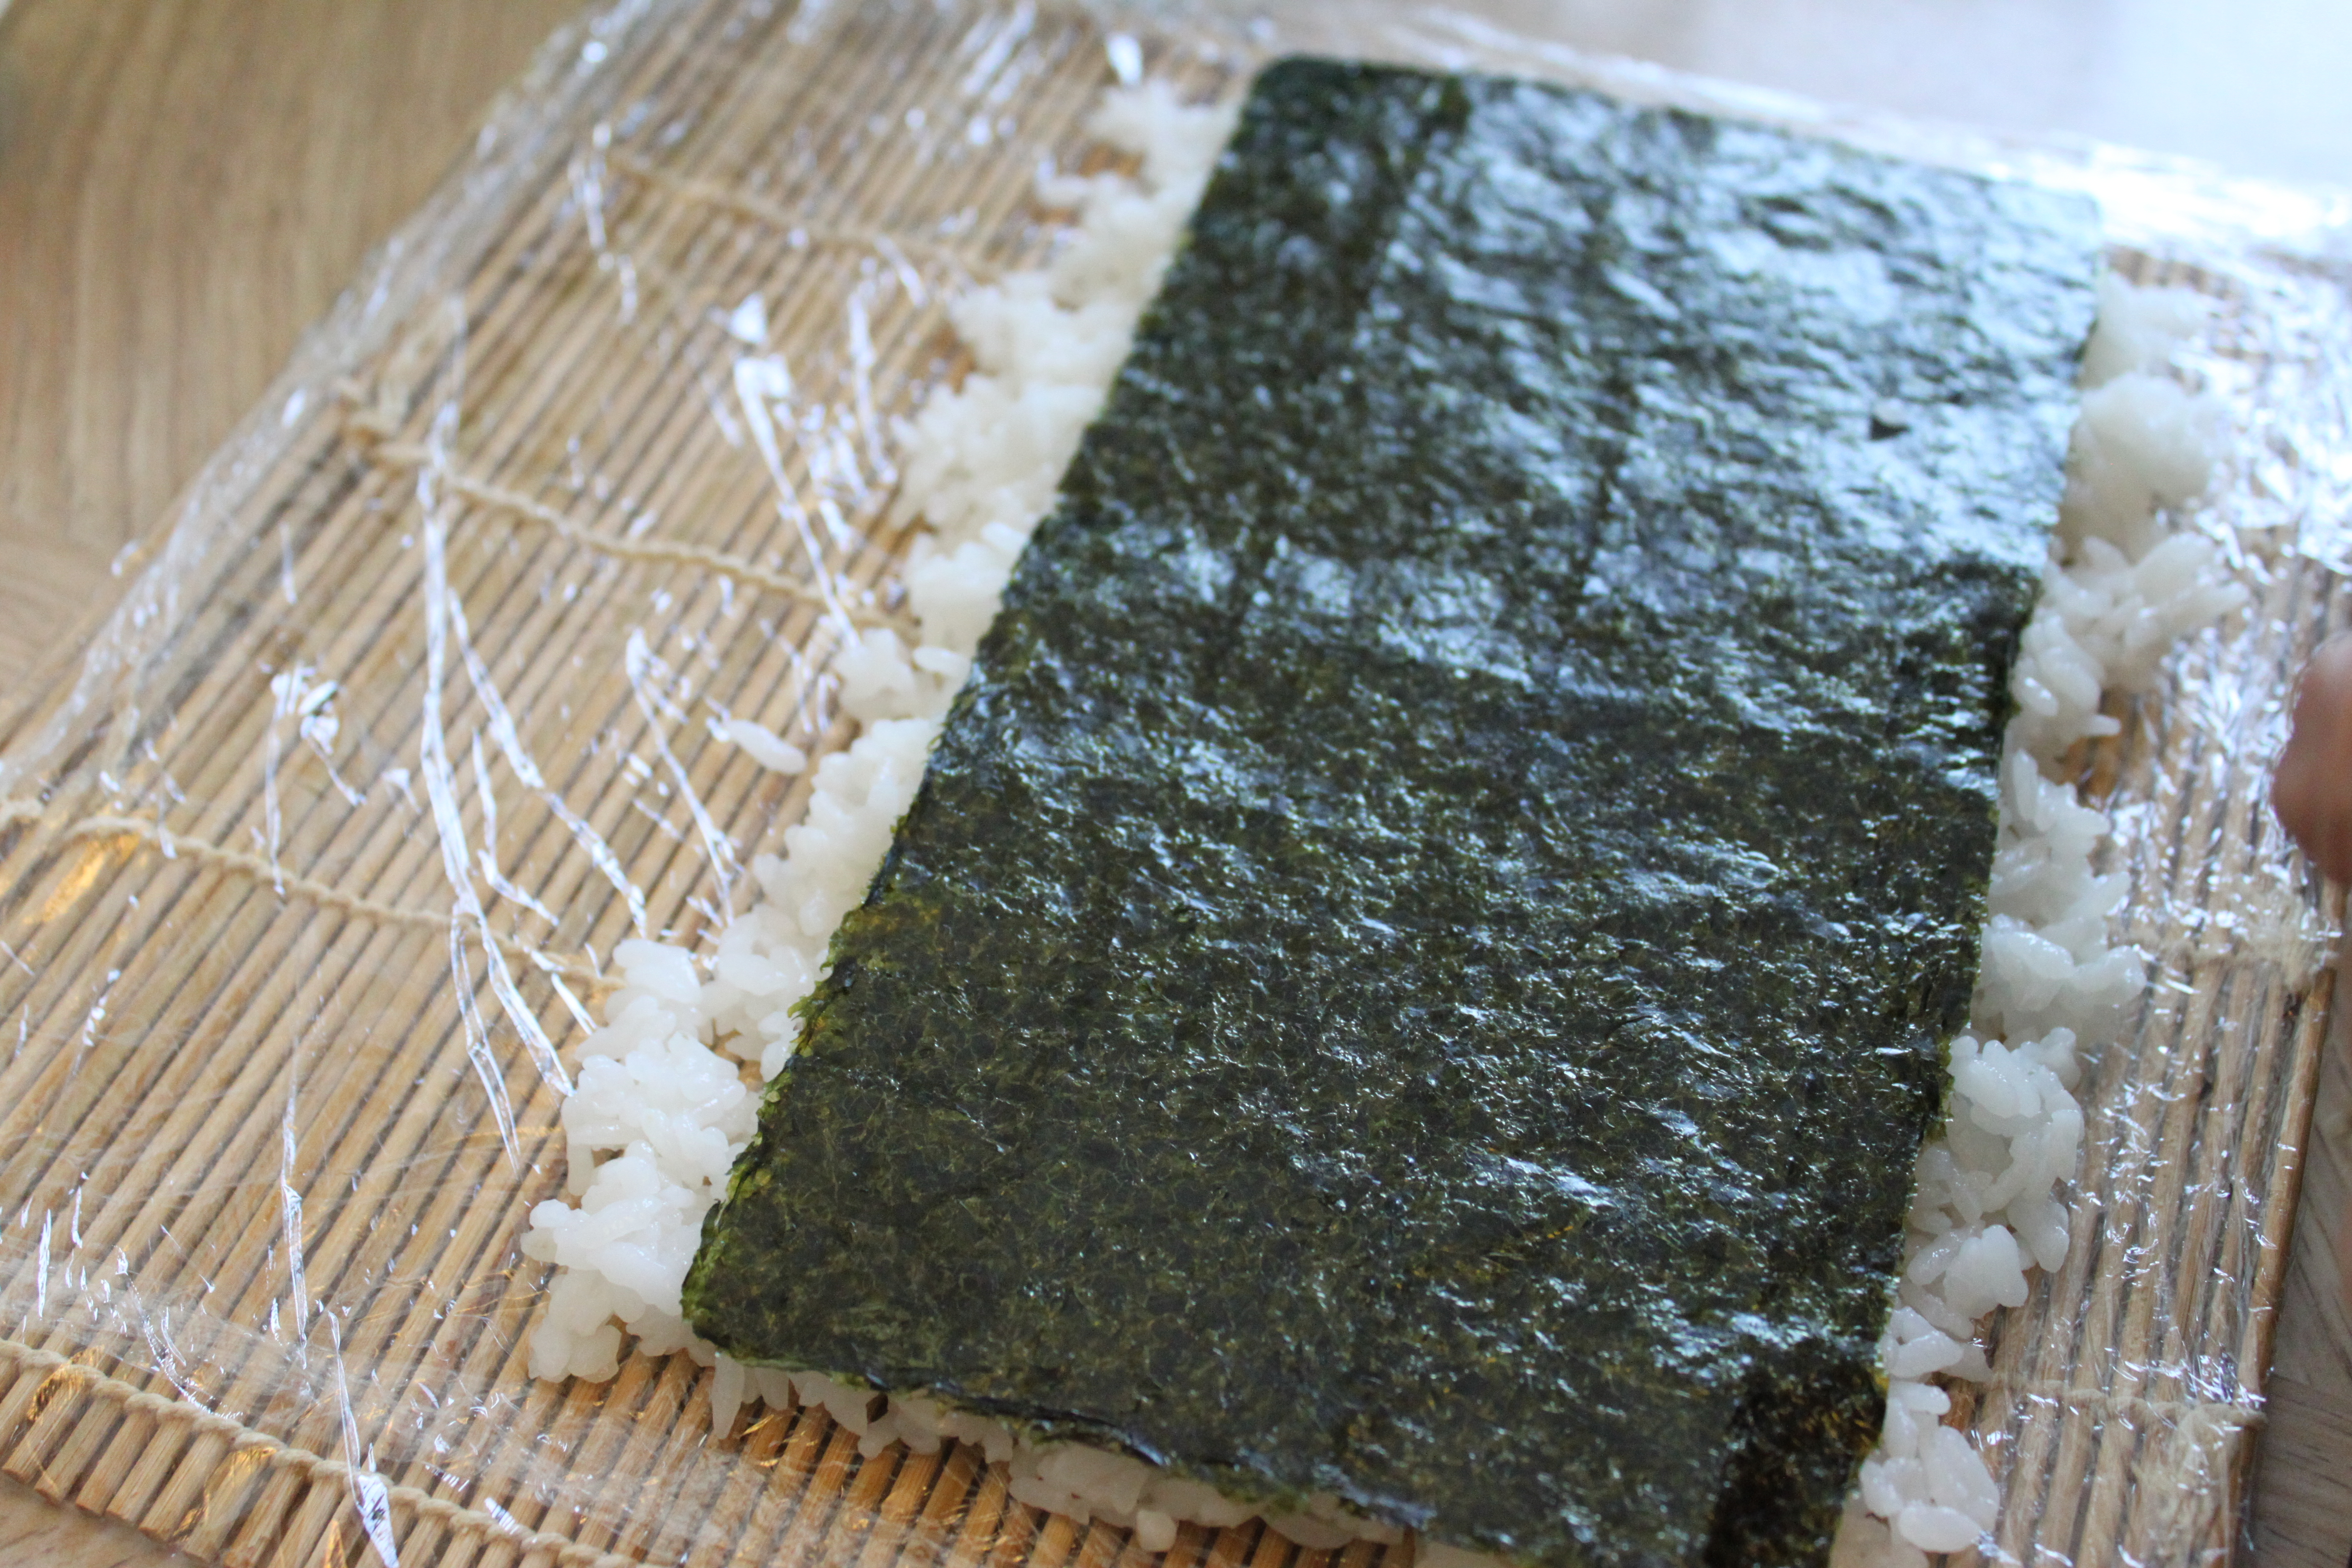
– Prepare the seaweed (nori) – Cut off 1/3 and use 2/3 to make the rolls (save the one thirds for later use).
– Prepare the bamboo mat, covered with plastic wrap and the sushi vinegar (to ensure the rice will not stick to the wrap).
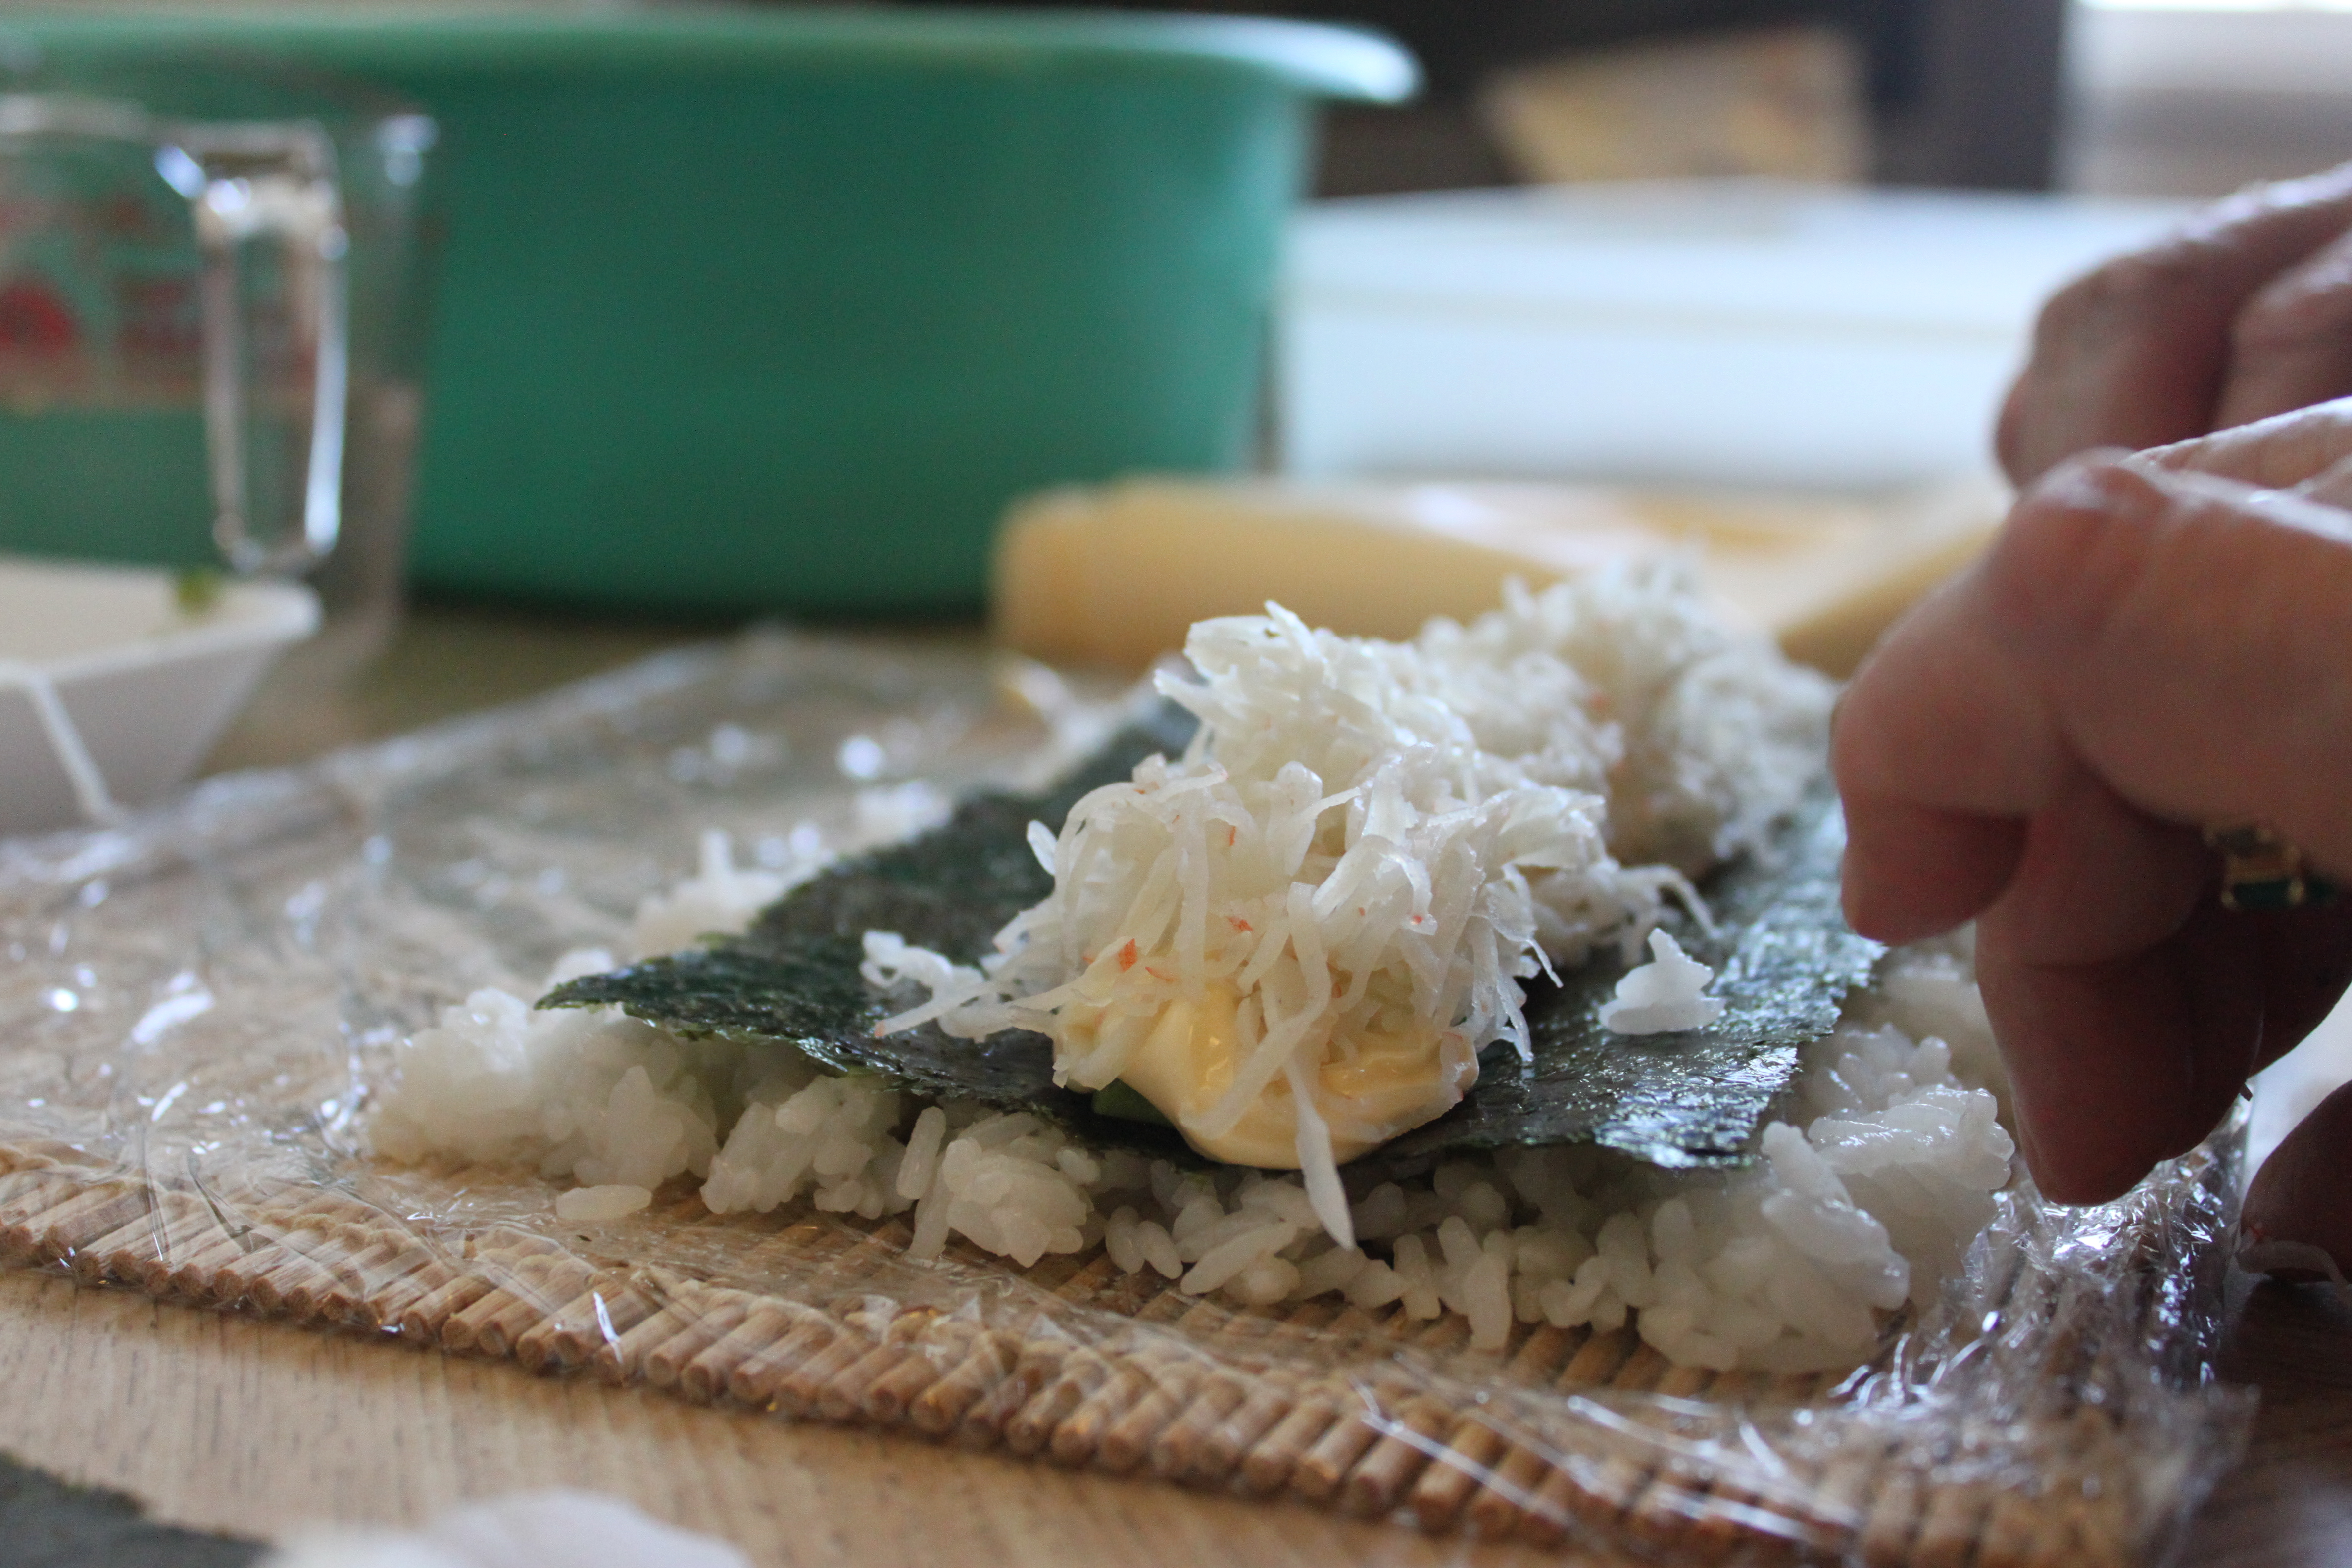
– Lay one seaweed sheet, shiny side down, on the mat. Wet your fingers in the sushi vinegar and spread approximately 1 cup or less (measuring cup) of rice thinly and evenly onto the seaweed sheet.
– Flip the seaweed sheet over so the rice is facing down; then line the edge of the seaweed sheet at the bottom of the bamboo mat.
– In the centre of the seaweed sheet, first place the avocado, then lightly squeeze one layer of Japanese mayonnaise over (don’t be too heavy-handed) and finally add the crab meat on top
From bottom: rice, nori, avocado, mayonnaise, crab meat
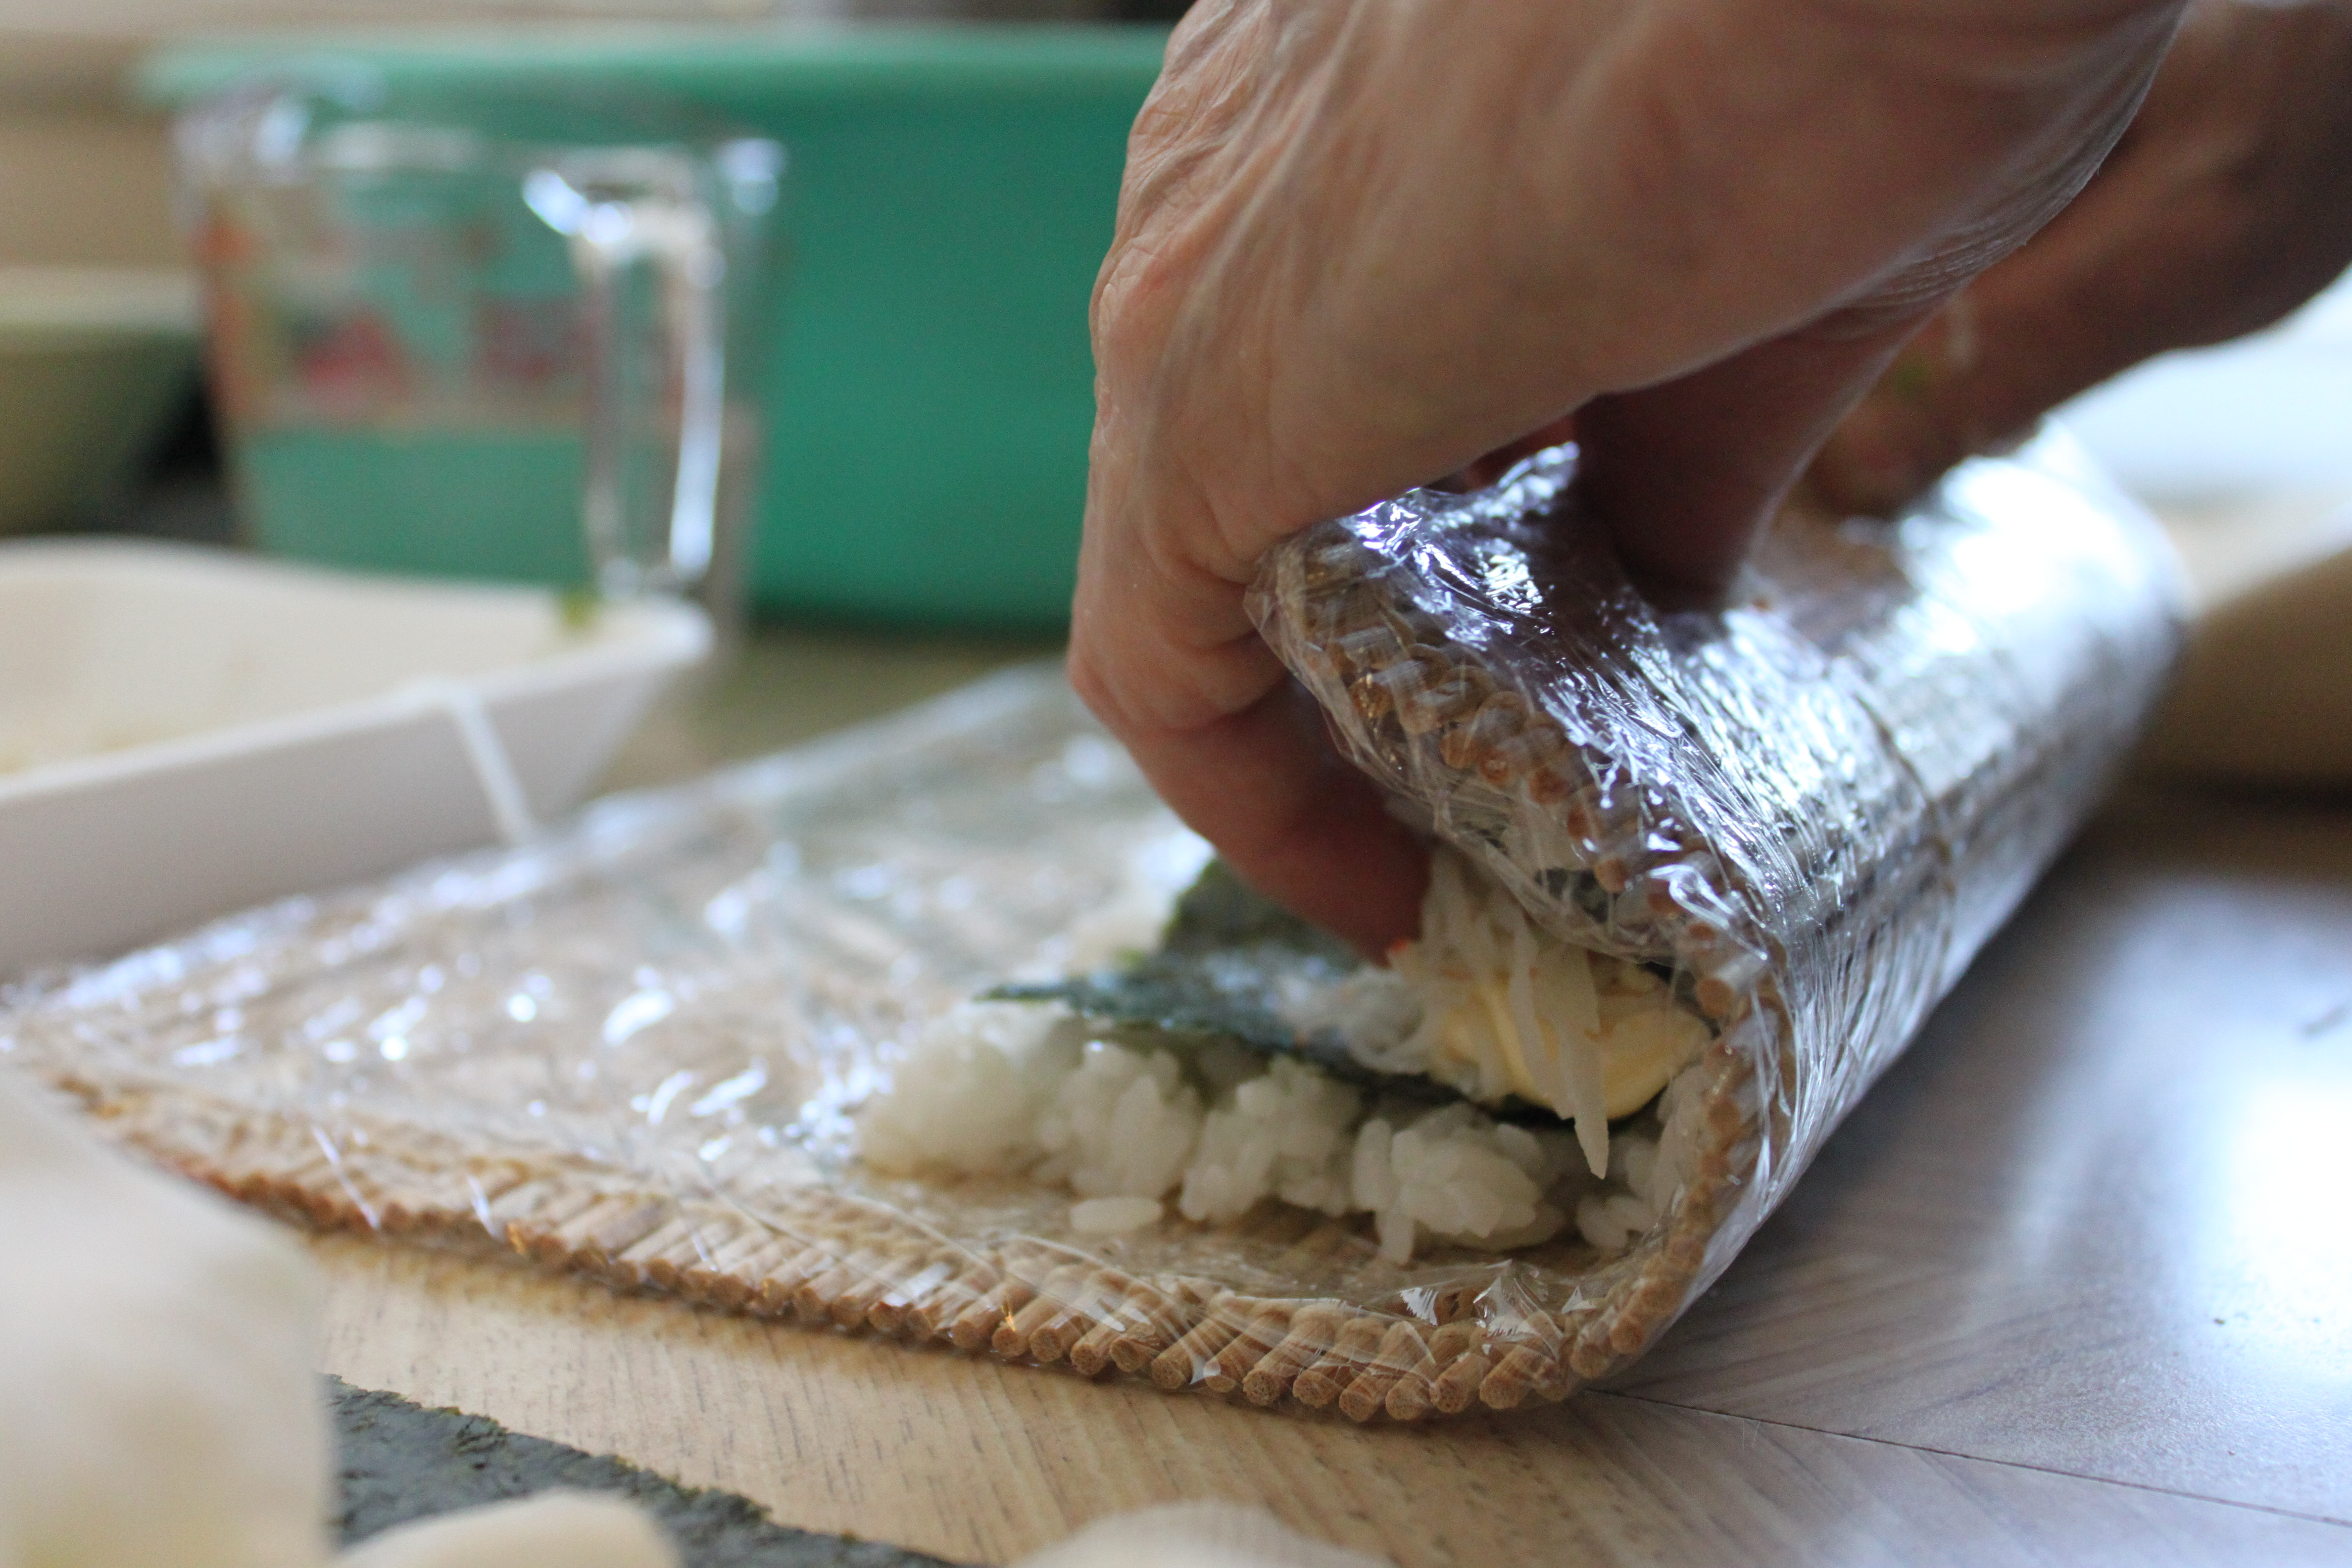
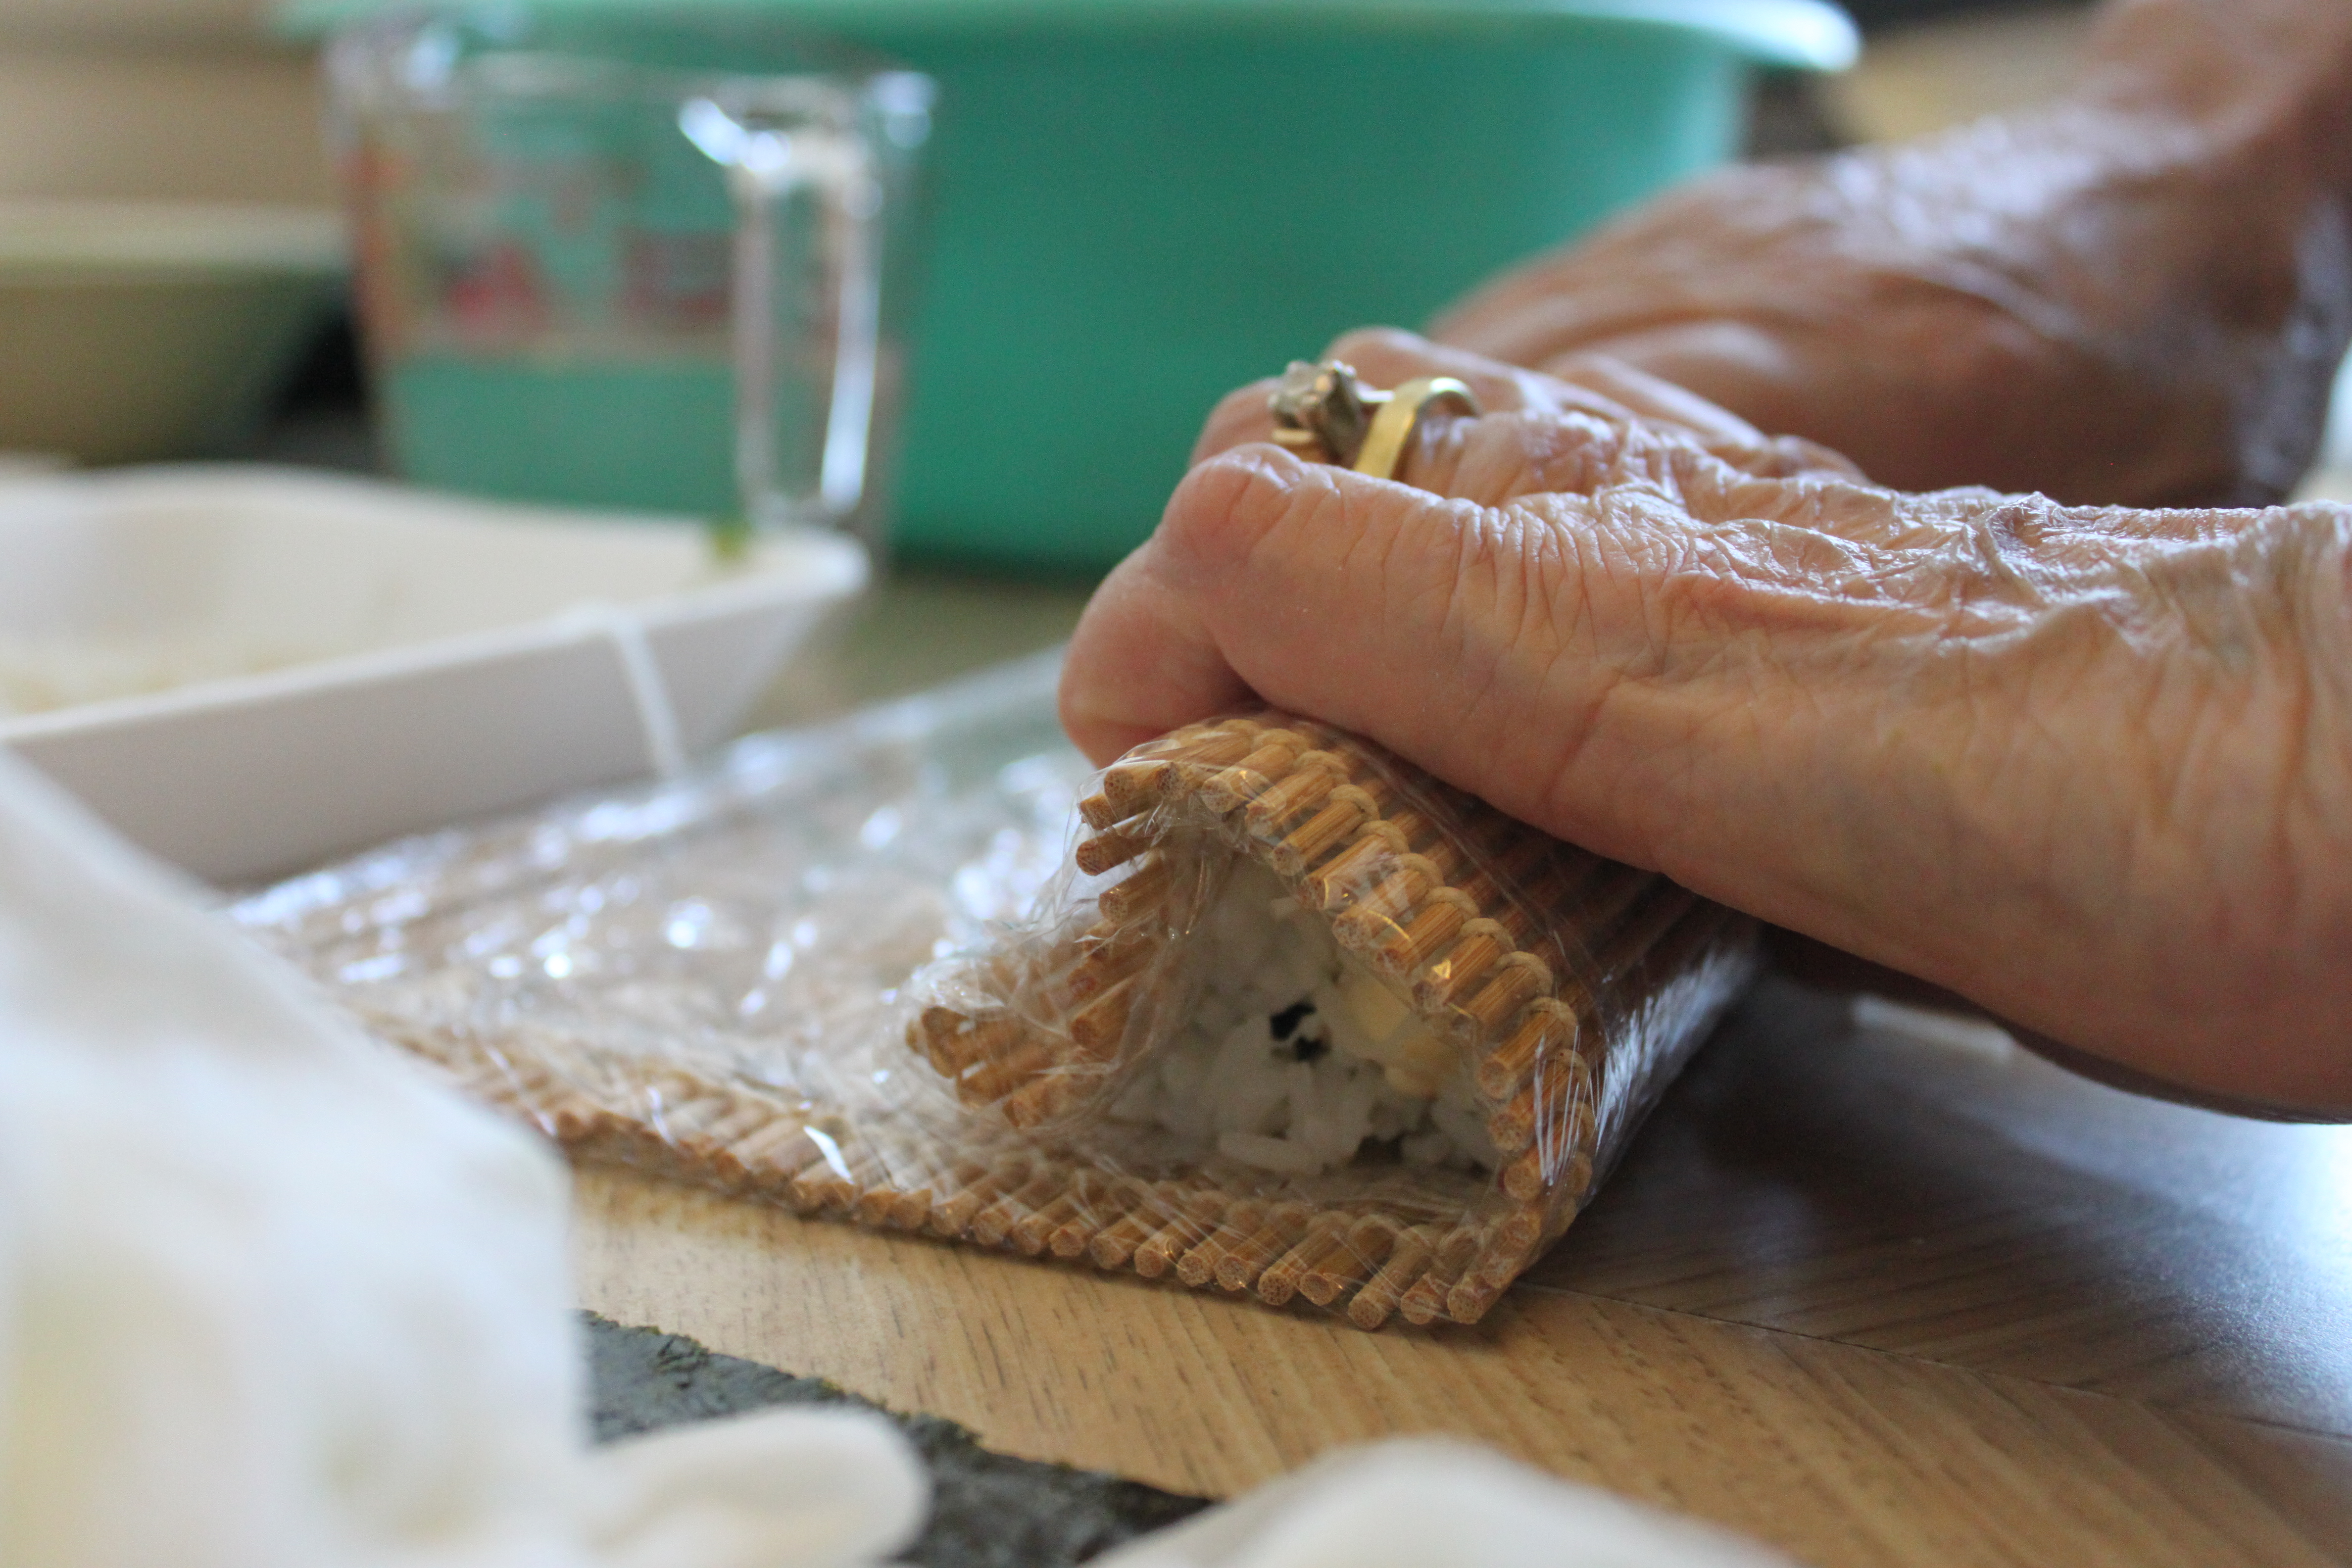
– Grab the edge of the mat closest to you; keeping the fingers in place with your fingers; start to roll it into a tight cylinder;
– Using the mat to shape the cylinder. Lift the edge of the mat slightly and roll it forward, apply pressure gently.
roll forward and push gentlyAlmost there….Another roll completed! How many more to go?Ready to cover the roll with white sesame
– Repeat until all the rice is used up.
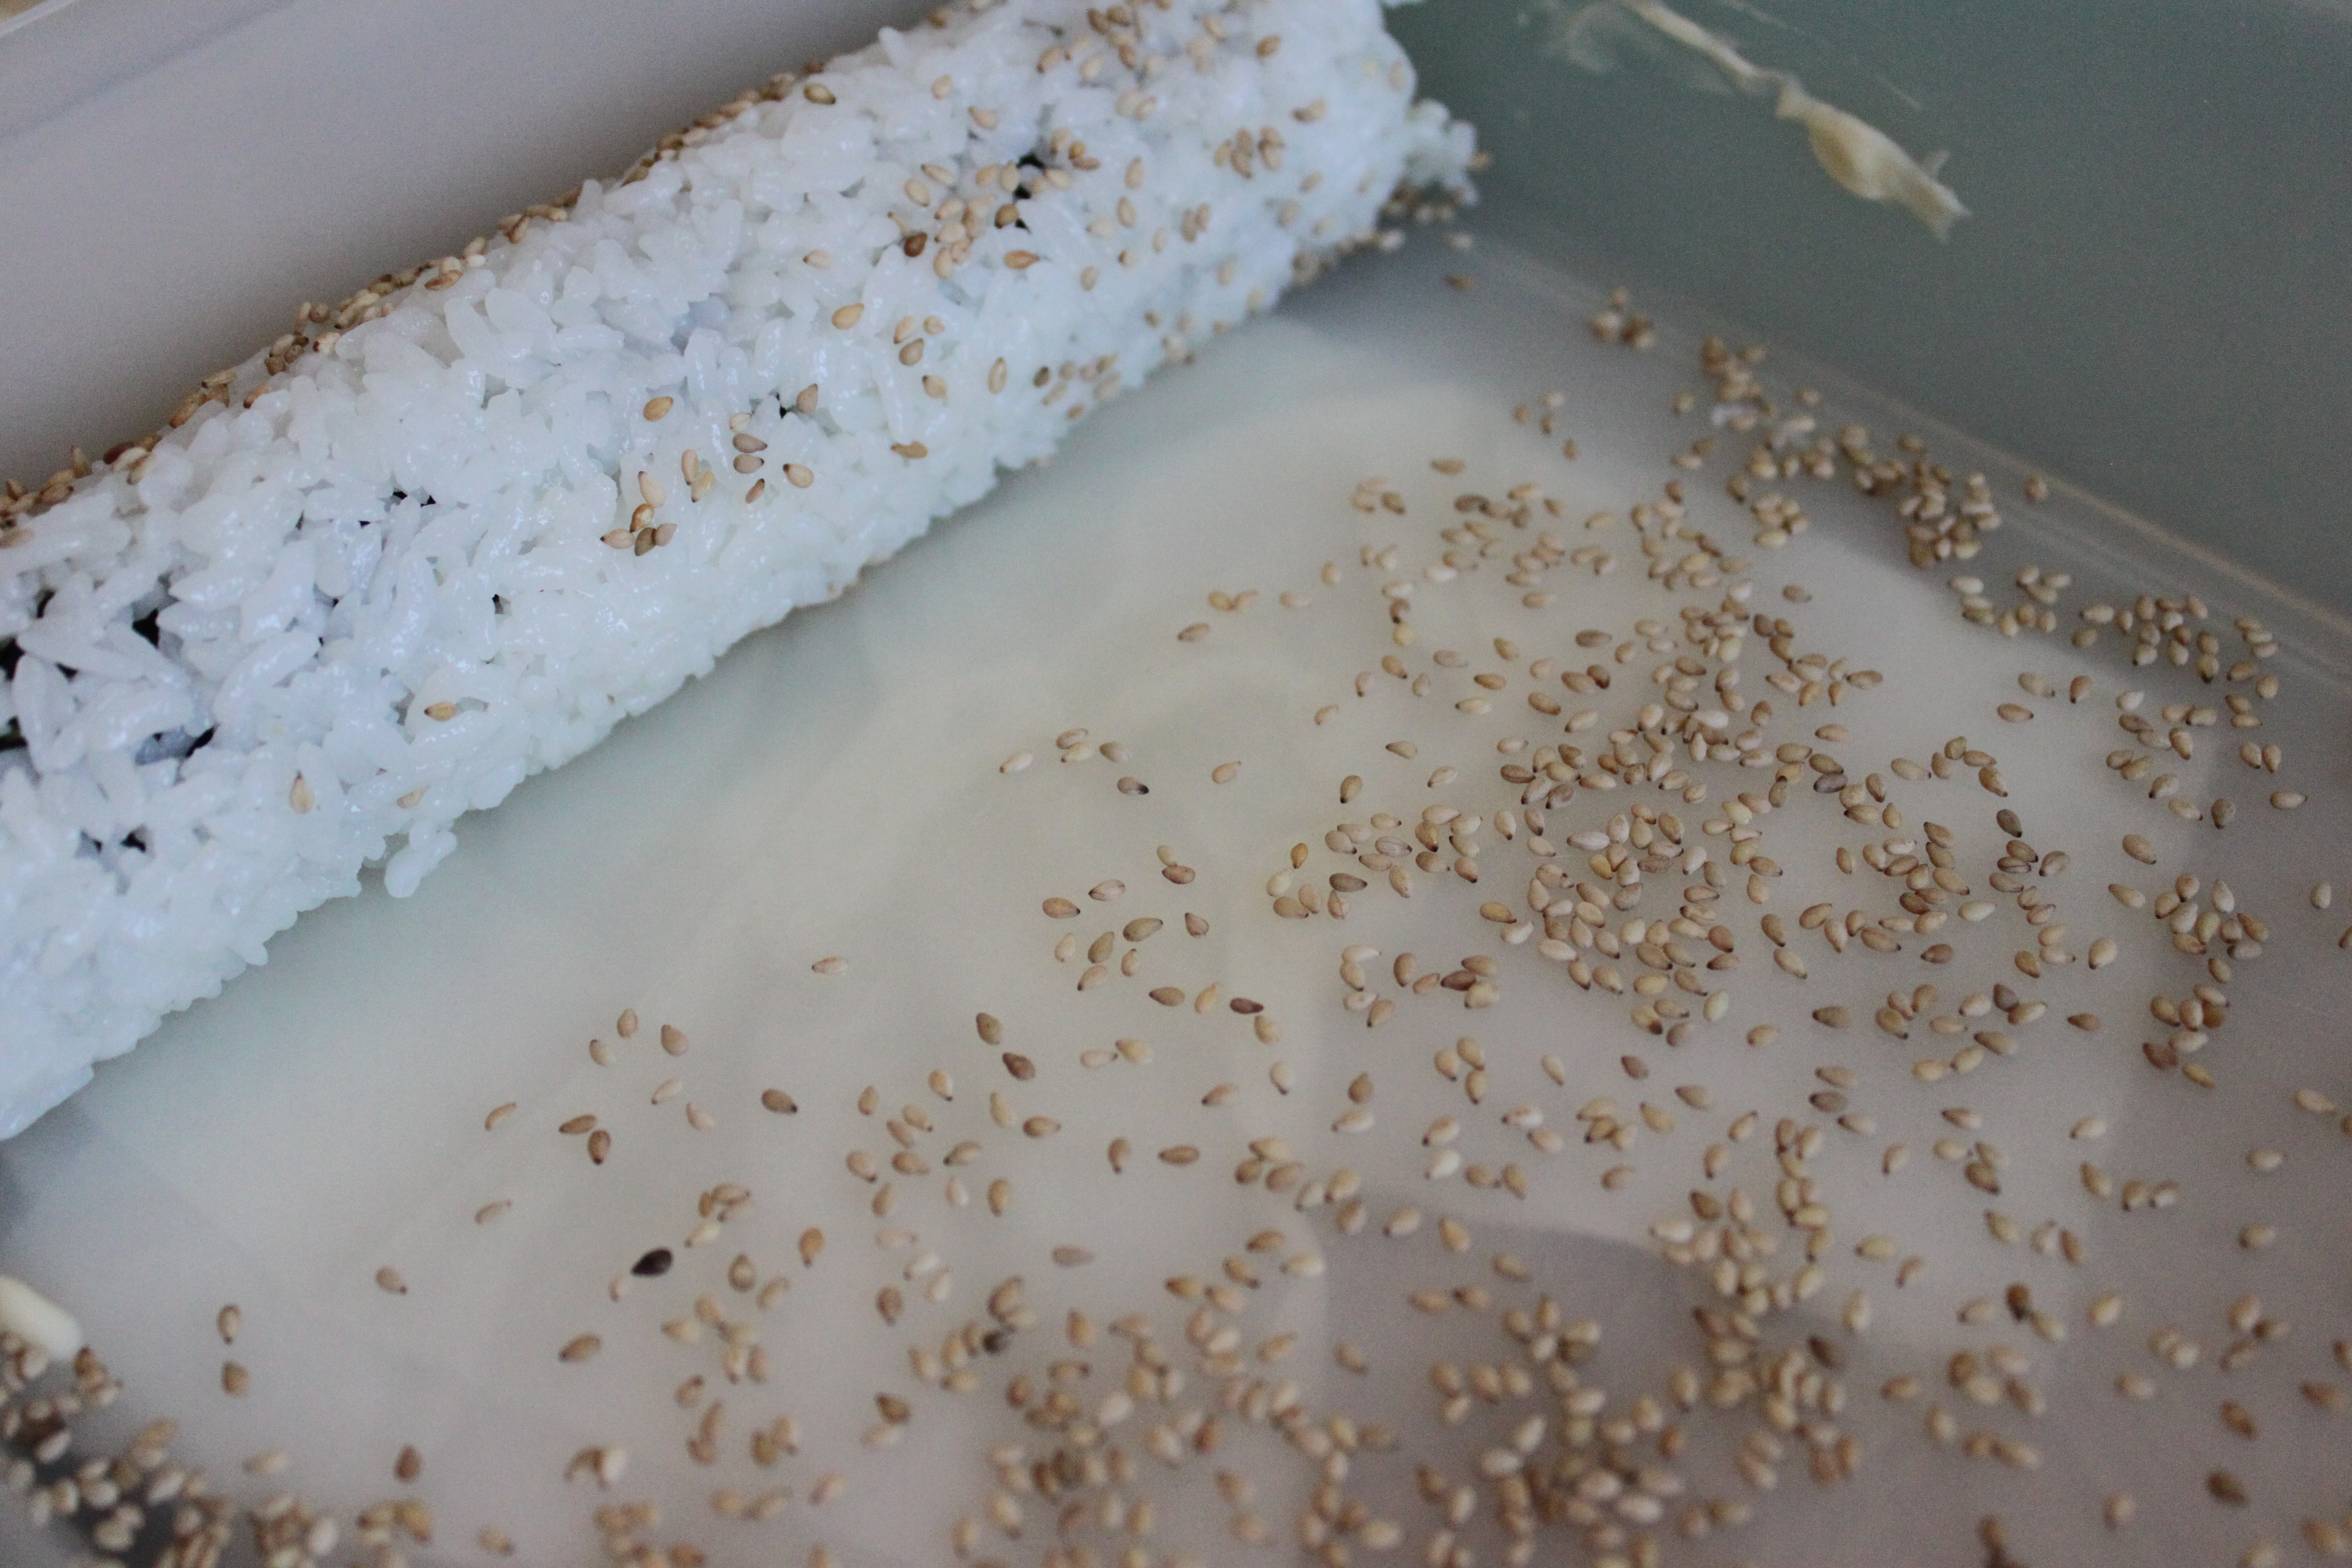
– Cover the bottom of a rectangular container or tray with the white sesame, glide the sushi roll over until it’s even covered.
– Cover the completed rolls with a clean damp cloth until you are ready to serve.
– When you are ready to serve: Use a sharp knife and cut each roll first in half, then cut each half into 3 pieces. After a few cuts, remember to clean the knife with a damp cloth (to keep the rice from sticking and maintain a clean finish).
Notes:
– We always use the cut seaweed sheets for smaller roll sushi, mostly tuna or cucumber rolls.
– Some of the ingredients we estimated the quantity (for example the sesame seeds), please adjust accordingly.
– Fresh crab meat can be used; my mother in law usually purchases the imitation crab meat, and other ingredients from Fujiya (912 Clark Drive, Vancouver, BC).
– Other recipes include cucumber; sometimes we use flying fish roe (tobiko) instead of toasted white sesame seeds, or both (OO).
Over the weekend I hosted a bridal shower for my dear friend Virginia (Congrats!) and she specifically requested to have corn soup on the menu! I choose to make my favourite recipe, adapted from Jane Lawson’s Yoshoku – Japanese food western style with slight modifications (added chicken stock, omitted sesame oil). This is very easy to make; it’s great as a starter or a meal on its own, Enjoy (OO).
Ingredients: (Serves 2 – 4 (as small starter)
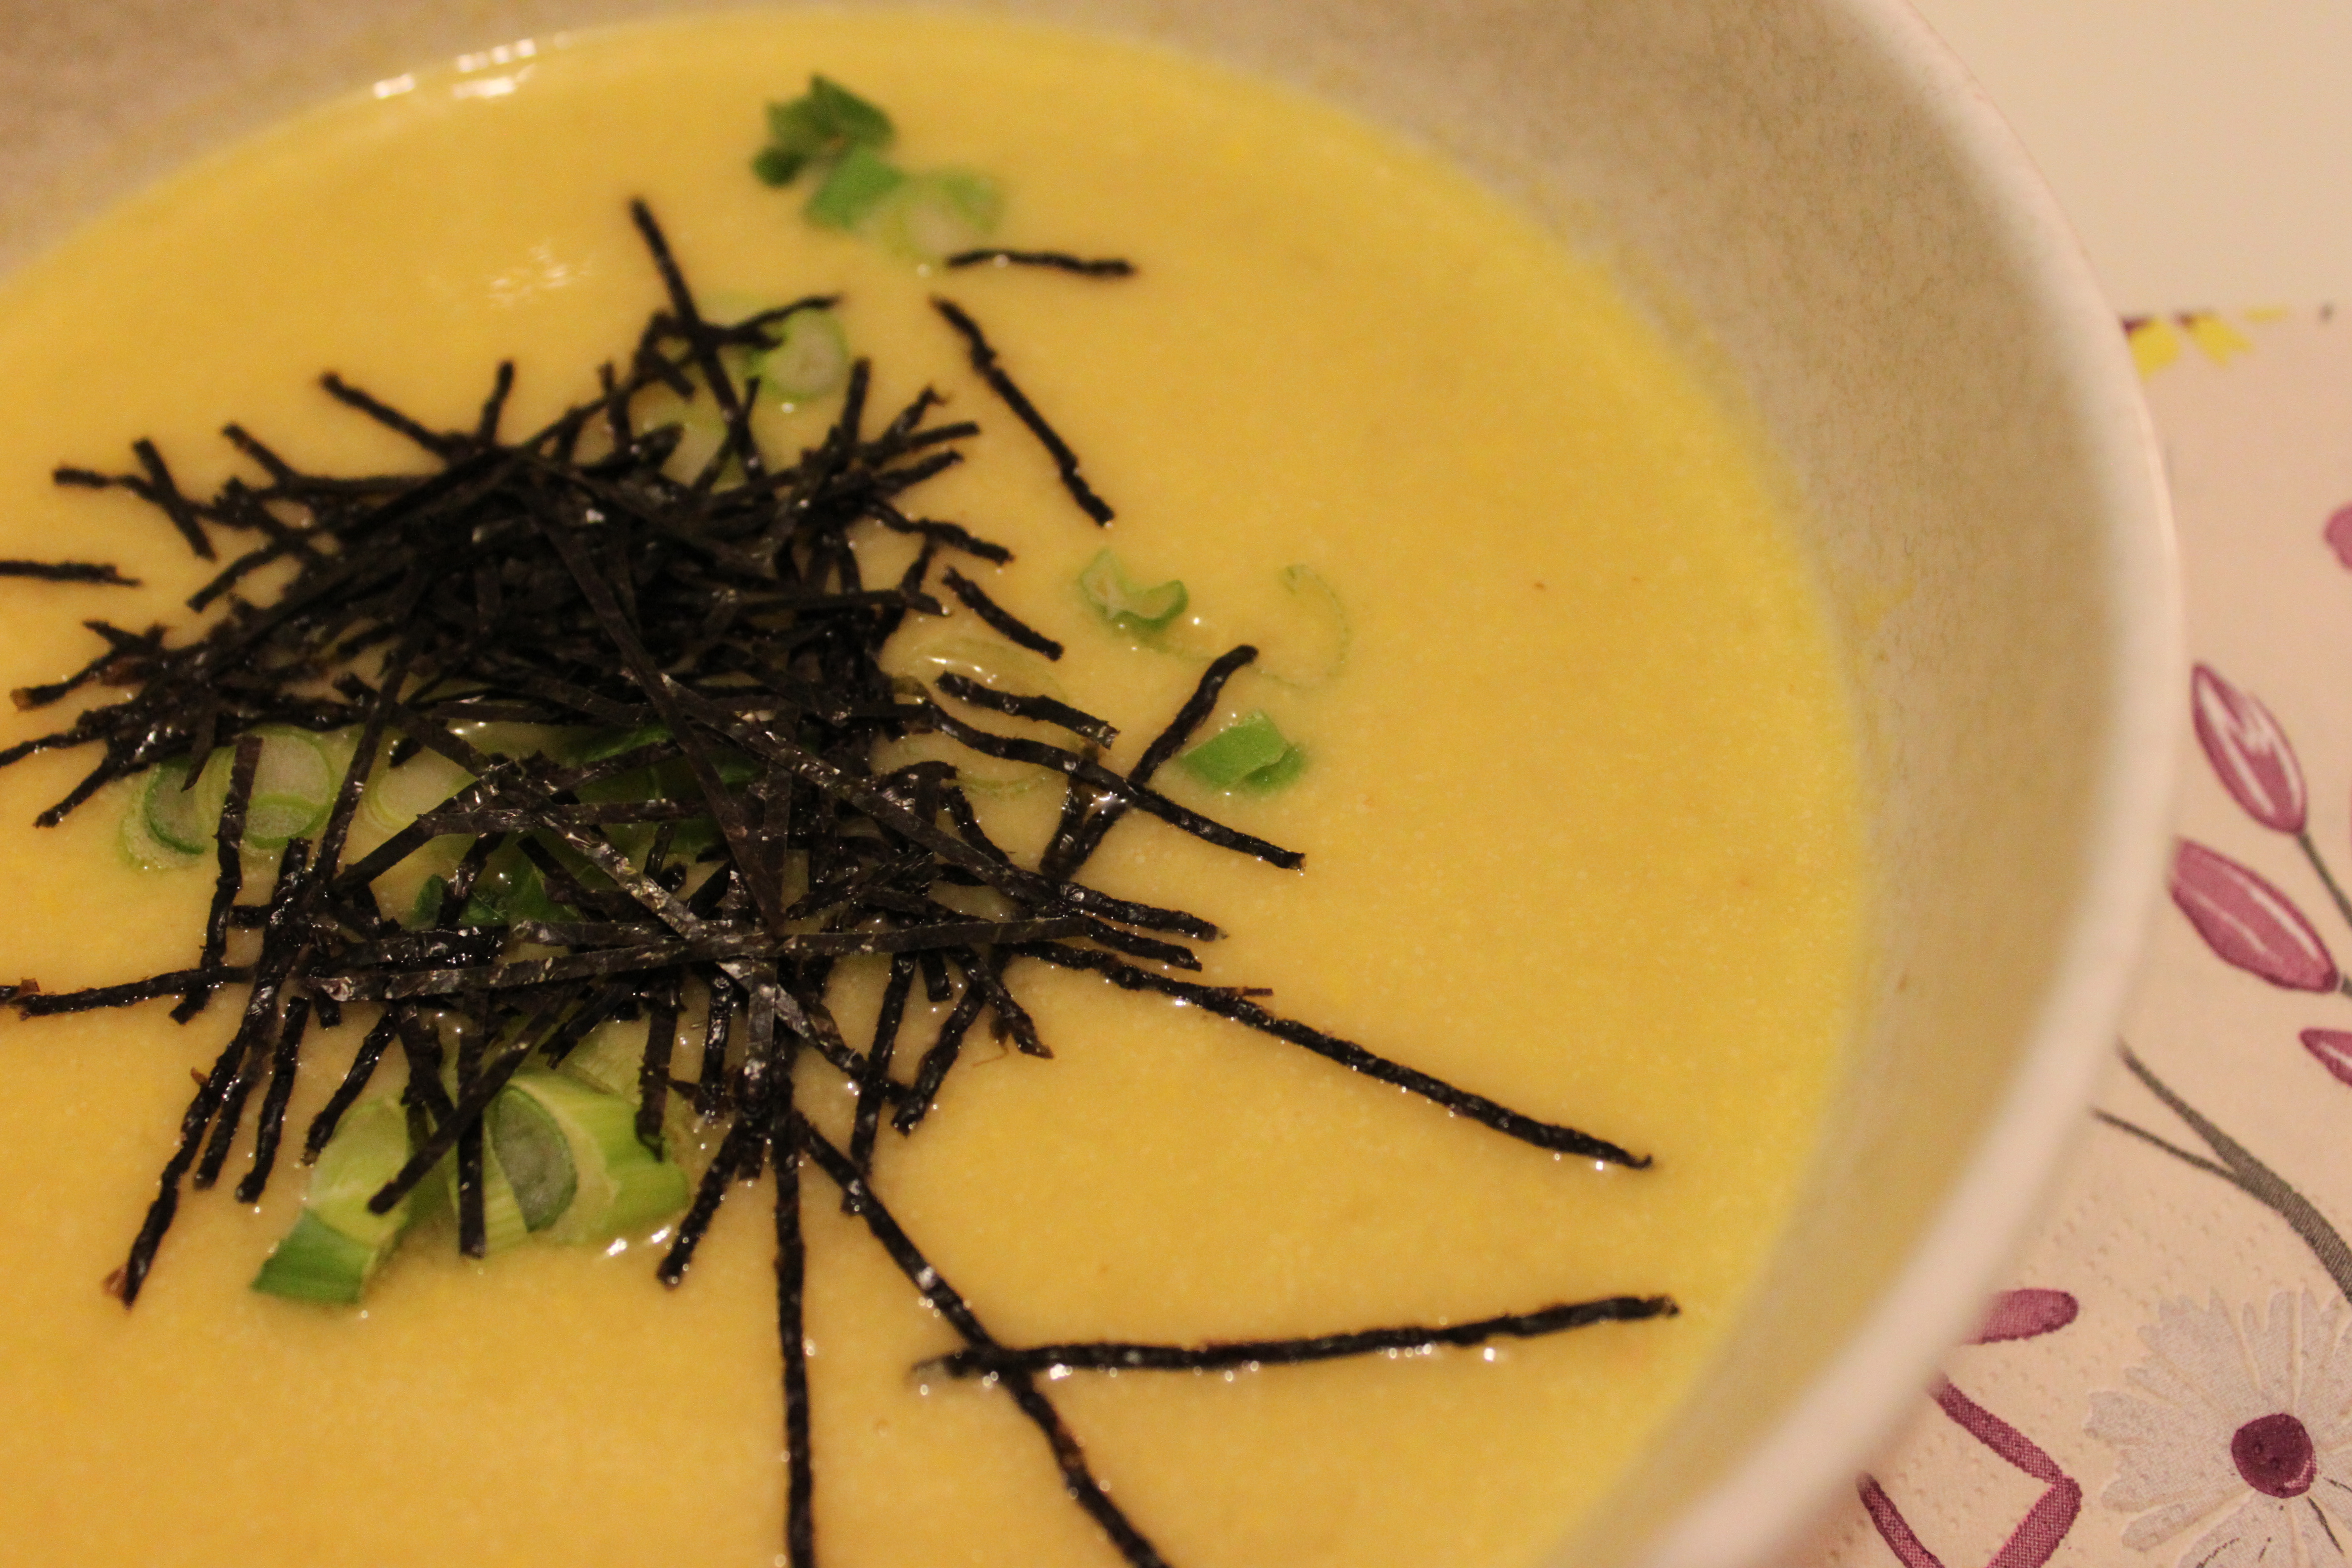
4 cups kombu stock, 1 cup organic low sodium chicken stock (optional), 4 cobs fresh sweet corn (peaches and cream); 1 oz organic unsalted butter, 1 teaspoon grape seed oil, 1 medium leek (white portion only, thinly sliced), 1 celery stalk (finely chopped), 1 to 2 garlic clove (crushed), 1 teaspoon finely grated ginger, 1/4 (60 ml) cup mirin, 1/2 cup (125 ml) cream, salt and pepper to taste, nori flakes and thinly slice green scallions (optional for garnish).
Preparation:
– Cut the kernels from the corn cobs, set kernels and cobs aside.
– Prepare the kombu stock; in a separate saucepan, bring chicken broth to boil, turn off heat and set aside.
Kombu stock: (1 piece of kombu (around 20 g – gently cleaned and wiped with damp cloth), 4 cups of cold water
– Put the kombu and 4 cups of cold water in a large saucepan. Heat up the water slowly on medium low heat; just before it starts boiling, remove the kombu.
– When kombu stock is ready, add corn cobs and hot chicken stock to the pan and return to the boil. Reduce to simmer and cook for 15 to 20 minutes, remove from the heat, discard the corn cobs and set aside.
– In a separate 8 quart stock pot, add butter and grape seed oil, melt over medium heat.
– Add leek, stirring regularly, cook for approximately 5 minutes or until lightly golden. Add celery, garlic and ginger, cook until fragrant (approximately 1 minute); stir in corn kernels, mix well with other ingredients and cook another 1 to 2 minutes.
– Add stock and mirin to corn and leek mixture, and bring to boil over high heat, then reduce to simmer and cook for 20 minutes.
– Using an upright blender, process and puree the soup in small batches (be mindful to fill blender jar less than half way).To prevent the liquid from splattering, remember to allow heat to escape; remove the blender’s lid centre insert (cap), hold a kitchen towel over the top when blending.
– Return puree soup to stock pot, stir in the cream and heat gently over low heat, do not bring to boil.
– Season to taste with salt and pepper; to serve, sprinkle with nori flakes and green scallions (optional).
Notes:
– I added the organic chicken broth (optional) for more flavour; the original recipe calls for 4 cups of kombu stock only, because I’ve added the additional cup of chicken broth, the soup is not as thick. If you want a thinner soup, add more cream.
– For a smoother and more refined texture, push the puree soup mixture through a fine sieve before stirring in the cream.
– I opted to use a light cream and seasoned the soup with sea salt from Okinawa (a precious gift from my friend “FanFan”, thank you very much!!).
Corn Soup in “Pink Striped” Icecream paper bowls for the bridal shower
– For the bridal shower, I served them in little “ice-cream” cups:)
This is my friend’s own recipe, inspired by the different types of soba salads she has had; this light and tasty salad has become a staple on my menu. I also made this for our New Year family gathering, and most recently for my friend’s birthday potluck party.
We made this dish together a few months ago when sea asparagus was in season; it was an excellent addition and added a different texture and taste (“sea-salt”) . As this is a homemade recipe, the quantities and ingredients can be changed according to your taste and dietary needs.
“Poached Pear Queen”, thank you very much for sharing (OO).
Ingredients: (Serves 4 – as light meal)
1 package 100% buckwheat noodles (200g), 1 Tablespoon grape seed oil, 6 to 8 fresh shiitake mushrooms (thinly sliced), 1 package white organic shimeji mushrooms (approx. 100g), 1 package organic buna shimeji (beech) mushrooms (approx. 100g), 1 to 2 cloves of garlic (finely minced), sugar snap peas 250 g (lightly blanched and sliced on the bias), 1 large red (or orange) pepper (thinly sliced), 2 pieces satsuma age (Japanese already cooked fried fish cake) thinly sliced, 1 medium onion (thinly sliced), green scallions (chopped for garnish), 1 Meyer (or regular) lemon zest (for garnish), 1 to 2 teaspoons of Japanese mirin, juice of half a Meyer lemon (or regular lemon), sake (just a dash for mushrooms), kosher salt (a little for seasoning mushrooms), drizzle of sesame oil (optional).
Dressing: 4 to 6 Tablespoon yuzu ponzu sauce, 1 to 2 Tablespoon Japanese soy sauce, 1 small red chilli peppers (thinly sliced), 1 to 2 Tablespoon rice vinegar, black pepper for seasoning to taste.
Preparation:
– Prepare ponzu dressing (Yuzu ponzu to soy sauce – 3 to 1), add sliced red chilli pepper and mix well.
– Lightly blanched sugar snap peas, peel and slice on the bias.
– Separate the white and beech shimeji mushrooms into individual stalks, slice shiitake mushrooms, onion, red pepper and fish cakes, set aside.
– In large saute pan, heat oil over medium high heat.
– Add onions, sautéed until lightly browned, add mushrooms, garlic, Japanese sake, mirin and season with kosher salt (a pinch to lightly season the mushrooms) and black pepper, stirring occasionally until they begin to wilt, approximately 7 to 8 minutes.
– Add red pepper slices, cook for another minute, then fold in snap peas and fish cake, add Meyer lemon juice, mix well and cook for 2 to 3 minutes. Keep in mind you would like to keep the vegetables “crunchy”. Remove from heat and set aside to cool for a few minutes.
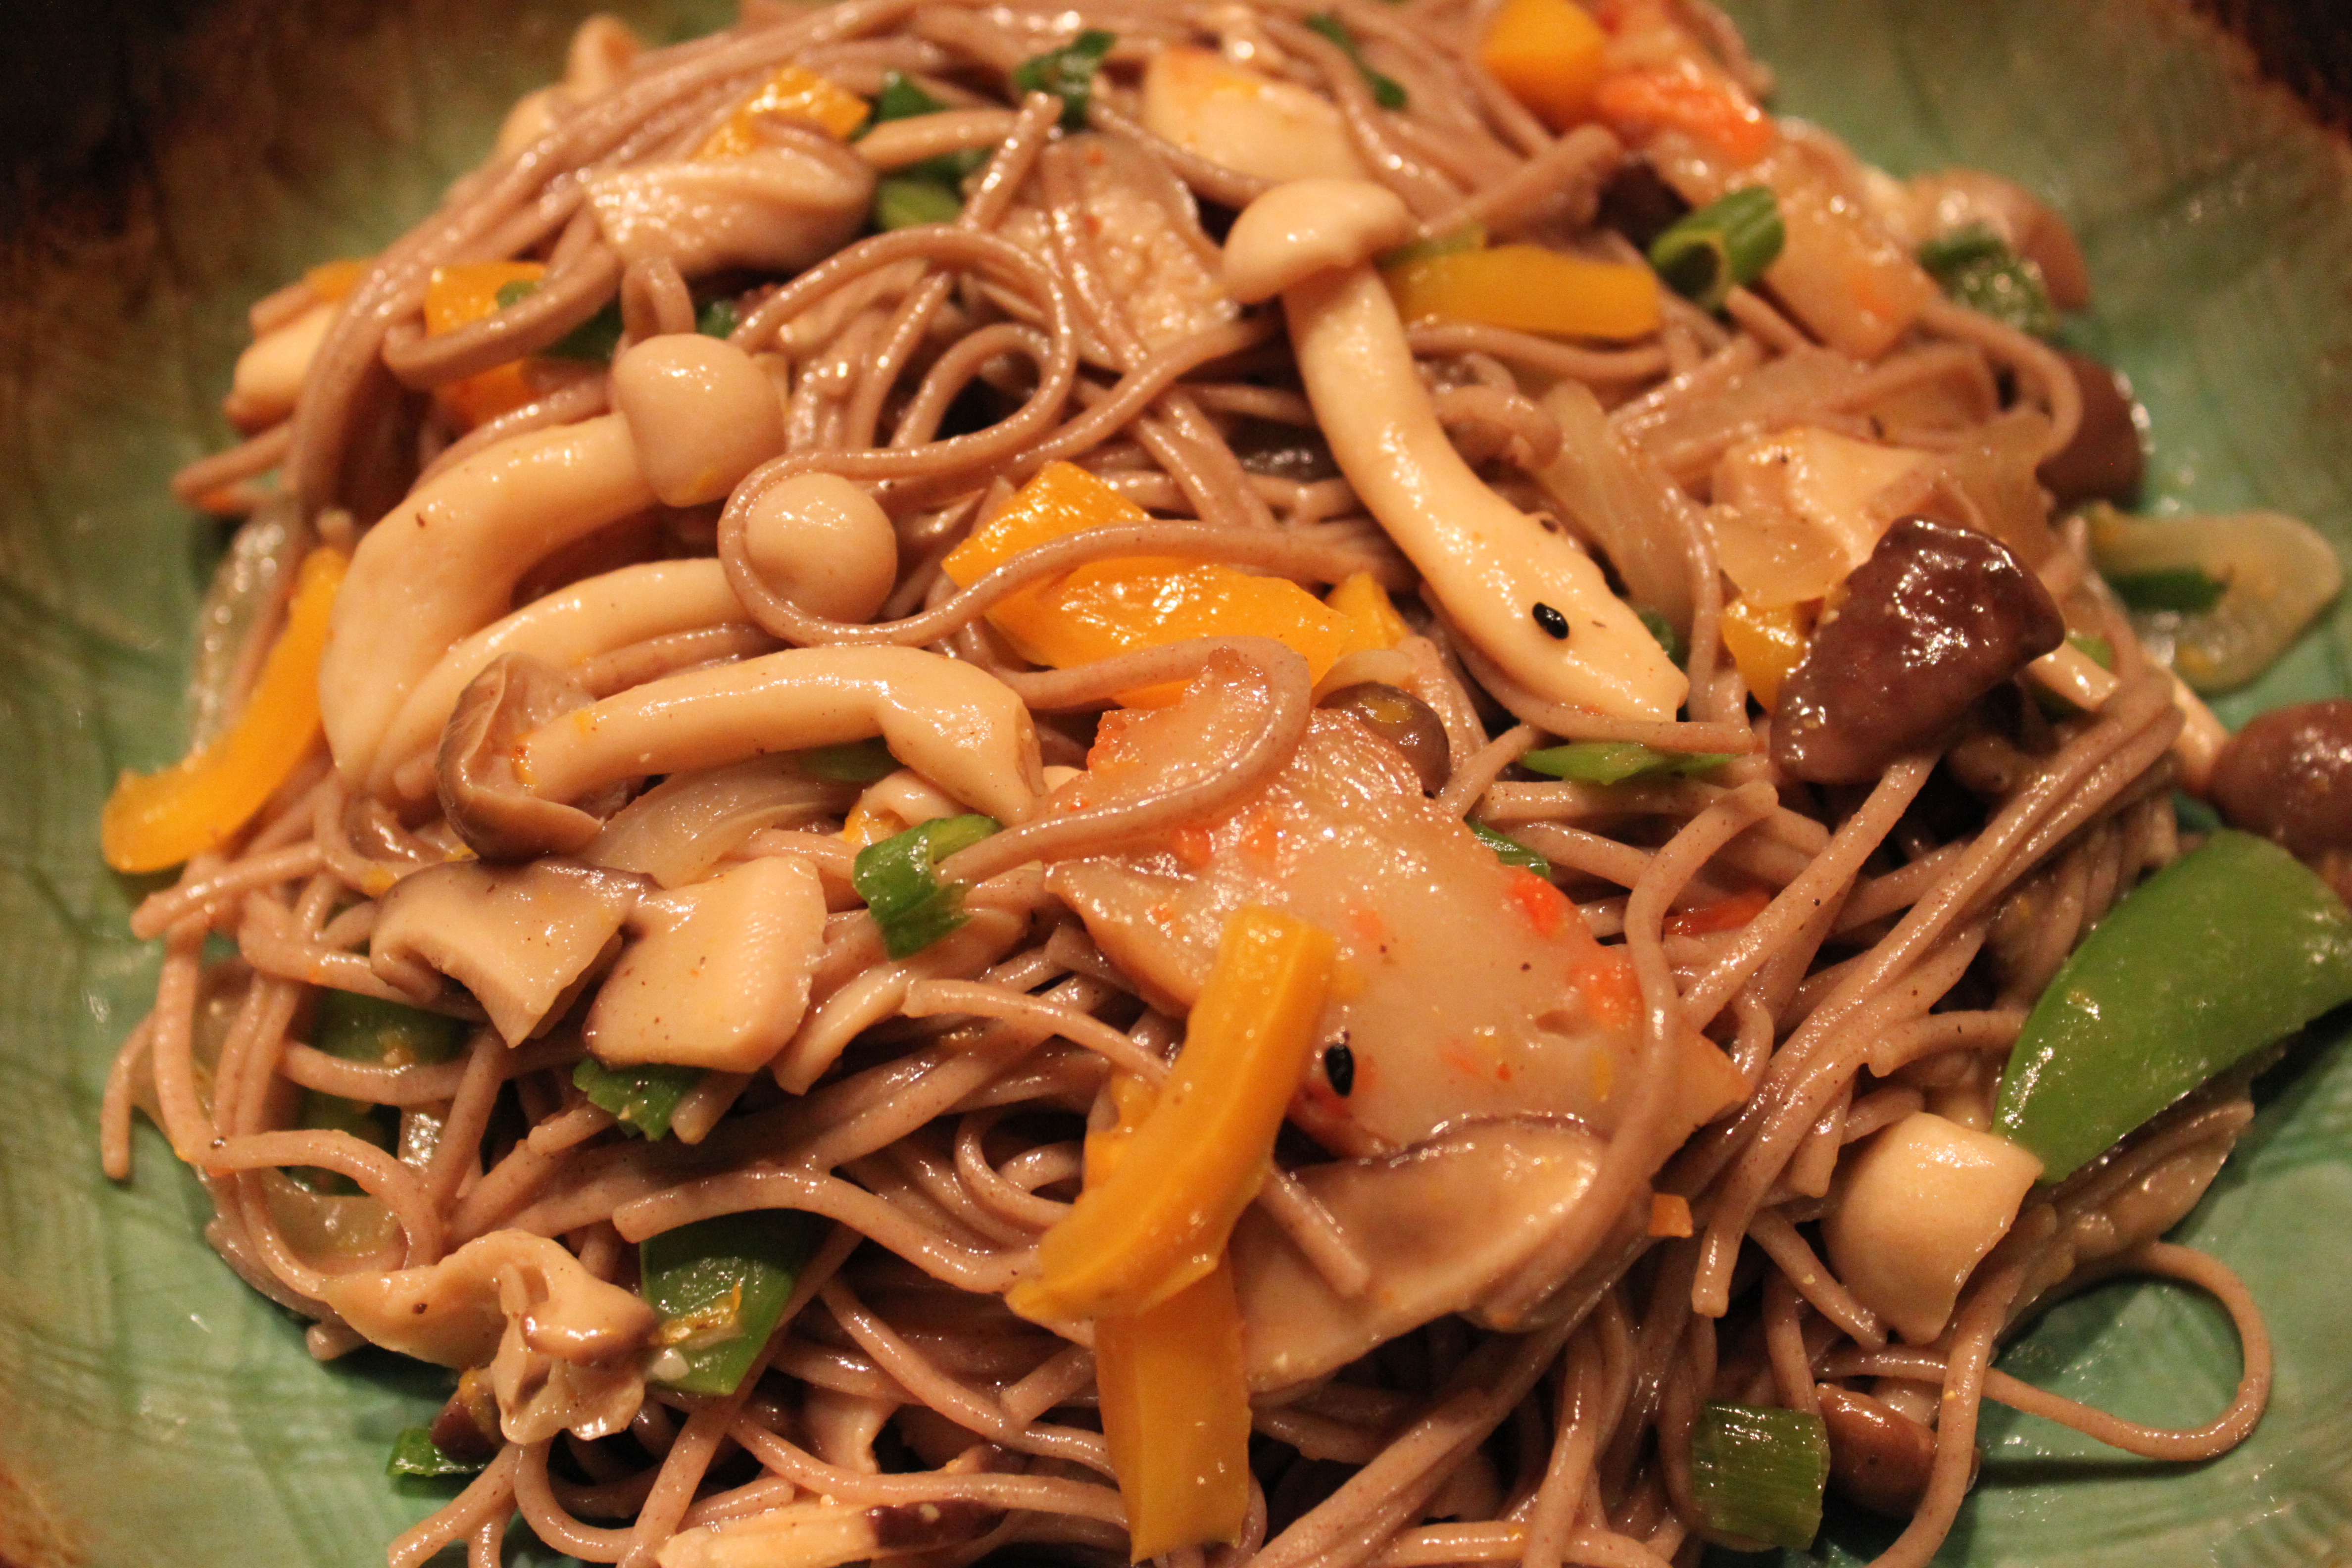
– Cook the Soba noodles in boiling water according to package instructions; cook until they are al dente (treat it as pasta). This step requires your full attention as soba noodles can be overcooked easily. When they are done, rinse under cold water (until water is no longer murky), toss and drain the noodles thoroughly.
Soba noodles rinsed, tossed and drained thoroughly.
– In large mixing bowl, (by hand using plastic disposable food prep gloves or tongs) toss mushroom mixture with soba noodles, the lemon zest and green scallions, slowly drizzle dressing and toss well with all ingredients.
– Taste and adjust with your choice of seasonings (soy sauce, yuzu ponzu, black pepper) according to your own preference.
– Lightly drizzle with sesame oil or garnish with toasted sesame seeds (optional).- Served immediately or chill until ready to serve.
Notes:
– Meyer lemon has a very distinctive flavour which is slightly resembles yuzu. It is not as sharp as regular lemons which work just as well and adds a different flavour.
– When adding the dressing, do it slowly; some of you may prefer a even lighter or heavier dressed noodle salad, you may not use all (or you require more) dressing. Be prepared! If you choose to chill the salad before serving, it’s best to have more dressing available as noodles may become a little dry after refrigeration.
– The small red chilli pepper is spicy; so beware! if you want “kick”, add another one (OO).
– You can make this entirely vegetarian by omitting the fish cakes. Back in September 2013, we made this dish with sea asparagus, maitake and crimini mushrooms, be adventurous and change the ingredients!
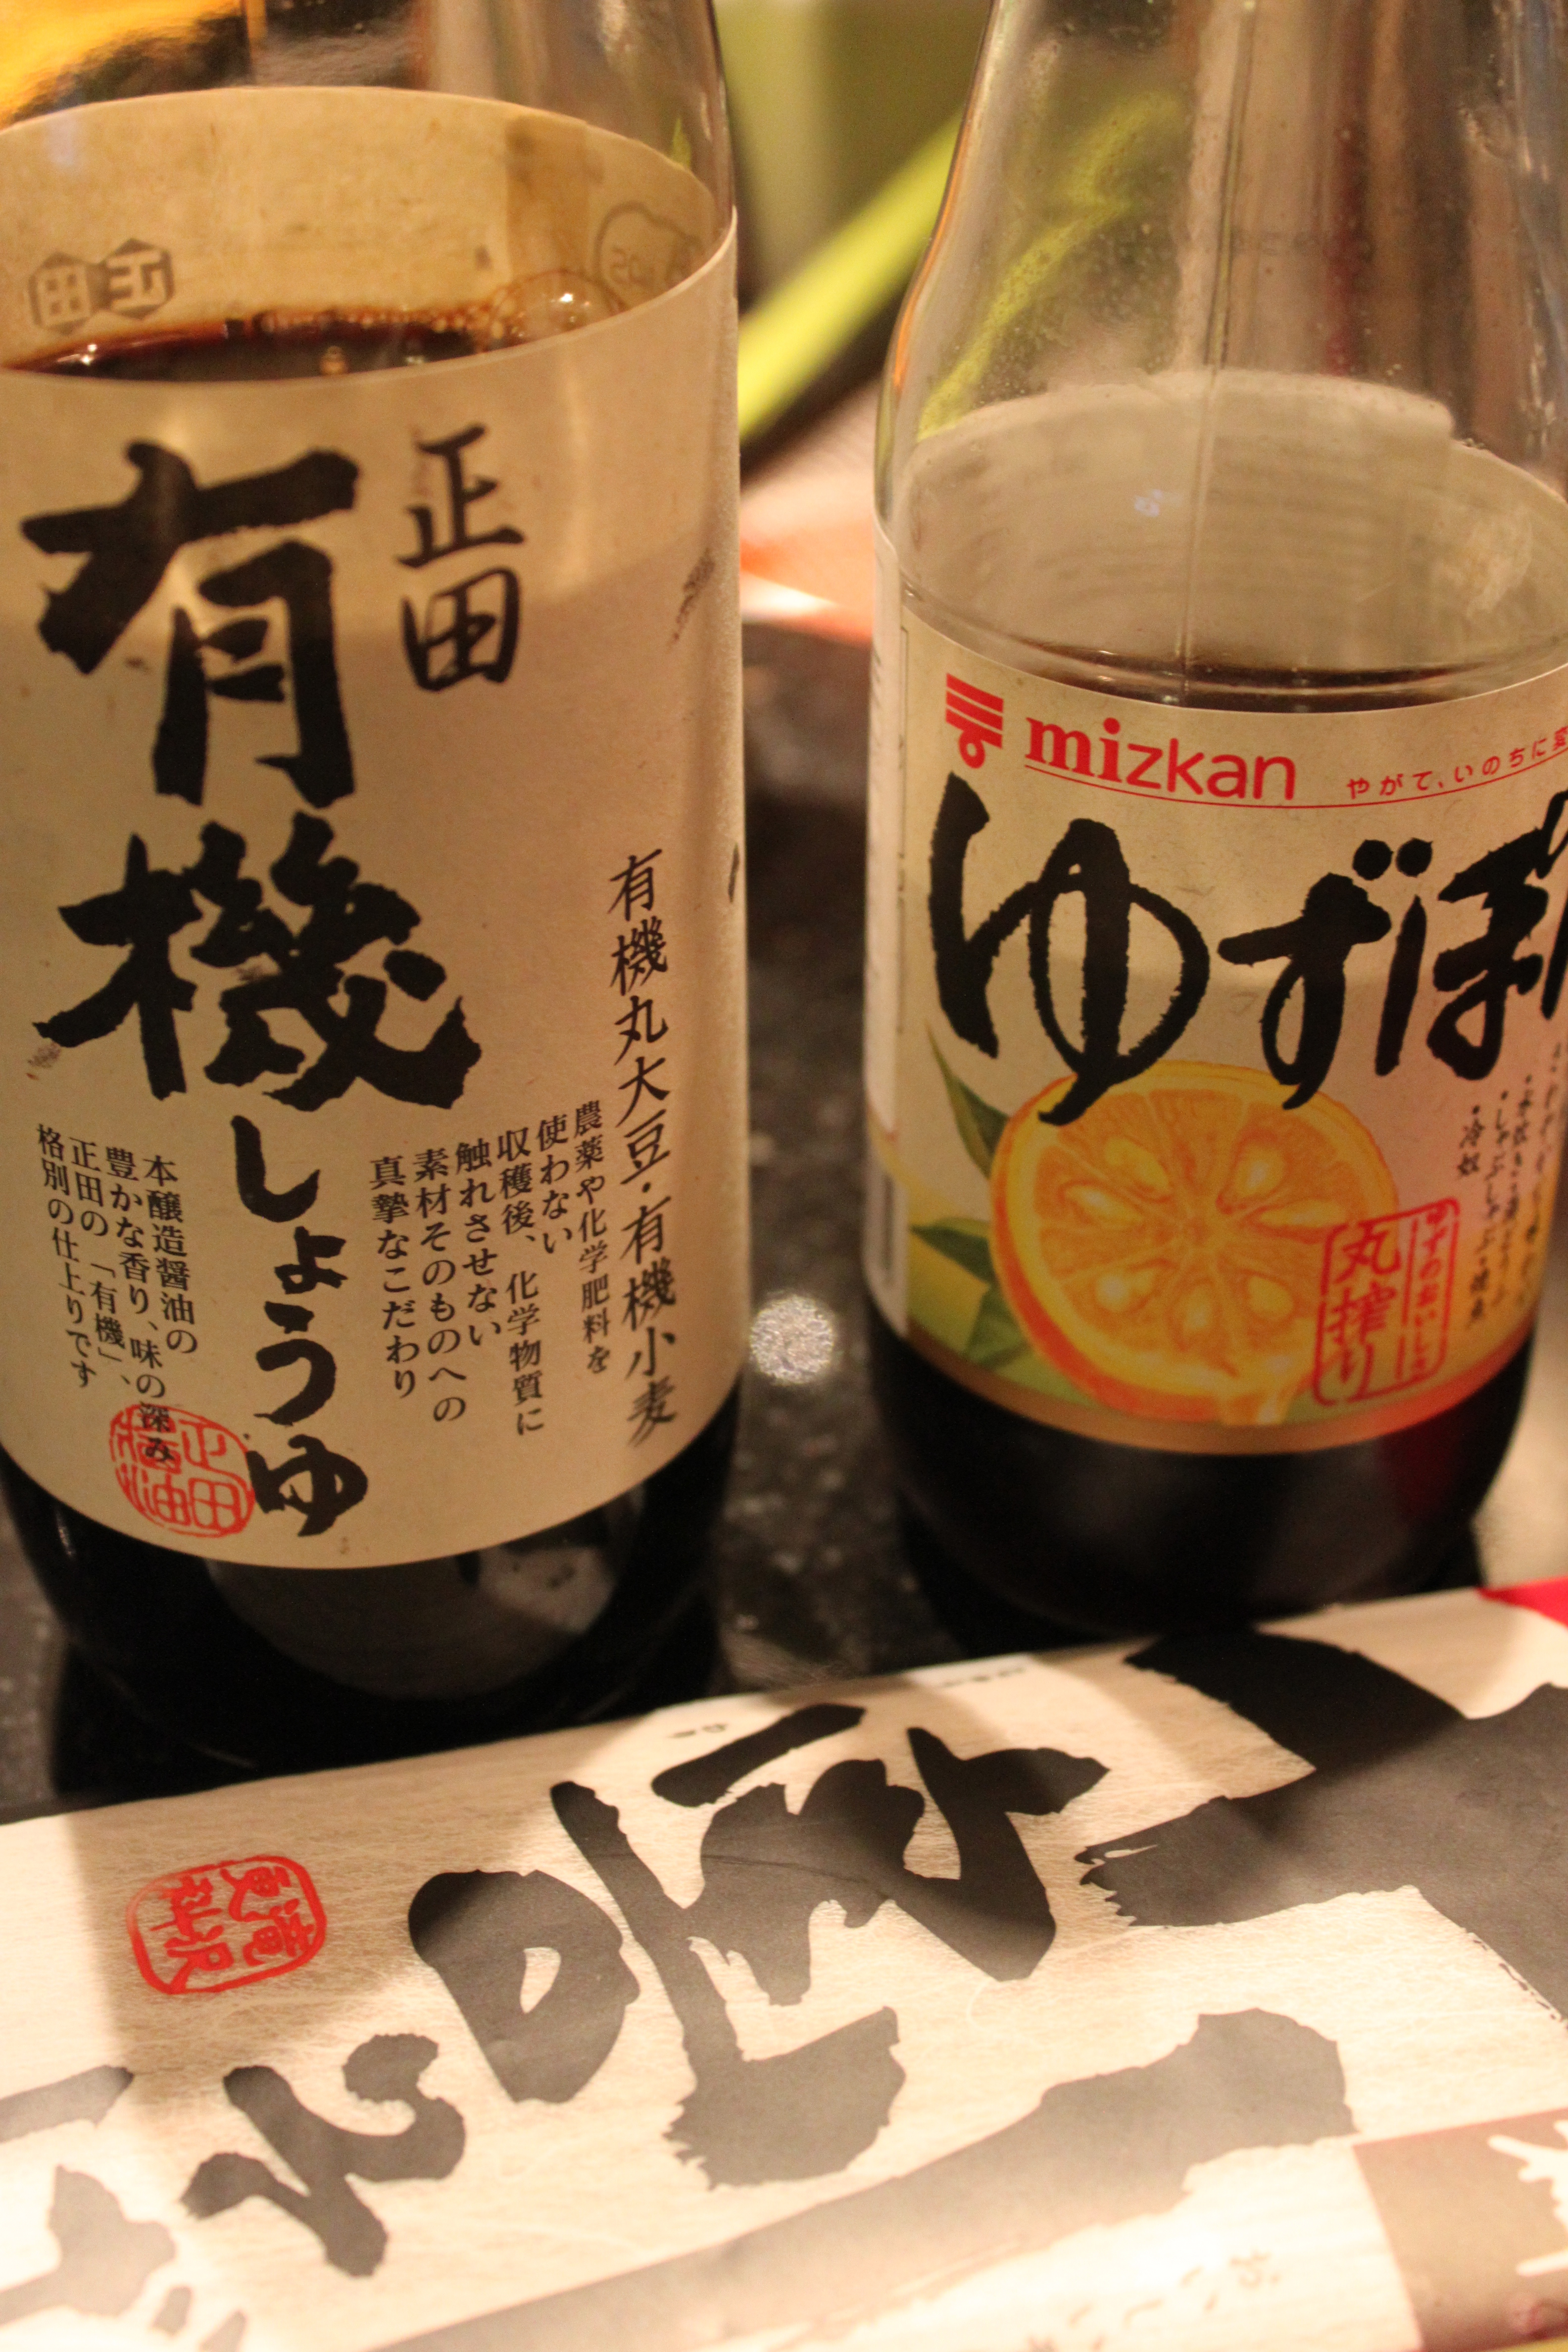
– Here’s a picture of some ingredients: organic soy sauce (top left), Yuzu Ponzu (top right) and 100% buckwheat noodles (bottom). In Vancouver, you can purchased all ingredients at Fujiya Japanese food store (912 Clark Drive, Vancouver, BC). The organic packaged mushrooms are also available at T & T Asian supermarket (various locations).
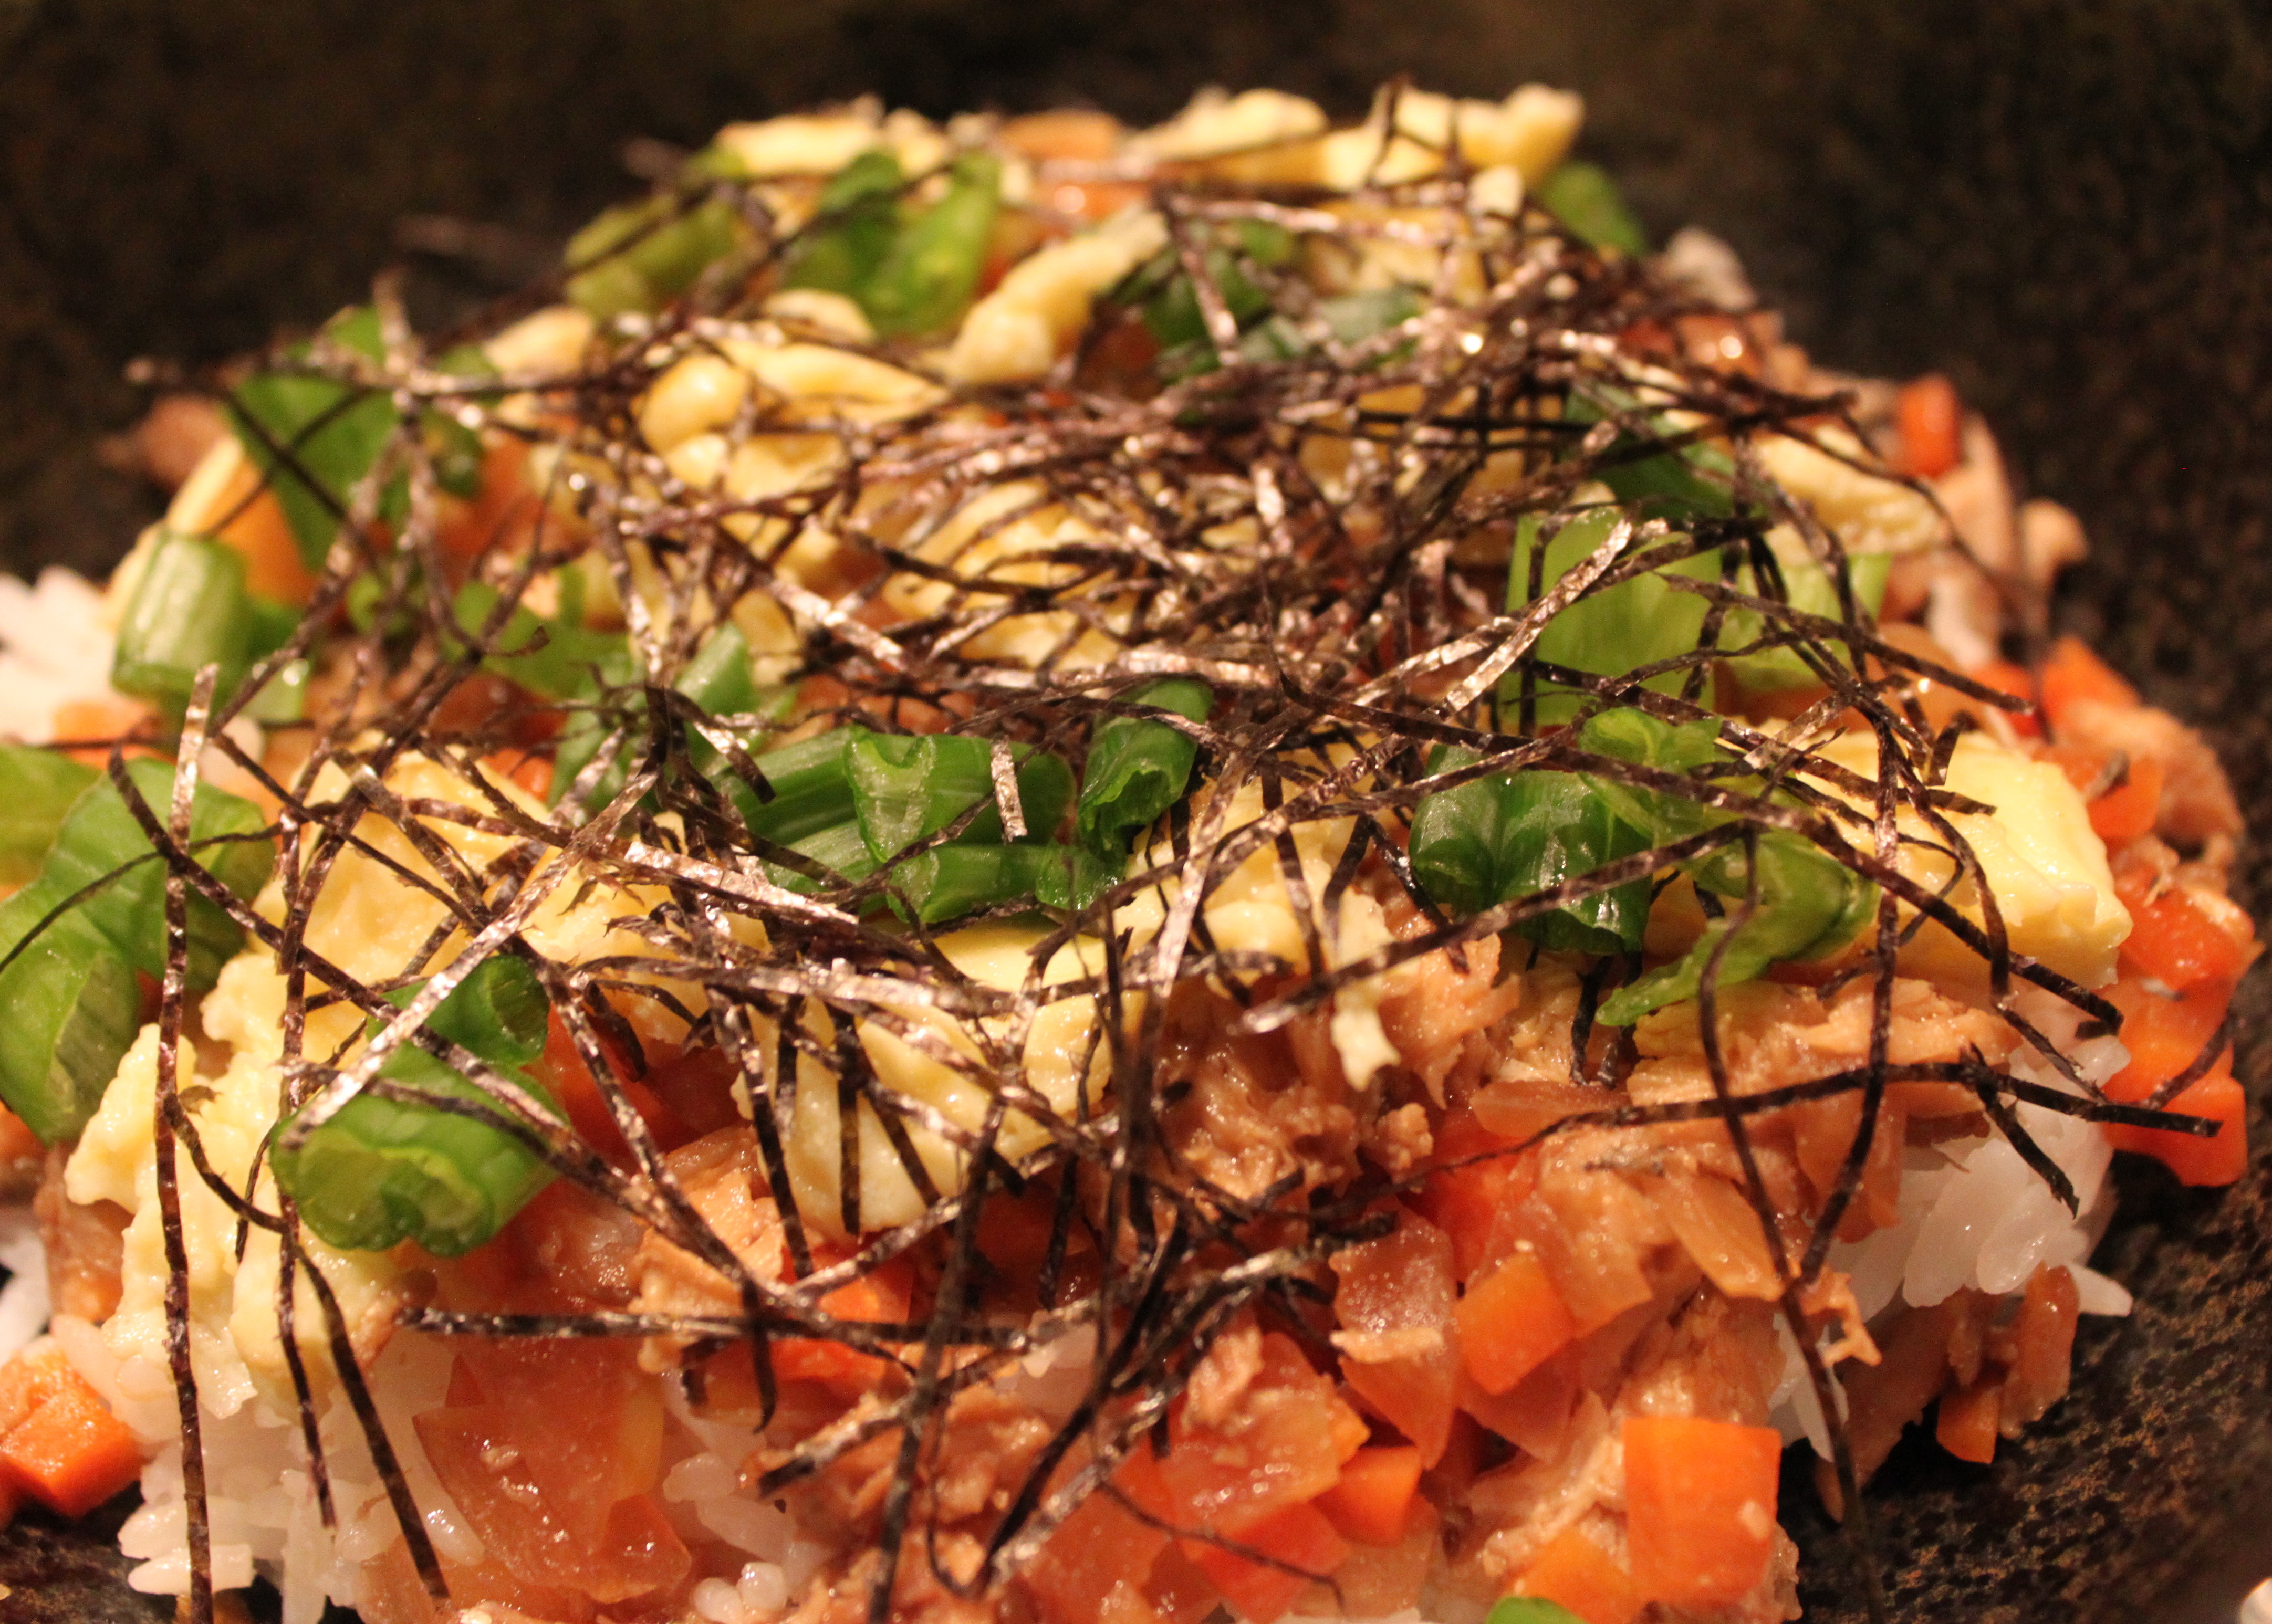
My Saba Soboro Donburi (leftovers next day assembled at home) – Itadakimasu!
I had the most wonderful time cooking with my “Twin” Green Apron and her husband Shin; they welcomed us to their house for a family style dinner and I spent the entire afternoon learning from Shin how to prepare Mackerel three ways.
This simple and delicious Japanese dish is served with rice, scrambled egg, chopped green onion and toasted nori (Japanese dried packaged seaweed); the combination of flavors and texture is perfect! Shin-san adapted this recipe from“Gochisosama ga Kikitakute” by Harumi Kurihara (English version is Harumi’s Japanese home Cooking);she is one of the best known cookery writers in Japan. Enjoy (OO)!
Ingredients: (serves 4)
Saba Fillet (2-3 slices), 1 medium carrot (finely diced), 1 medium onion (finely diced), 1 Tablespoon grapeseed oil (2 if necessary), 4 Tablespoon Japanese soy sauce, 2 Tablespoon Sake, 2 Tablespoon Mirin, 1/2 Tablespoon Miso (brown), 1 Tablespoon brown sugar, 1 Tablespoon finely grated fresh ginger.
For serving: Japanese Rice, 3 eggs, green onions (green part only – thinly sliced) and Japanese dried toasted seaweed (shredded)
Preparation:
– Check and remove any visible bones from the mackerel fillet.
– Using a spoon, scoop the fish meat from the skin from head to tail, pulling away from the skin. Set fish meat aside.
– Peel the carrot and onion, chop into very fine pieces, and grate (or chop) the ginger finely.
– Prepare sauce: Mix soy sauce, sake, mirin, sugar in measuring cup, set aside.
– Heat oil in nonstick skillet over medium heat, add ginger and mackerel, let them brown lightly. When fish meat starts to flake, add onion and carrot, sautéed for 2 to 3 minutes.
Saba, onion, carrot and sauce cooked together until very liquid is left.
– Stir in sauce and mix well with ingredients. At Medium low simmer, slowly cook until there is very little liquid left in the pan. Stir occasionally to keep ingredients from burning.
– While fish is cooking; prepare scramble eggs (seasoning not required), green onion (thinly sliced) and toasted seaweed (cut in small pieces).
Scrambled eggs, Toasted Seaweed and Saba Soboro – ready to assemble!
To serve: On fluffy Japanese rice, add scrambled egg on top, sprinkle with green onion and toasted seaweed then you’re ready to go! It’s best served as family style (see picture on left) and everyone can assemble their own “donburi” to taste.
Notes:
Mackerel are now readily available at Asian supermarkets or local fish store. In Vancouver, you can find mackerel at H-Mart (various locations), or Seafood City (http://www.seafoodcitygi.com/) at Granville Island. All Japanese “staples” can be purchased at Fujiya (912 Clark Drive, Vancouver, BC).
Mackerel usually comes in whole, you can ask fishmonger to fillet them. For the more adventurous home cooks, you can fillet them at home; there are many instructional videos available through Youtube.
– The ratio of mackerel meat to vegetables can be adjusted according to your own preference.
– We had a carrot salad (recipe will be posted) as side dish; when I had my leftovers, I prepared a seaweed and wild greens salad on the side.
This past weekend my friends hosted a “French Feast New Year’s Party”; I was invited to join my friend Jo in her kitchen as her “sous chef’ to prepare dinner for 18 people! She found the recipe for this wonderful Jacques Pepin’s classic French recipefrom Saveur online; we prepared this dish as an appetizer, with help from others for plating and serving. It was excellent team work; for a while it felt as if we were working in a restaurant kitchen…enjoy (OO).
Ingredients: (Serves 6)
8 oz button mushrooms (minced), 3 small shallots (minced), 6 Tablespoons unsalted butter, 2 Tablespoons parsley (minced), 1 Tablespoon minced tarragon (plus 6 whole leaves to garnish), kosher salt and freshly ground pepper to taste; 3/4 cup dry vermouth, 1 bay leaf, 6 large sea scallops, 2 Tablespoons flour, 1/2 cup heavy cream, 2/3 cup grated Gruyere, 1/2 teaspoon lemon juice
Preparation:
– To prepare the duxelles:
Heat mushrooms, 4 Tablespoons of unsalted butter, and 2/3 of the shallots in a saucepan over medium heat, cook until mixture forms a loose paste, approximately 25 to 30 minutes. Stir parsley and minced tarragon into mixture, season with kosher salt and pepper; set aside.
Bring remaining shallots, vermouth, bay leaf, salt and 3/4 cup of water to boil in a 4 quart saucepan over medium heat. Add scallops and lightly poach until barely tender, less than 2 minutes. Remove scallops from cooking liquid and set aside.
– To prepare the sauce:
Continue to boil cooking liquid until reduced to 1/2 cup (it takes approximately 10 minutes), strain the liquid.
Heat remaining butter in a different sauce pan over medium heat; add flour, cook until smooth (approximately 2 minutes).
Whisk in reduced cooking liquid and cream; cook until sauce is thick enough to coat the back of the spoon.
Add cheese, juice, salt and pepper.
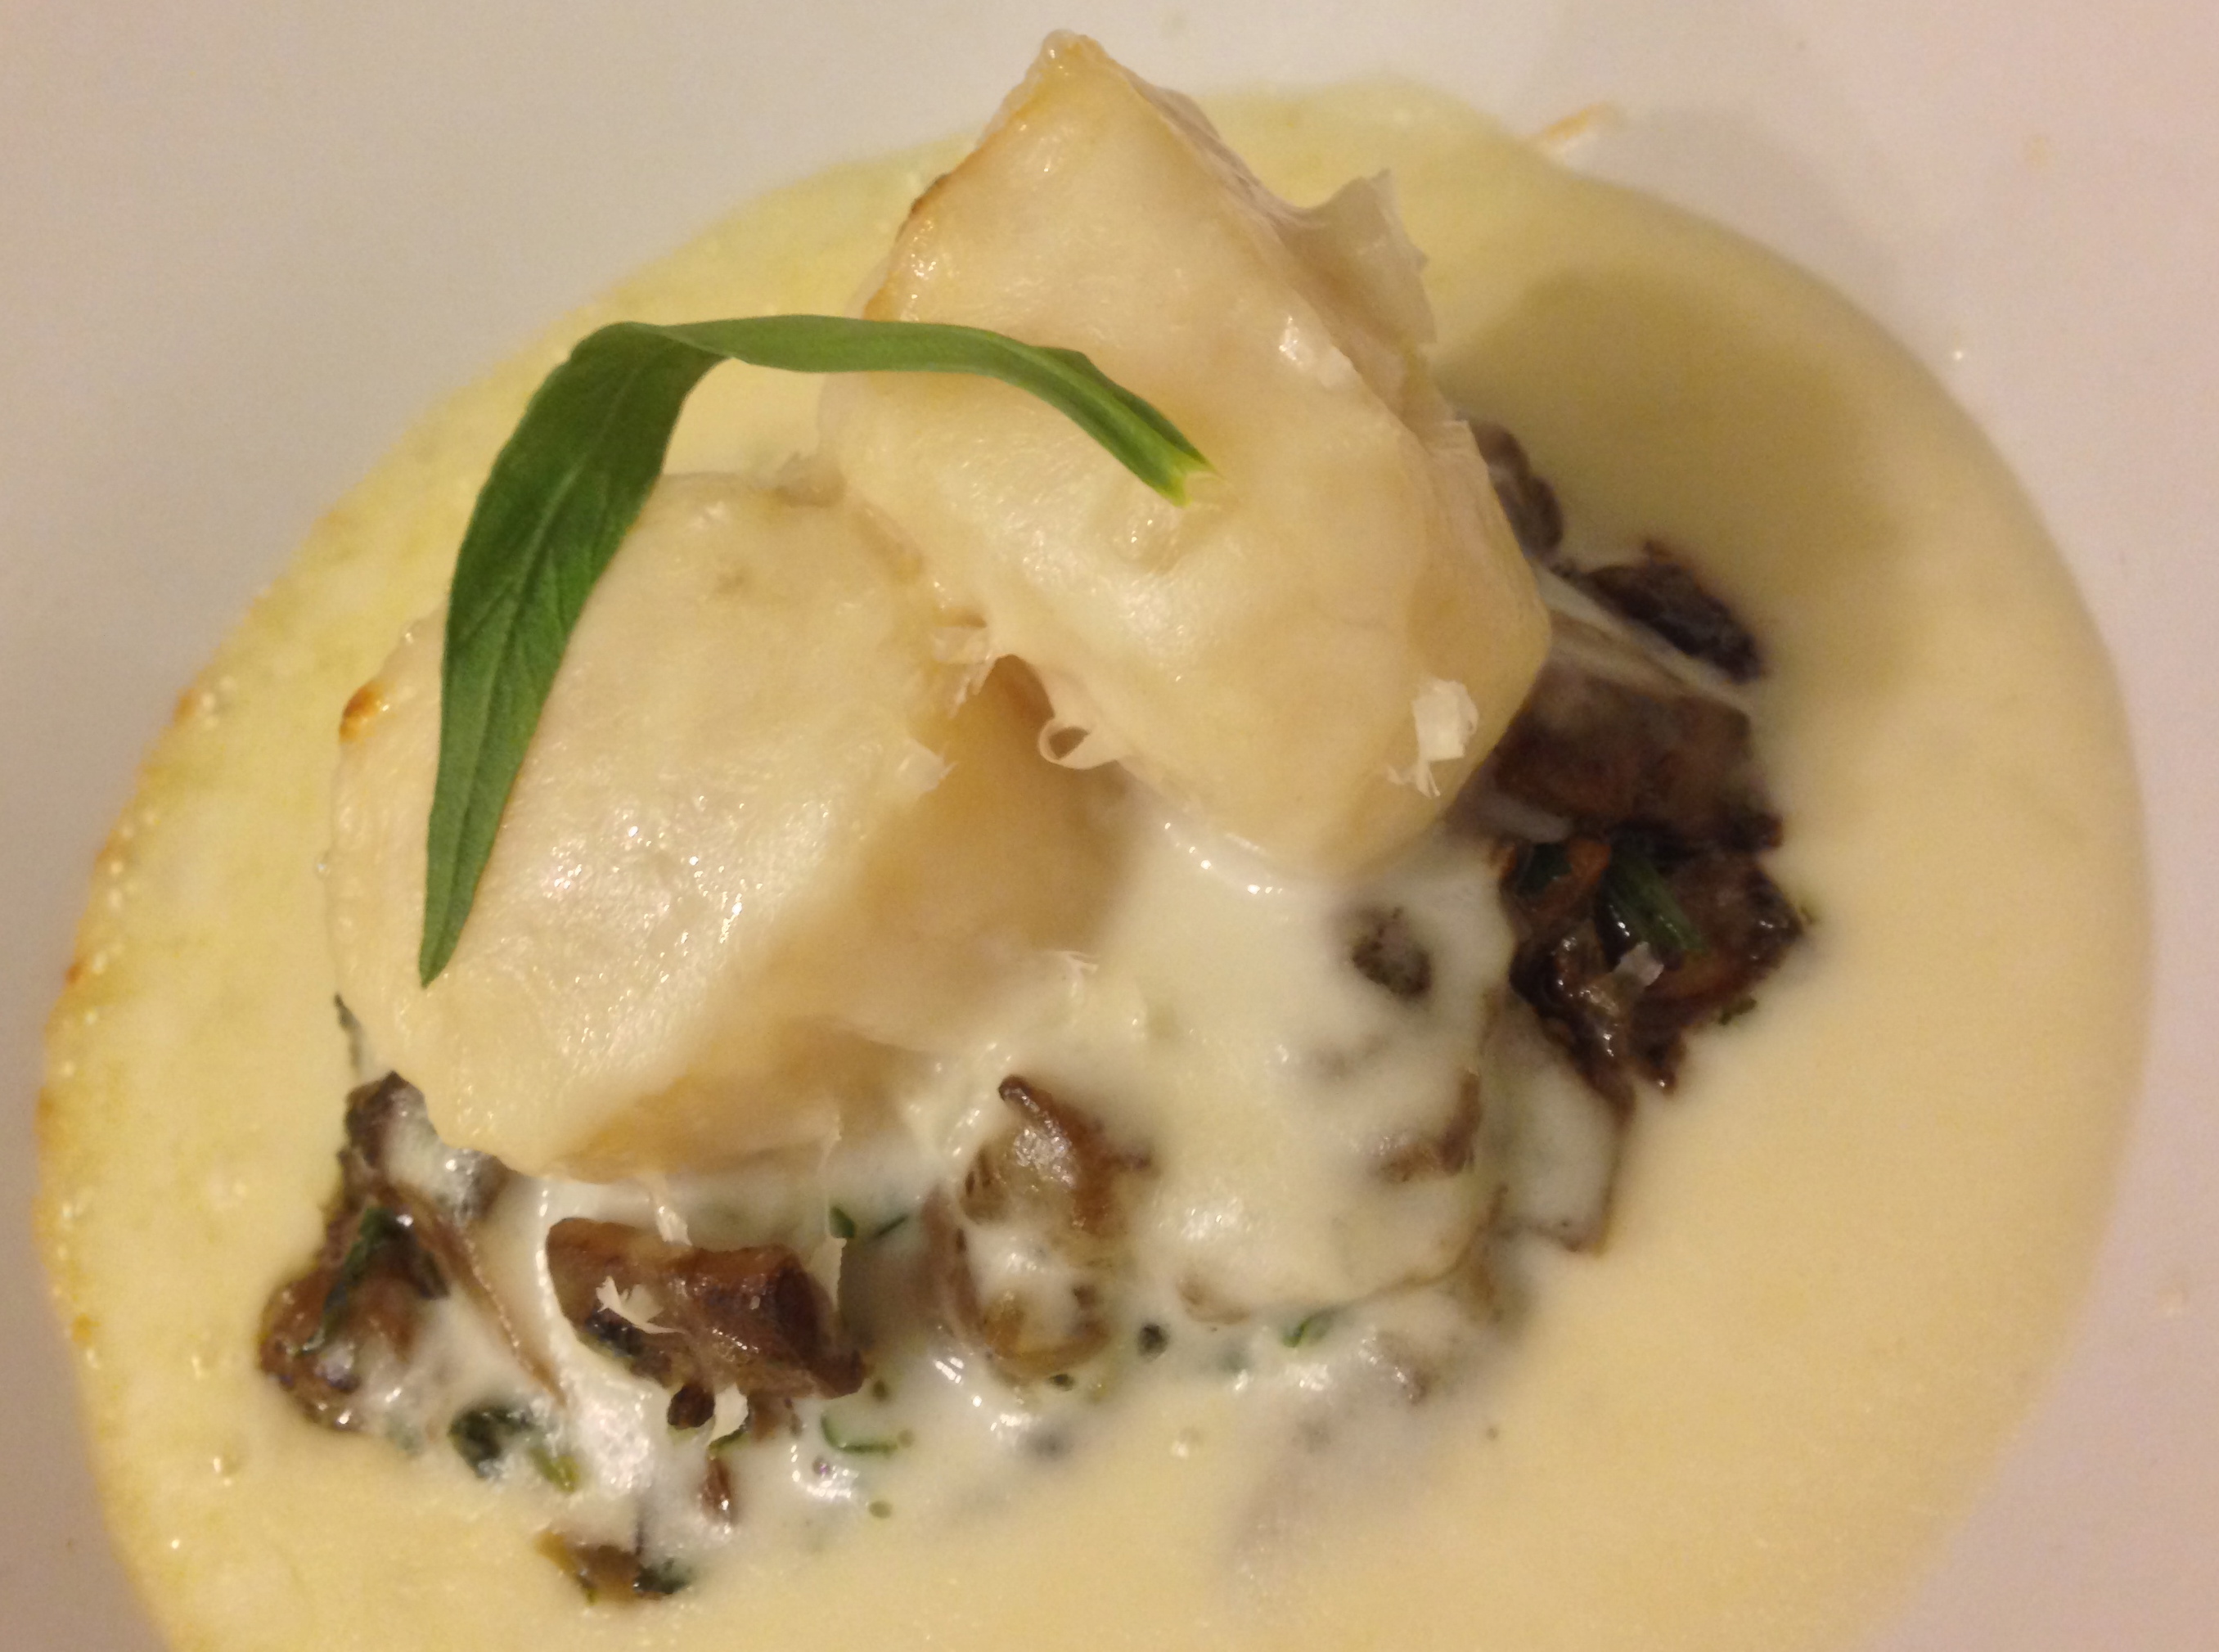
– To assemble the dish:
Heat broiler to high, place rack at the top.
Dividing the mushroom mixture among the dishes.
Place 6 shallow gratin dishes on baking sheet, divide mushroom mixture evenly.
Place scallop over mushroom mixture; divide sauce over scallops.
Broil until browned on top, about 3 minutes, garnish each with tarragon leaf.
Notes:
– We used 2 scallops per serving, we were unable to find sea scallops and luckily found these wonderful frozen ones from Hokkaido (**They are sashimi grade, purchased from Golden Summit Frozen Seafood in Richmond, BC).
– The mushroom duxelle can be prepared one day ahead (we did and store in tightly sealed container).
– I’ve broken down the steps according to how we prepared the dish; we have used a lighter cream instead of heavy cream.
I love the combination of tomatoes and saffron; this recipe is adapted from the January 2014 issue of Bon Appetit Magazine which emphasized on healthy eating and offered many new fish recipes. I have made slight modifications: I used sea bass instead of cod, added organic chicken broth and onions for more flavour, and increased the quantity of the poaching liquid. The fish was served with wild rice blend which was so flavourful when eaten together with the sauce; for a moment, it felt as if I was having a “fish only – deconstructed” paella…Enjoy (OO)!
Ingredients: (Serves 4)
1 to 2 Tablespoon olive oil, 3 to 4 garlic cloves, thinly sliced; 1 medium onion, sliced, 1 teaspoon crushed red pepper flakes, 1 28 oz can organic whole peeled tomatoes, drained; 1/2 cup dry white wine, 1/2 cup low sodium organic chicken stock (store-bought or homemade), 2-3 bay leaves, pinch of saffron threads, 4 4 to 5 ounce sea bass (fish size approximate), white pepper, kosher salt and black pepper to taste, chopped parsley as garnish (optional)
Preparation:
– Heat oil in dutch oven (or pot with lid) over medium heat. Add onion, garlic and crushed pepper flakes and cook, stirring often, until fragrant (garlic should not take on any colour), about 3 minutes. Do not burn!
– Add tomatoes, crushing with your hands as you add them, wine, bay leaves, saffron and chicken stock (or water).
– Bring to a boil, reduce heat, and simmer until flavors meld, 25 – 30 minutes, season with kosher salt and pepper.
– Reduce heat to medium low, pat dry the sea bass with paper towel, season with salt and white pepper; place in poaching liquid. Cover and cook at a bare simmer until sea bass is opaque throughout and begin to flake, 8 – 10 minutes (*Note – thicker pieces will take longer to cook).
– Gently transfer sea bass to shallow bowl and spoon poaching liquid over, serve on bed of wild rice.
Notes:
– The original recipe uses cod; other suggestions – black bass or flounder fillets.
– Saffron can be overpowering; adjust accordingly. For Non-meat eaters (pescatarians), omit the low-sodium chicken broth and use water instead. As always, adjust the seasoning according to your dietary needs and taste.
– I cooked the wild rice separately, we prefer either Nuworld Wholesome Wild Rice Blend (Costco or Price Smart) or Lundberg Wild Blend (Choices, East West Market (on Main Street) in Vancouver, BC or Whole Foods (various locations)).
A simple and easy way to prepare zucchini; instead of pasta, I recently served this with Tomato glazed meatloaves (see other recipe posting).
Ingredients (Serves 4)
4 medium size zucchini, kosher salt and pepper to taste
Preparation:
– Using a vegetable peeler, from top to bottom of each zucchini, slice the zucchini into ribbons.
– Place ribbons in a covered microwave safe dish
– Nuked them high for two minutes
– Drained the excess liquid (if any), and toss with kosher salt and freshly ground pepper to taste.
Notes: An old fashion vegetable peeler or mandoline works. To turn zucchini into “spaghetti” style noodles, you will need a spiral slicer. Enjoy the zucchini ribbons raw as a salad! Enjoy (OO).
The recipe is adapted from Deb Perelman’s Smitten Kitchen’s “Tomato glazed meatloaves with brown butter mashed potatoes“; I’ve changed things up a bit by mixing different meats for the meatballs, and served them with zucchini “noodles”; I’ve also doubled the quantity of the glaze. The results? A wholesome and hearty meal…a bit nostalgic..a perfect Sunday evening dinner.
Ingredients:
Glaze:6 teaspoons olive oil, 1/2 cup tomato paste, 4 Tablespoons cider vinegar, 3 teaspoons honey, 4 teaspoons Worcestershire sauce, 2 Tablespoons Dijon mustard, kosher salt to taste (**I’ve doubled most of the ingredients from the original recipe, we love sauce!)
Meatballs:
2 slices sandwich bread (I’ve used approximately 2 ounces of organic bread crumbs), 2 garlic cloves (minced), 1 medium onion (finely chopped), 1 medium stalk celery (finely chopped), 1 medium carrot (peeled and finely chopped), olive oil (for cooking), 1 teaspoon kosher salt plus more for vegetables, freshly ground black pepper, 1 pound extra lean ground beef, 1/2 pound ground pork, 1/2 pound ground veal, 1 to 2 tablespoon tomato paste, 2 teaspoon Dijon mustard, 2 Tablespoons Worcestershire sauce, 1/2 cup milk (I’ve used almond milk), 1/4 to 1/2 cup chopped fresh flat leaf parsley, 2 large eggs
Preparation:
To make the glaze: Combine glaze ingredients in a small saucepan, let it simmer and whisk constantly, for 2 to 3 minutes, set aside.
To make the meatballs:
– Pre-heat the oven to 350 degrees.
– Tear the bread into chunks then blend it, in a food processor, into breadcrumbs. Place breadcrumbs into large bowl.
– Add onion, garlic, celery and carrot to the food processor, pulse it until they are finely chopped.
– Heat a large skillet over medium heat. Once skillet is hot, coat the bottom with olive oil, heat for a minute then add the finely chopped vegetables. Season with kosher salt and pepper to taste, and cook, stirring frequently until they begin to brown (not burn), about 10 to 15 minutes.
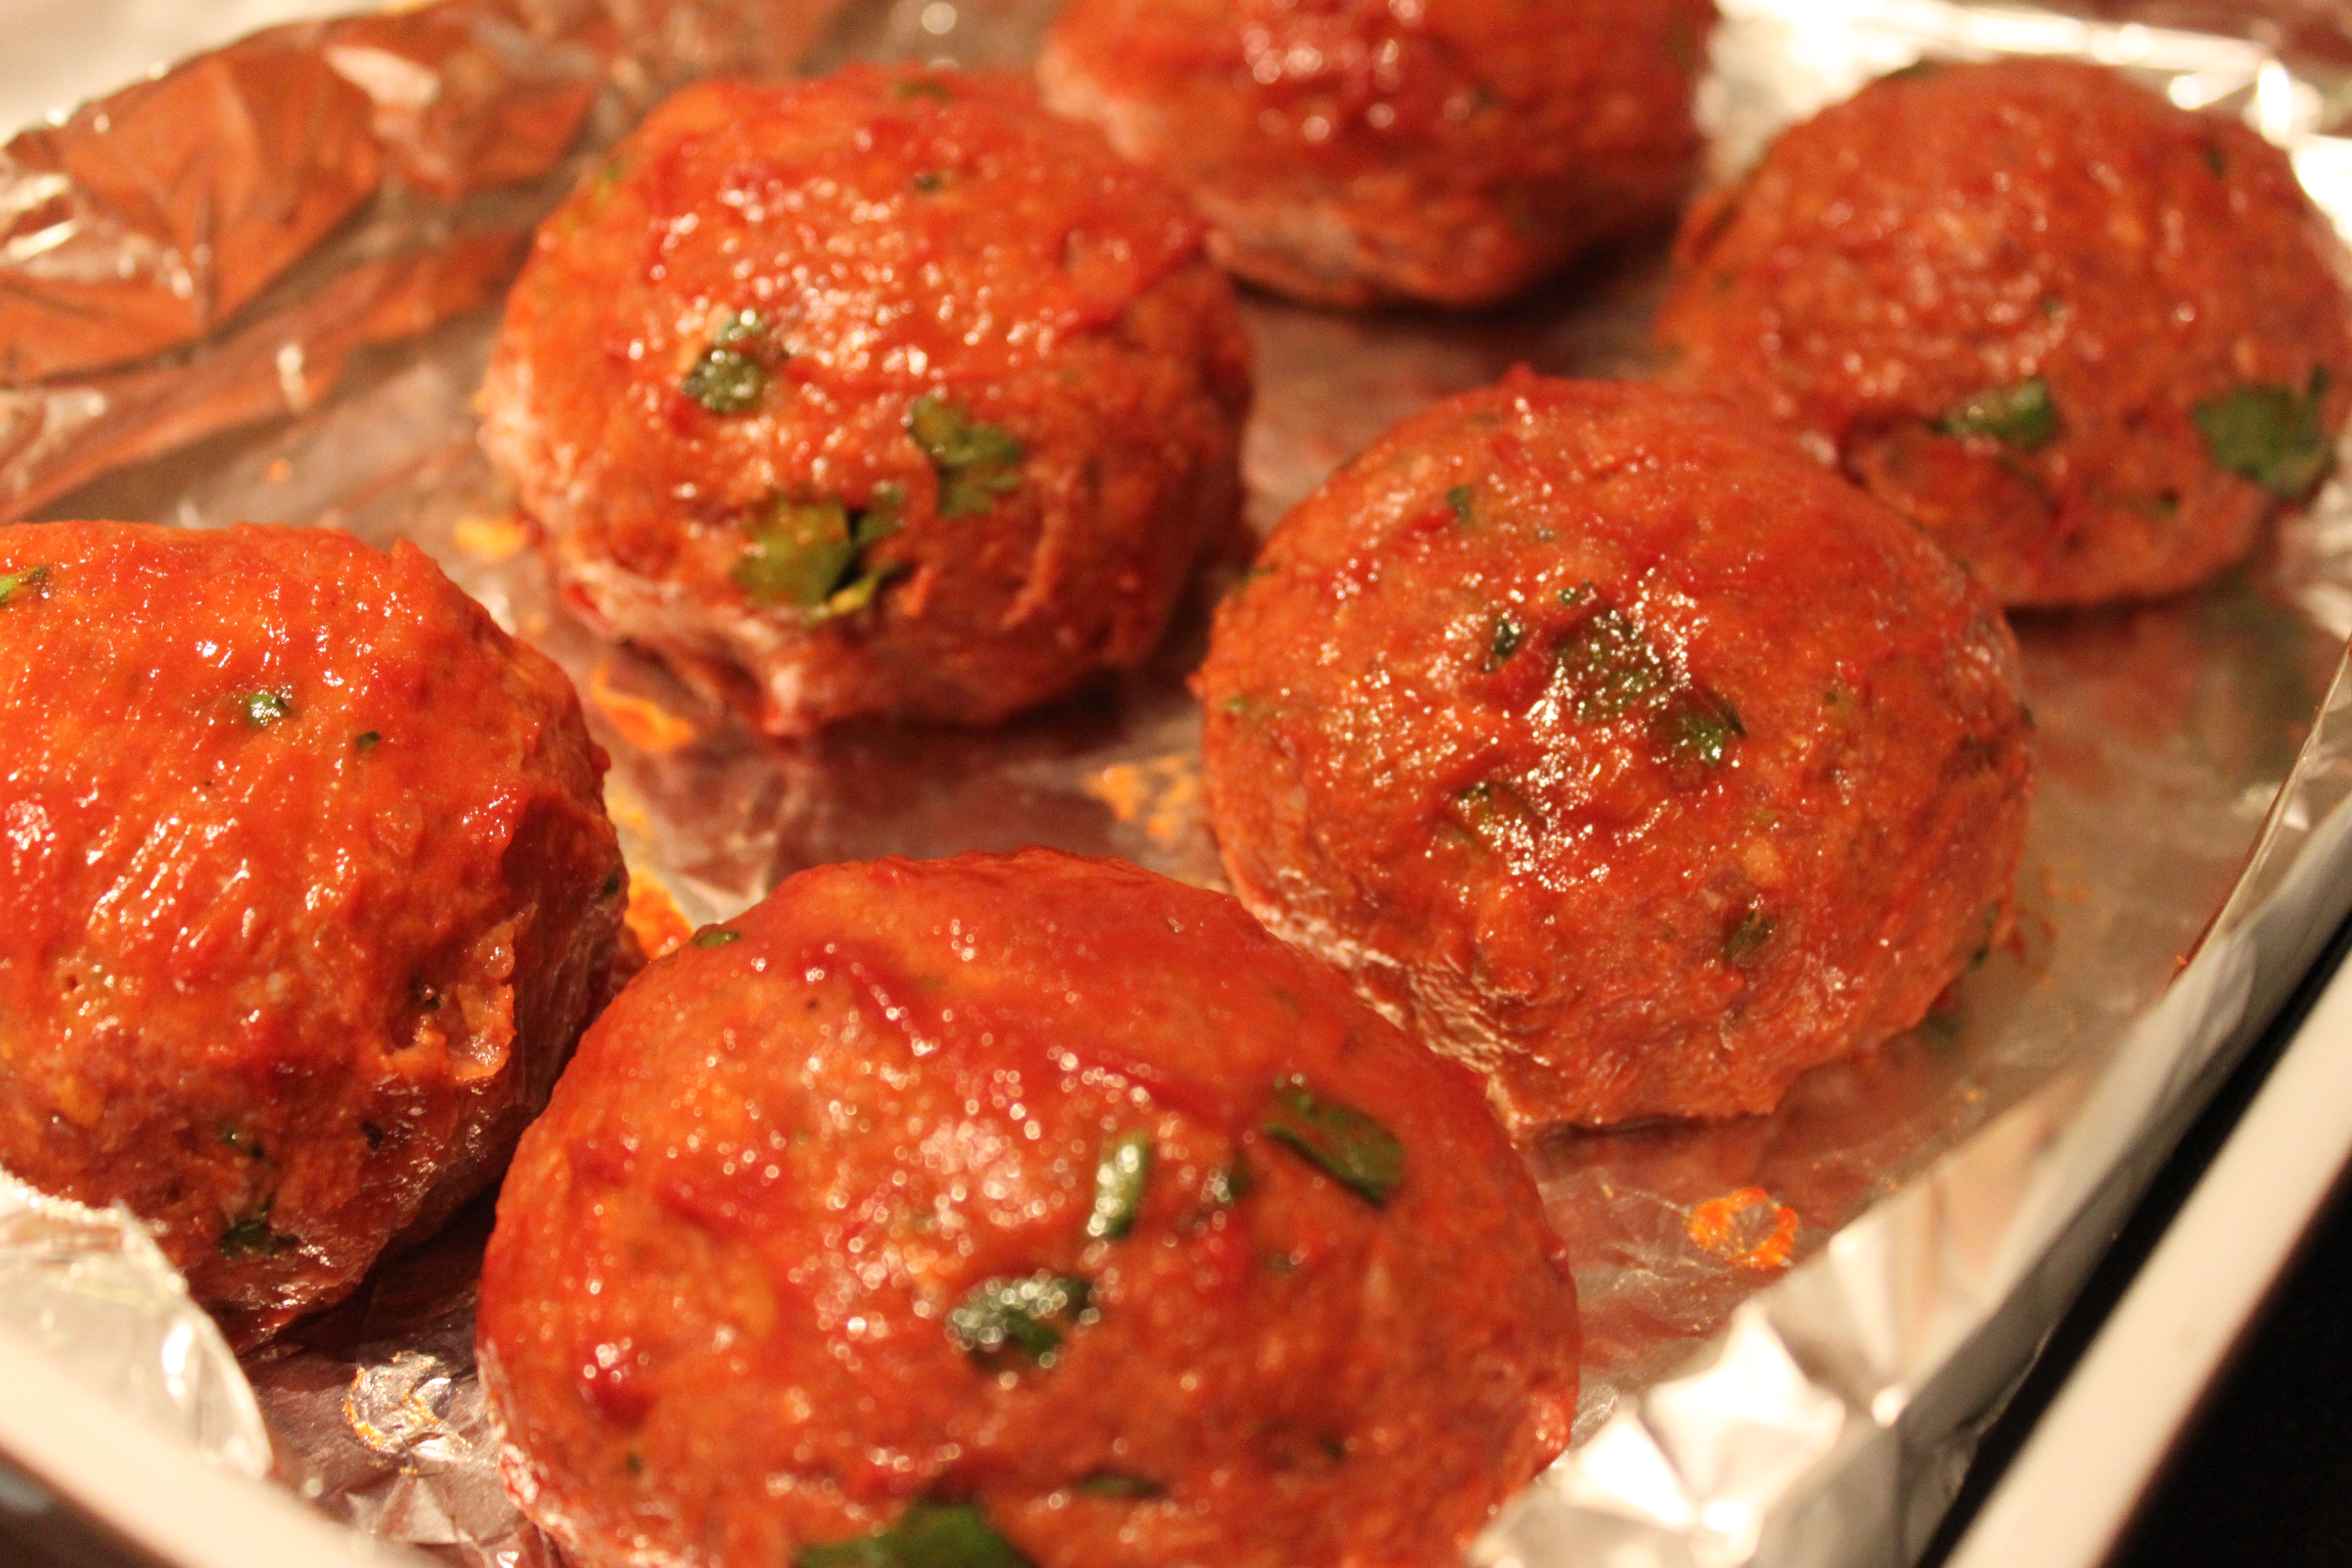
– Add the cooked vegetables to large bowl with bread crumbs, then add the remaining ingredients. Hand mix the ingredients together, then form the mixture into twelve 3-inch meatballs, each will weigh about 4 ounces.
– Space the meatballs in a baking dish so they are not touching. Drizzle or brush each meatball with a teaspoon or so of the tomato glaze.
– Bake the meatballs until cooked through, for approximately 20 to 25 minutes. By using an instant thermometer inserted into the centre of the meatball, a cooked meatball will register 160 to 165 degrees.
– Adjust the oven temperature to 400 degrees and let the meatballs “brown” for approximately 5 minutes
– To serve: Serve with remaining glaze on a bed of garlic mashed potatoes and zucchini “noodles” on the side.
***Ms. Deb Perelman served the meatballs with her brown butter mashed potatoes; I’ve made my own version with way less butter, almond milk (instead of buttermilk) and added garlic. Recipe for the simple zucchini noodles posted separately.
Notes: Always remember to cook ground meats thoroughly! I opted to “brown” the meatballs for an extra 5 minutes and it was a perfect finish. Adjust the breadcrumbs and quantity of milk according to need, the meatloaf mixture should feel “moist”, not runny; adjust the seasoning according to your taste and dietary needs. Enjoy!