Feeling a little sluggish after the holiday meals? This is my simple and easy home remedy for digestion and water retention. I usually take it late in the morning and never exceed a cup a day for a short duration when I feel it is necessary.
A month ago I had a pretty bad dry cough, I made this drink and it also helped to soothe the sore throat and get rid of the “dryness” we often encounter here in Vancouver during the winter season.
I remember as a child we had a lot of barley drinks particularly in the hot summer months, the taste and the feeling of comfort is deeply ingrained in my memory.
Same as any other herbal remedies, please use sparingly and according to your needs. Pay attention to your body’s reactions and always check with your physician if you are unsure.
Ingredients:
1 litre of filtered water, 1/3 cup of red barley, 1/3 cup of pearled barley, 1 medium singo (korean singo) pear and small handful of goji berries (optional)
Method:
Peel and core the pear, then cut into chunks
Rinse and clean the barley, you can mix them together
Put all ingredients in large pot and bring to a boil, then simmer for 25 to 30 minutes.
Strain the liquid, store in glass container and refrigerate after it cools down
Notes:
Can be served hot or cold; I prefer to take it as a hot drink
Store barley in tightly sealed glass container in refrigerator
Fall has always been my favourite season ; I simply love the colours, the weather and the beautiful and delicious local harvests! I was overly excited and overextended myself a little with Thanksgiving family dinner and cooking classes (which I love!), I ended up catching a cold. Yikes! Changing seasons is a very tricky time period, we should all be extra mindful in taking care of our bodies in order to prepare for the long winter season ahead.
Snow Skin Mooncakes! I finished “third” place in the “mooncake beauty pageant”
A couple of months ago I came across True Nosh through Instagram, what I found intriguing about True Nosh is their focus on “no added sugar” cooking! Coming from a family with history of diabetes (on my maternal side of family), I thought I could learn something new to even further reduce the usage of sugar in foods prepared for my family.
I browsed through their website and signed up for the Chinese Green scallion cake (one of my favourite Chinese snacks) class; I think most of you by now know “working with dough” and cooking Chinese food is not my strong suit (Ha ha).
The class focused mainly on demonstration by owner and certified dietitian Ms. Renee Chan; only a small part requires hands on participation.
What is no added sugar cooking? Ms. Chan finds a creative way to use the natural sweetness from fruits and vegetables to replace refined sugars in traditional cooking. A lot of restraint is exercised by limiting the quantities so sugar content is lower and the dishes are lightly sweetened.
The menu for the evening also includes braised beef shank (which goes very well with the green scallion cakes) and mango mochi (without added sugar) as dessert. The dough was proof ahead of time by Ms. Chan and her team; the six class participants helped to roll out the dough and shaped the actual pancakes while Renee would cook and teach us Chinese (simple Chinese words in Cantonese and Mandarin) at the same time, she certainly made it fun and relaxing for everyone.
What did she use to replace the refined sugar? A small quantity of chopped red dates and apricots were used to create to a paste and added into the braised beef shank (picture not shown) as sweetener. (The usage of this ingredient was featured at another vegetarian/vegan class which I attended later – see below). After a most enjoyable evening, I decided to sign up for her “moon-cake making” class.
The second class was held at her newest location (West 7th avenue and Ontario Street, very close to Main), Renee and her team prepared all the ingredients and dough ahead of time, and participants only assemble and created the moon cakes with the beautiful tools provided. For the filling she has selected lotus (paste made from seeds) and red date (paired), mung bean and apricot (paired), red bean and purple yam to create the fillings, green tea powder and saffron were used as natural food colouring to change the “skin” colour. The textures and flavors are definitely different from store-bought “snow-skin” moon cakes, it is more rustic and not as sweet.
Renee and her team are helpful and friendly, I had the best time chatting with her about cooking and travel! Her family was also present that afternoon and I was delighted to have met her mother, the atmosphere was very warm and personal. All recipes were sent to participants via email with nutritional information.
Her company also offers a range of sauces and condiments with funky names and interesting flavor profile for Chinese cooking. Check out her website for more information. Thank you Renee and team for the connecting, see you at one of your classes another time!
I like her overall concept and support for a good cause (ending diabetes); and I am already thinking how I can introduce this “no refined sugar” method to my family and friends. I do think this a better option however it is still important to exercise personal judgement and stay well-informed on what suits your own dietary needs….As I always say, always cook with lots of care and love.
Learn and Nourish at Workshop Vegetarian Cafe (296 Pemberton Road, North Vancouver, BC)
My favourite dish : Kabocha and Corn Soup with crispy grains…created by Pokeman Vancouver !
In the past couple years more vegetarian and vegan restaurants have opened up in Greater Vancouver, even regular restaurants now offer more vegetarian and vegan options. Most of their flavor profile tend to be either Mediterranean or Middle eastern inspired, there are only just a handful of authentic Asian-flavored ( Chau Veggie Express) centric vegetarian friendly eateries operating in Vancouver.
The Workshop Vegetarian Cafe opened in 2016 and they well-known for their creative veggie bowls and signature ramen creations. Owner Tak and his wonderful team have created a Japanese menu featuring fresh seasonal and local ingredients. This delightful gem is very welcoming and cosy; it offers a complete vegetarian menu, with gluten-free and vegan options available; inside they operate a “corner shop which sells produce, frozen noodles (their in-house made udon/ramen), vegan and gluten-free condiments. I first visited this cafe in September 2016 with my friend “Kanekic” and really enjoyed their avocado toast and ramen.
I came across their workshop information through Instagram, apparently they have started to offer special workshops almost on a monthly basis with different themes.
On a beautiful Sunday morning I attended their sake kasu workshop, the focus is on the explanation and demonstration of key ingredient “sake lees” used in four recipes (which was given to us also), and a special five course lunch was included afterwards.
The demonstration was hosted by one of the chefs Oku-san, who is from Artisan Sake Maker at Granville Island, Canada’s first local sake maker (opened since 2007). You may ask what is sake kasu? It is the lees left over from sake production; it is a versatile ingredient which can be use as a marinade or pickling agent, adds lots of flavor to soups and sauces. If you taste the kasu on its own, the flavor itself is actually quite strong, so very little is needed in all applications.
In the demo class he taught us how to create of amazake (Japanese New Years drink), Vegan Chocolate Banana Smoothie, Miso Marinade and Vegan Mayonnaise; we all get to sample them afterwards and we were all given a small tub of sake kasu to take home for our cooking experiments.
Sake Kasu Vegan Mayo – tasty!
The biggest surprise came when lunch was served; Oku-san and his friends, three other experienced chefs who work at different establishments in BC, they collaborated and created an exquisite five course lunch which exceeded my expectations. The meal was perhaps could easily ranked as the best vegetarian I’ve had in Vancouver, it is so wonderful to see we have high calibre chefs collaborating together and showcased not only their individual talent, but their superb team work; as a home cook, I left with not only a full stomach but also a very inspired mind.
I will be returning in November to attend a dashi-making workshop, I simply look forward to see what they have to offer next time. Meanwhile if you are unable to make it to Vancouver, check out their postings on Instagram; their feed is very positive and inspirational. Thank you very much Tak and team for the inspiration!
Follow mefor more recent updates; remember always adjust the seasoning and ingredients according to your own and loved ones’ dietary needs, and the most important ingredients, COOK with LOTS of LOVE and PATIENCE (OO).
One pot suppers season is back in full swing!!
If you have been following my Instagram accountyou probably notice my claypot has been making a few appearances in my feed since late September…
This month is all about Japanese comfort foods: Matsutake-Chanterelle mushroom rice, Japanese Oden stewand my take on the popular homestyle dish Niku-jaga, which literally means “Meat and potatoes” – I named my dish Cauli-Niku-Jaga (see picture above).
The cooking method for the “jaga” is exactly the same as the making of a regular Niku-jaga with a couple minor tweaks: barley fed pork belly slices were used instead of beef, the addition of two vegetable component : edamame beans and cauliflower florets were added (1-1 cauliflower-potato ratio and about 1 cup of beans); I have also changed things up a little with the meat stewing process. To soften meat I usually use orange juice, the usage of sugar to soften the texture of the meat is a more suitable and great tip from Chef Masa from Masa’s ABC Cooking.
Ingredients and Preparation (2-4 people): (Part of Recipe adapted from Masa’s ABC Cooking)
200 grams of thinly sliced pork belly (Sliced in half, marinade in 1 teaspoon of coconut palm sugar(*my preference only) and 1 Tablespoon of sake for 15 to 20 minutes, set aside)
Prepare all the vegetables: 1 onion (medium size, sliced), 4 potatoes (I’ve used medium size creamer potatoes (usually russets are used) – quartered, edges slightly”peeled”*to prevent breaking up while cooking, in Japanese the method is called “mentori”, then soaked in water for 10-15 minutes, drained), cauliflower (florets – about 1 1/2 cups (to your liking, chopped about same size as carrot), 2 medium carrot (peeled and chopped in rolling wedges, size slightly smaller than potatoes because it takes longer to cook), 1 package of shirataki noodles (blanched, rinsed and drained), 1 cup of edamame beans (frozen and shelled – blanched then shocked in cold water, drained and set aside)
Prepare the dashi stock (recipe in my archives or you can use water) – 700 to 800 ml (I usually make extra just in case I need more, it not available, just use water).
Measure the seasoning: 3-4 Tablespoons Tamari or organic low sodium soy sauce (*can be substituted with regular soy), 3-4 Tablespoons sake, 2 Tablespoons of Mirin, 1 Tablespoon coconut brown sugar (**can be substituted; this is my preference)
Cooking Process all in one:
Over medium high heat, use a large pan (a braiser would be excellent, I used a Japanese donabe) and add 1 teaspoon of vegetable oil (something neutral of your choice – canola or grape seed oil), saute the pork slices until slightly browned, removed from pan and set aside.
Add slice onions and carrots, saute until they slightly browned.
Add potatoes to the pan, gently mix well with onion and carrots, then add the drained shirataki noodles, continue to saute, make sure the shirataki noodles do not lump together and do not mash the potatoes.
Add dashi stock to pan; make sure you have enough stock to cover all ingredients
Once it comes to a boil, turn the heat down to medium and skim off the scum. Add seasoning to pan, stir and mix well. Cover the lid and let ingredients cook for approximately 6 minutes.
Remove the lid then add pork slices, make sure the slices are evenly distributed, then sprinkle the cooked edamame beans. When meat is cooked, taste and adjust seasoning if necessary. Remove from heat and let it stand for while before serving, the ingredients will absorb the flavours!
***Note: This is the step which I have tweaked to keep the meat tender. You can watch his original video for his method and wonderful cooking tips (Masa ABC cooking on YouTube )
If you want a thicker sauce, you can turn up the heat and the sauce will reduce if you cook it a little longer.
For this dish the most difficult part would be balancing the sweetness and saltiness; just keep tweaking and you will find the balance to your liking, remember it also depends on what kind of sweetener you are using. Do not make it overly sweet!
My sources in Vancouver for ingredients: Nikuya Meats (for the pork slices, in Richmond BC), Sakura-ya (517 East Broadway, Vancouver, BC) and Whole Foods (various locations – for Delta’s Fraserland Farms Creamer potatoes).
You know Fall is here when matsutake mushroom (Japanese pine mushroom) becomes available; this year I changed things up a bit and added chanterelle mushrooms, and voila it really works. Remember back in August 2016I recommended Food Video Channel (in Mandarin Chinese) on YouTube (also on Wechat, Weibo) ? Well the chanterelle mushroom mix idea is also from one the videos I watched on that channel, apparently somewhere in Yunnan province chanterelle mushrooms are also available and they usually saute them together with Chinese ham.
It is very difficult to purchase high quality cured ham here in Vancouver; last Fall I experimented with Italian cured pork jowl “guanciale” and lay them underneath the rice, then topped with sliced (torn actually) matsutake (doused with little sake earlier) and the kombu (kelp from the dashi making). When rice is almost cooked (with approximately 10 minutes remaining), I used organic unsalted butter to saute the remaining mushrooms then add to the rice cooker and let everything finish cooking together. It worked beautifully and my family totally loved it.
This year I added the chanterelle mushrooms (thanks to a trip to Vancouver Farmer’s MarketI got the fresh chanterelle) to cook with everything else initially in the rice cooker, repeat the same organic butter saute finishing process. The chanterelle mushrooms were quite difficult to clean, however it added another depth of flavor to the rice and the results were beyond my own expectations.
Because the mushrooms are quite expensive, I use them sparingly. For 3 cups of rice (I used Haiga rice), I use approximately 1/2 to 1 lb of mushrooms (depends on budget, grade and availability).
I used the rice cooker for convenience because my Zojirushi has the “Mixed Rice” setting; the rice is also cooked in homemade dashi, with the standard soy sauce, mirin and sake seasoning (3-2-1 ratio which works very well – always adjust according to your own taste).
My “hybrid” version (that’s what my friend “mydoctorgreen”called it) tries to retain the nuance of the original concept, keeping things simple without over-seasoning, just adding another layer of flavor to enhance and showcase the star ingredient, the matsutake. The chanterelle also did not overpower and they co-existed together harmoniously.
Important notes: Remember the guanciale is a little salty so factor that in when tasting. The rice should be cleaned and soaked prior to cooking; because you are adding mushroom, reduce the water (my experience at least 1/4 less liquid) and the guanciale should be removed before serving. This mushroom rice simple recipe should work well with shimeji and maitake mushrooms also, be adventurous and experiment.
It tastes as good as it looks (OO).
My source for Matsutake mushroom in Vancouver: Fujiya Japanese Food Store on Clark Drive (East Vancouver).
Japanese Oden with Umeboshi flavoring – Recipe adapted from Masa’s ABC Cooking
My Japanese friends taught me how to make oden a long time ago without any specific recipe; just like any regular home cook/hobby chef, sometimes we just make something “on the fly” based on our existing knowledge. When I try to make a new dish, I like to research a few recipes, apply my own skills and tweak things to our tastes, hence the creation of “hybrid” food (like my cauli-niku-jaga).
I don’t get to make oden very often at home because my husband somehow must have experienced a childhood episode which may have scarred him for life, he finds the idea of having oden repulsive. Well that being said, I would cook it for myself when he happens to be away on business trips (Ha ><). The most recent creation happened a couple weekends ago when my friends came over for a gathering.
Recently I have been watching Chef Masa’s channel quite a lot; been busy comparing and tweaking my own recipes, learning new tips and applying new techniques. Changes are also made according to our preference and dietary needs! The more I study about cooking, the more I love it.
This is what I truly love to do during my down time at home.
I highly recommend you to watch his original video for wonderful cooking tips and methods.
This dish is really great for cold weather and the recipe is good for 2 people, be sure to try it out this winter!
Ingredients and Preparation for Soup base: 500 ml homemade dashi, 2 Tablespoons Sake, 1-2 Tablespoon Mirin (I used 2), 1/2 to 1 Tablespoon tamari (*my preference, use regular soy and don’t add too much because it will darken the soup), 1 teaspoon sugar (**I used coconut palm sugar) and 1/2 teaspoon sea salt.
Add all the above ingredients in this particular order to the claypot (Japanese donabe), taste and adjust accordingly.
Oden Ingredients and Preparation:
Japanese daikon radish (peeled skin, sliced approximately 4 cm thickness, then use small knife and smooth the edge of the daikon (Mentori method as mentioned and used for the potatoes in previous recipe) – mark an “X” cut in the middle (do not cut through completely), using medium heat, at radish slices to cold water, bring to boil and cook until soften. While daikon is cooking, prepare the other ingredients. Check on the daikon periodically, when cooked through and softened, remove from pot gently and set aside.
Enoki Mushroom: 1 small package, ends cut, set aside.
Napa Cabbage : a small one would do, washed, sliced to bite size, blanched, drained. Lightly squeeze excess water when napa is cool enough to handle.
Japanese firm tofu (approximately half a box, 200 g – slice into squares. Using medium heat, brush the pan lightly with vegetable oil, sear and brown all sides of the tofu lightly. It is easier to handle by using a small pair of tongs.
Japanese konjac (konnyaku): 1 small package, cut into square pieces (approximately 2 cm thick), lightly scored both sides (think Cuttlefish Chinese way, the konjac will absorb the flavor). Then sliced into triangular pieces. Parboil konjac in hot water to get rid of the “fishy” taste, set aside.
Kombu (kelp): The cooked kelp from the dashi making can be added to the oden. Rinse and lightly scrub off the “sliminess” without breaking the kelp, cut into trips and tie into a bow shape.
Chikuwa (tube like fish cake purchased at Japanese food store) stuffed with asparagus: 2 pieces of chikuwa and 2 -4 stalks of asparagus (ends trimmed, blanched, shocked in ice (to keep color) and stuff inside chikuwa. If the asparagus stalks are really thin, you may need two for each chikuwa). Slice each chikuwa into 3 pieces, place 3 pieces of chikuwa on each skewer.
Eggs (2 large eggs) – boiled and peeled, set aside.
Lay all ingredients nicely and get ready to cook in the donabe which you have used to prepare the soup base earlier.
Using medium low heat, keep the soup base in a simmer and add 2 umeboshi (store bought pickled plums – removed the seed); put the napa cabbage, daikon, cooked egg, konjac, tofu and kombu in this order. Turn up to medium high heat, cover with lid and cook the ingredients for approximately 4-5 minutes.
Remove the lid (be careful as it will be very hot!), check the ingredients and if necessary, cover again and cook for another 2 to 3 minutes.
Remove the lid (again be careful) and gently add the chikuwa skewers and enoki mushrooms. cover again and cook for another 2 to 3 minutes.
The Delicious oden should be ready…once you open the lid, steam will come through and you will see a nice bubbling action; hear a “bub bub bub bub bub” bubbling sound…and smell a whiff of the pickled plums flavor….
**My Verdict: Chef Masa‘s idea of adding umeboshi to the soup base adds freshness and slight “tartness” which my friends and I enjoyed immensely. This is such a wonderful idea which I am trying to work into other recipes. Thank you Chef Masa for all your cooking tips!
Notes:
In the video he made Japanese napa cabbage rolls; I didn’t want any meat in this dish so I did not replicate the recipe. The cooking time will definitely be slightly longer if you include the cabbage rolls. Other fish cakes (can be purchased at Japanese deli) and Mochi bags (kinchaku – mochi stuffed in fried tofu skin) are great oden ingredients. I avoid eating processed foods so I may skip the chikuwa next time.
I have a bigger size donabe so I was able to cook more ingredients at the same time, and I prepared more dashi.
**Potatoes and Daikon have sharp edges which need to be removed before cooking, otherwise when the pieces cook together in the pot, they will start rubbing and it will cause breakage. The method is called “mentori”.
My sources in Vancouver: Fujiya (Japanese food store on Clark Drive in East Vancouver), Sakura-ya (East Broadway and Fraser in East Vancouver).
I have taken many cooking classes, however this is the first time I came across a knife sharpening workshop being taught in Vancouver.
I am completely clueless on this subject matter; I usually hone them with a steel (learn through YouTube and not sure exactly what I was doing) and take them out for service when required.
Our kitchen knives are our best friends; they are the most used tools in the kitchen, come to think of it, we spend a lot of time prepping our ingredients!
You may think these days we can practically learn almost anything on YouTube, so why a workshop?
It is a personal decision based on the way how I learn, I also happen to enjoy exchanges and connections with people in general (at times flipping between being an introvert and extrovert).
On this particular subject matter, I have tried to watch videos, I realize I need to see first hand in reality how it is done with instructions and thorough explanations.
So two weekends ago on a Sunday morning I overcame my fear (of the unknown) and spent two hours, together with three other students, learn about the basic principles of knife sharpening through Vancouver Chinatown’s Ai and Om Knives‘ ; the workshop was taught by local chef and shop owner Douglas Chang.
Ai and Om Knives carries a curated selection of Japanese knives and accessories; the first time I came across this specialty shop was actually through Instagram. When they opened last summer in August (official opening in October), I paid a visit and purchased my treasured nakiri bocho , a Japanese knife specifically used for cutting vegetables. My first experience at the store was very pleasant and positive so I subsequently subscribed to their newsletter.
I was truly elated when I saw their workshop schedule recently, I signed up immediately through email without any second thoughts.
My Nakiri bocho, the perfect fit
On the day of we all brought their own knives for sharpening, fees were paid ($75.00 for the session) before the workshop started and I also purchased the split whetstone (discount given to students who signed up) , I was a bit scared and I was all ready to go, not knowing what to expect! The workshop was taught at the back of the shop where our “sensei” (teacher) spent the first half explaining clearly the technical terms and principles; he later proceed with a demonstration and sufficient time was allocated for our own hands on practice.
I admit initially I was overwhelmed and didn’t know where to begin as there were just a lot of information to remember and understand; in the spur of the moment I decided not to overthink and calmly focus on what our “sensei” has explained earlier, breaking it down step by step (the precis writing skills acquired back in secondary school really helped to pick out the “Key” words and points) and slowly got into it. Although the technicalities are very important, if we put all things aside, the process itself is actually very simple and rustic, it just comes down to the knife, the stone, your own concentration and focus.
Personally at that moment the lesson transcended into something more enlightening, I was engaged in a short “self-realization” journey, directing my own focus to be “in the moment” and learn how to appreciate the simplicities in life. I found the process to be very calming and therapeutic, I enjoyed it tremendously, much to my own surprise.
I was enjoying the process and did not even think of the results until it was time for the true test to see if I achieved what I was taught: to test and see if the knife will slice through paper effortlessly. I was absolutely thrilled when my nakiri “swished” through the paper….. I was more excited about the fact that I overcame the fear of another “unknown” .
I am not going to get into the details of knife sharpening as I have only learnt the basics and currently digesting what I have learnt; I assure you the session was informative and in the end you will be equipped with enough basic information to start sharpening your knives at home, and gained a better understanding of the art of knives and sharpening techniques. Hats off to local chef and owner Douglas Chang; he is very knowledgeable and articulate speaker who shows great patience and exerts a calming presence. Thank you very much for a very meaningful and eye-opening lesson.
My other thoughts on this experience: Never stop learning and practice definitely makes progress! Take good care of our kitchen tools will definitely help us to become more efficient with our meal preparations; improved efficiency will ease our minds, our focus will become clearer, and time will then be saved.
And time, perhaps is the most precious gift, spending time together with family and friends is the true expression of love and care.
Note: Ai and Om Knives is located in the heart of Vancouver Chinatown, 129 East Pender Street. Besides selling knives, they also carries a range of accessories , provide knife sharpening services and hosting workshops. Check their website for more details.
PS Note to my dear friend James; My knives will always be sharp from now on (OO).
Mangiamo Bene! Prosciutto di Parma, Mortadella and figs, homemade salmon pate and bagna cauda, just a few of the dishes we enjoyed on our “Italian Night”
Over the Labour Day long weekend, I spent a wonderful Sunday evening with my pal James, hosting a group of our friends together at my home to our famous “Italian Night”.
For the past three years I always look forward to March and September when my dear friend James returns from Italy to Canada for a short visit; we have a semi-annual standing ” Italian cooking date”, a tradition which has a very special place in my heart.
Sweet and Special Delivery with love from Sabina, Casperia, Italy
Cooking and sharing with family and friends is the most beautiful way to celebrate relationships and bring people together.
That night we talked, we laughed, we cooked, we learnt and we shared; the memories we created together are priceless…
To my friends who joined us this time (you know who you are), it was great seeing you all and catch up, Grazie! And to our dear friends who missed the gathering this time (you also know who you are), we missed you.
To my dear friend and teacher James, I look forward to our next “date” in March, hope to continue this wonderful tradition for many years to come and one day we will be able to cook together in Italy…Alla Prossima…xxxooo
Remember the most important ingredients you will need to create a beautiful meal….Patience + Love + Kindness + Gratitude
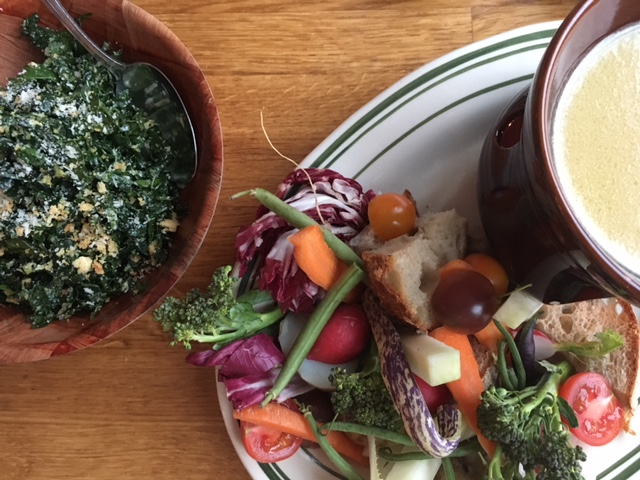
Bagna Cauda: an aromatic “hot bath” for fresh vegetables and bread
Have you ever had Bagna Cauda? It is a dish originally from Piedmont, Italy.
Fresh market vegetables, both cooked and raw, are dipped into a flavourful warm sauce, made of anchovies, olive oil, garlic and butter, enjoyed with scrumptious chunks of bread; this makes a wonderful sharing and wine-pairing dish for any dinner gathering, particularly during Fall Harvest Season.
I’ve only had this dish in restaurants twice here in Vancouver, once a few years ago enjoyed a Japanese “miso” version at Rajio (Izakaya on West 10th Avenue in beautiful Vancouver), and most recently a beautiful rendition at Osteria Savio Volpe.
Bagna Cauda (right) at Osteria Savio Volpe : my inspiration
It sounds very good already right? The even better part, it is not difficult to make.
The key to make a beautiful bagna cauda is having the freshest ingredients and you are already halfway there; the rest involves a lot of meticulous cleaning and chopping! Oh one more thing… a fondue pot will be handy to keep the sauce warm. I actually didn’t have the pot, so I just heated up the sauce right before dinner starts so it was ready to go when we were ready to eat!
I have roughly based the sauce recipe on Epicurious; for my version I have reduced the quantity of the butter and anchovies (trying to be more health conscious by reducing the fat and salt intake). Once you type in “Bagna Cauda”, you will be able to find many different versions for this classic Italian recipe (see alsoFood52 detailed write-up on its background and recipe).
Ingredients for dipping sauce: 1/2 cup – 3/4 cup of extra virgin olive oil, 4 Tablespoons unsalted butter (room temperature), 6 – 8 cloves of garlic (chopped), 8 – 10 anchovies fillets.
Preparation: Blend the anchovies, garlic and olive oil in the blender until smooth.
Pour mixture into a medium saucepan and over medium low heat, cook the sauce for 15 minutes, stirring occasionally. Cook until the garlic becomes fragrant, you must pay lots of attention garlic burns easily, you don’t want to brown it. Before removing from the heat, stir in the butter until blended nicely.
Taste and season with pepper (if you like) and sea salt (if necessary, remember anchovies are quite salty).
Serve raw or cooked vegetables and bread; I prepared a tray of fresh vegetables (picture below) purchased from the farmer’s market: a selection of beans, tomatoes, cucumber, carrots, cauliflower and peppers.
My version of Bagna Cauda: All the goodness in a Huge bowl – Fresh in season vegetables purchased at the Farmers Market
Stringozzi with Peas, Pistachios and mint sauce
We put all our friends hard at work this time making Stringozzi together!
Stringozzi is an Italian “peasant” pasta, the shape of the noodles resemble shoelaces; all you need is water and some finest Italian “00” flour (we used “Caputo 00 flour” – see Saveur’s magazine article)
The noodle making process involves everyone’s participation; our “pasta master” James mixed the flour and water and we help a little to knead the dough. The dough is then put in the refrigerator to rest (wrapped in plastic wrap tightly, rest for about 30 minutes to an hour). We then take turns pulling the dough until it smooth (this is the most physically demanding part) and you can feel the “elasticity”. When the dough is ready, we cut into small pieces and divided it amongst our group to “roll” out the pasta by hand. We have to sprinkle a little flour on the noodles when we gather them together to keep them from sticking together. The noodles are actually quite delicate and a bit chewy, my friends said they resemble a little like ‘handmade’ udon.
Prepare a large pot of salted boiling water to cook the pasta, the noodles actually cook quickly (just a few minutes) and you have to stir a little while cooking. Do not “crowd” the pot by putting too much noodles all at once.
When the noodles are cooked 3/4s of the way through, transfer to the large pan already filled with the sauce of your choice, toss gently together and let the noodles to finish cooking through. Please DO NOT toss out the pasta water, you will need to use it to adjust the thickness of the sauce.
Kneading, pulling, rolling and now ready to cook!
My friend James created a “pesto” sauce – a mixture of sweet gorgonzola, peas (we used frozen), basil and pistachios, all blended together smoothly in the food processor. The sauce was transferred and cooked in a very large pan, use the pasta water to adjust the thickness of the sauce, when pasta was almost ready toss them into the pan and mix well, let the noodles cook through.
In the past we have created Stringozzi all’amatriciana (click to see recipe on Serious Eats – Tomatoes (preferred San Marzano), guanciale, red pepper flakes, wine and pecorino romano cheese ) which is one of my all time favourite.
Peas, mint, sweet gorgonzola and pistachio “Pesto” with Stringozzi – Ricotta cheese can also be used for this pasta sauce.
Notes:
Unfortunately I don’t have a specific quantity for this pasta recipe; I came across a general recipe which is very similar to what we have created on this blog: Madonnadelpiatto
If you are ever interested in learning how to make pasta, my dear Italian friend Peter (Pastaboy) is a wonderful teacher, click on his name for more details.
Here are some of the dishes which I have been cooking at home in September! Autumn is definitely my favourite cooking season (OO)
This month I am featuring three recipes which you may have seen on my Instagram account @mygoldenapron
Follow me for more recent updates; remember always adjust the seasoning and ingredients according to you and your loved ones dietary needs, and the most important ingredient, COOK with LOTS of LOVE and PATIENCE (OO).
Italian style Tomato, Green beans and Potato Salad (Adapted from September 2016 edition of Food and Wine)
I have adapted this simple and nutritious recipe from last September’s Food and Wine magazine; every six months when my dear friend James return from Italy to Canada for a visit, I always go through an Italian cooking phase!
Ingredients and preparation: You can change the produce according to seasonality; I find the balsamic vinaigrette works very well with savoy cabbage and brussels sprouts, so use your imagination and work with the flavours.
1/2 pound baby potatoes: In medium saucepan, covered with cold water and bring to a boil, add a pinch of sea salt and simmer over medium low heat until potatoes are tender. Drain and let cool, then slice in half.
1/2 pound green beans (or any other colourful beans you can find at your local market) – trim the ends; bring a medium saucepan of water to a boil. Fill a large bowl with ice water. Add the beans and a pinch of sea salt and blanch until the beans are crisp yet tender, under 2 minutes. Drain and transfer beans to ice bath to cool. Drain again and dry thoroughly.
1 whole shallot – thinly sliced, you can use red onions or add more shallots
1 -2 ears of fresh corn: remove the husk (you can freeze and save it for later use to make vegetable broth) and silk, bring a medium saucepan of water to a boil, add corn , cover the saucepan and return it to a boil. Cook until corn is tender; drain and let cool. Place the corn on a clean cutting board, trim one end of the corn so it stands flat, use a knife to slice the kernels off the cob.
1 Tablespoon capers, drained and rinsed
1/4 cup chiffonade (thin strips) of fresh basil and 1/4 cup chiffonade (thin strips) of fresh parsley
1 pint mixed cherry tomatoes, halved
In a large mixing bowl, whisk 1/4 cup extra virgin olive oil, 2 Tablespoon balsamic vinegar and a drizzle of honey (optional). Add the potatoes, beans, tomatoes, corn, shallots and capers and toss gently. Fold in the basil and parsley, season with salt and pepper.
*To increase our vegetable intake, I added some mixed greens to the dish. When making a vinaigrette, use a good quality extra virgin olive oil.
A Healthier Baked Pork Chop “Rice” (with cauliflower, carrot, rice) with homemade tomato sauce with onions, red and green pepper:
Baked pork chop rice is one of my favorite childhood dish, I made a version of this Hong Kong style dish using boneless pork loin (from one of my favourite butcher shop Petes Meats crusted in toasted panko (panko precooked before breading the pork, method adapted from Ms. Namiko Chen’s Just One Cookbook method)
Prepare the Panko Crusted Pork:
Preheat the oven to 350 F (place oven rack on top).
I have chosen a good quality pork and pound it evenly, prepare the toasted panko (1 cup panko and 1 Tablespoon extra virgin olive oil (enough to coat two pork loins) – Combine the oil and panko in a frying pan, and toast the panko over medium heat, stir once in a while to ensure all panko bits are toasted until golden brown and evenly. Set aside and let cool down, keep 1 to 2 teaspoons aside and use as “sprinkle” when ready to bake the dish.
Let the toasted panko cool before you start coating the pork loins. Coat the pork loin one at a time: dip pork loin into beaten egg mixture, make sure you get rid of the excess egg mixture.
Using your dry hand, coat the loins with toasted panko. Lightly brush the flakes to cover the pork loin, then lightly press the panko flakes, make sure they adhere and the fillet is coated evenly. Place the coated pork loins on the baking sheet. Baked the pork loins until 3/4 ways cooked through (approximately 8 – 9 minutes). Remove from the oven.
Prepare the cauliflower, carrot and rice combination: I do not have specific measurements for this recipe, however for the two of us, I have prepared one cup of cooked rice (I used Japanese Haiga rice), 1 cup of finely chopped cauliflower, 1 small carrot (finely chopped) – First I cooked the rice in the rice cooker, when it is ready, remove from rice cooker and let it cool (you can use “overnight rice”). In a frying pan, add 1/2 to 1 Tablespoon olive oil (or vegetable oil), sautéed the cauliflower (you will need to add a little water otherwise it will burn, you will need to cover pan for a short time to “steam” and soften the cauliflower), add carrot when cauliflower is half-cooked, add the cooked rice and a pinch of sea salt (season to taste), mix “cauliflower rice” and rice very well, when vegetables are cooked through, remove from heat and set aside.
Prepare the Tomato sauce: You can use canned tomato sauce and add onions, red and green pepper. For my sauce, I used 1/2 teaspoon extra virgin olive oil to sautéed three medium size San Marzano tomatoes (I got from the Farmer’s Market, they are so flavorful: chopped and seeded), you can use more tomatoes if you want to make more sauce), 1/2 to 1 cup filtered water and a clove of finely chopped garlic. Using medium low heat, cook the mixture until tomatoes are soft. Turn off heat, working in small batches, spoon mixture into blender, remove the centre cap from the lid of the blender. Cover the lid with a folded clean dishcloth and hold it down when you are blending. Repeat until you are done.
Using the same sauce pan, add another 1/2 teaspoon of extra virgin olive oil to sautéed one chopped (bite size) onion until slightly caramelized. Add one chopped red pepper (thin sliced) and one chopped green pepper (thin sliced), cook for 1 minute, return puree tomato sauce to pan, mix well and using low heat, simmer until sauce is thickened (20 to 25 minutes), season with sea salt to taste.
Preheat the oven to 300 F. Using an oven proof casserole or baking dish, spoon the “rice” in the bottom, then add a layer of the tomato and pepper sauce, place the panko crusted pork loin, then spoon more sauce and cover the pork loin, make sure you have some onions on top, and sprinkle the remaining toasted panko. Baked in the oven for 8 to 12 minutes, or longer if you want the sauce to brown nicely, remember the pork loin must cook through.
***You can use the “broil” feature to really brown the sauce, cheese can be added to achieve a “bubbling” effect.
***The Extra Virgin Olive oil which I use for sauteed or stir fry dishes is suitable for everyday cooking usage.
Shiso Lemon Water: Recipe from YouTube “Food Video”
Pretty in Pink: Shiso Lemon Water
Since last year I started watching the “Food Video” channel on YouTube; this channel is based in Shanghai, China and feature some professional and home chefs.This channel is so much fun to watch: the videos are short and stylish; the cooking demonstrations and instructions are simple to understand.
Do you like shiso (perilla leaves)? It is commonly used in Taiwanese and Japanese cooking, particularly used to flavor and pickled plums, and often it will appear on your sashimi order. If you have read my other posting (August 2017: Cheesecake and Salad Rolls with Cooking Buddies), my friend Phung has shown us to add shiso leaves to homemade salad rolls; I have also used shiso in my duck breast dish (September 2014 posting).
Shiso has its medicinal benefits and two recipes are featured on this video: the one I have tried is a very refreshing drink, a great digestive aid and helps to reduce the “dampness” (Chinese medicine term) in your body. The flavor is very subtle and drizzle of honey is used to sweeten the drink. When the lemon juice is added to the purple shiso water, it changes into a very pretty pink colour.
I have made this drink a few times and I really enjoyed it! You only need three ingredients: fresh purple shiso leaves, lemon juice and a little honey (I used a drizzle of manuka honey).
Below is a translation of the recipe:
In a large sauce pan, add 80 grams of chopped purple shiso leaves to 1 litre of filtered cold water, bring to a boil and simmer for 10 to 15 minutes.
Set aside and let it cool.
Add 50 ml freshly squeezed lemon juice, the shiso water will start to turn “pink”.
Add a drizzle of honey as sweetener.
You can drink as is or add ice / ice water if you prefer the drink to be slightly diluted. Enjoy (OO)
Strawberries have a very special place in my heart: remembering when I was a kid and enjoyed very delicious strawberry french crepes for the first time in Hong Kong
On August 30th I will be on Ms. Deborah Moore’s radio show on Fairchild 1470, 1030 am sharp.
For more recent updates; follow me on Instagram: @mygoldenapron
Crescents – shadows cast through the trees, a bit moon like, a bit bat like…Picture taken at Olympic Village after the peak time for eclipse viewing on August 21st
From Richmond to Langley: Birak Berry Farm (4200 No. 6 Road, Richmond):
During the BC Day Long weekend, my friend “Kanekic” brought me along on a short tour at Birak Berry Farm with the owner.
We didn’t go berry picking, however it was fascinating to learn about the berry farming business briefly over a 1 hour short tour. She was very nice and patient and answered many of my questions related to berry varieties, seasonality, harvesting, equipment and processing; the entire operation is very extensive and more complex than I ever imagined! We went home with really sweet strawberries and blueberries; thank you very much again for the wonderful time and delicious berries.
The farm is open to public for berry picking, for information please check the BC Strawberry growers Association website.
Visit to Birak Berry Farm in Richmond; Thanks Kanekic for bringing me along! This photo was selected by Tourism Richmond and included in their album on Facebook. Thanks Visit Richmond!
Strawberry and Waffles at Krause Berry Farm (6179 248 Street, Langley, BC)
Two weekends ago I finally made it to Krause Berry Farm! As it is already the tail end of berry picking season, we only went for a short time to enjoy their delicious strawberries (Sweet) and waffles (Picture below, reduced whipped cream (trying to be good)) at their outdoors dining patio. The line up was quite long but the friend worked so efficiently we didn’t really have to wait long! The waffles were crispy, however I would definitely ask to have the toppings on the side next time. We quickly walked through their wine tasting room and spent a little time in their shop which is filled with goodies from their farm and a nice selection of kitchen ware (Danger zone for me!). The ambience is warm and friendly, I will definitely make it back much earlier next year. For their offerings and year-round schedule, visit their website for more information.
Strawberries and waffles…and I asked for less whipped cream…Fruit Wines and Sparkling at their Tasting Room
Premium Rice Donburi and Affordable Omakase at Tetsu Sushi Bar ( 775 Denman Street, Vancouver, BC)
Unagi Donburi: Love their premium rice!
Tetsu sushi baris a 14-seat Japanese sushi restaurant located on Denman Street (at Robson); I was first introduced to this small gem by my friends J and VG (A Big Thank you to both of you!). The experienced owners used to work in a well-known Japanese restaurant in Richmond; opened since April, lately this little gem is slowly building up their reputation and gaining some attention from local food lovers.
This friendly little place offers an extensive menu of cooked foods and very good quality sushi at reasonable pricing; their lunch sets in particular I find are of great value and the food quantity is in line with their pricing.
I have been to Tetsu on a few occasions for lunch and dinner, I am honestly hooked on their premium rice, which is only offered when you order their donburi (my personal fave is the unagi don). The aroma is enticing (I think I smelled konbu), the texture is not sticky, and you can pick up and taste each grain. My other favourite item on their menu is the Yamaimo salad with plum dressing, which adds an interesting flavor to the salad (I love Japanese dried plums and use them quite often in my cooking) and tastes so refreshing.
They also offer omakase dinners (basic start at $45.00 per person) which includes 3 kinds of appetizer, 5 piece daily sushi, inaniwa udon (cold or hot) and ice cream. For additional costs you can upgrade to premium 5 piece or 7 piece daily sushi; follow them on @tetsusushibar_van.
We shared many dishes including an upgraded premium omakase which includes the bluefin tuna (a very guilty indulgence I admit); the fish were very fresh and clean tasting.
The space has a very humble and neighbourhood feel, as seating is limited, it is more suitable for small gathering (4 at most to sit comfortably) and it is better to call ahead to make reservations.
Cold Inaniwa udon – a separate order! We had the hot udon with the omakase.Guilty – otoro, hirashi, houbou, aji and uni
Found on Instagram: Temaki Sushi on Arbutus:
I didn’t even know this restaurant existed until recently I saw postings popping up through Instagram.
I saw a very enticing sushi lunch picture on Instagram posted by a renowned Vancouver chef, so I decided to have lunch at Temaki Sushi one Friday afternoon.
Their in-house chef known as @sushi_hil has posted a lot of delicious sashimi pictures on Instagram, showcasing his skill and the offerings from the restaurant.
I was skeptical and nervous when I first walked in, the decor is nothing like a typical Japanese eatery.
It was a very busy lunch hour; I was greeted and seated promptly by a friendly staff.
I honestly didn’t know what to expect, I looked over the Specials Board and decided to go with what I have seen on Instagram (gut feeling), so I went with the nigiri sushi special, 8 pieces priced at $28.00. The fish was very fresh, there was offering of fresh wasabi (for a small additional cost) and the sauce for the aburi was light; this is definitely a personal preference as I am not keen on anything which is too heavy-handed.
When I finished my lunch and asked for the bill, I met another server (her name is Ellen) who was very friendly and started to chat with me, asking for feedback and tell me more about the background of the restaurant and its owners.
We often read a lot of reviews and ask for recommendations before we try out a new restaurant; often we would go in with a certain level of preconceived notion; if there is one lesson to be learnt – everyone deserves a chance.
In the last July weekend, I spent the entire Saturday cooking with my friends Jo, Phung and Rita (thank you very much for hosting).
I always learn something new from this trio and under their “supervision”, moi the novice baker completed the measuring and most of the mixing/whisking tasks, we successfully made a really fabulous Japanese cheesecake, based on Ms. Namiko Chen’s recipe from Just One Cookbook.
One important note: you must prepare and weigh all the ingredients, have everything organized and follow each step carefully. I find the most difficult part is folding the egg whites into the cream cheese mixture.
We actually skipped the glaze and the cake is still very tasty.
I posted the picture on Instagram and got a very nice reply from Ms. Nami. Thank you to my friends who supervised me through this process, and thank you Ms. Nami for sharing a wonderful recipe.
Try making it and you will love it !
For her recipe, please check Ms. Namiko Chen’s website:
We did it!! Under “supervision”, moi the novice baker managed to complete most of the complicated tasks ….Beautiful group effort, fabulous result !
Below you can see the fixings we prepared for our Vietnamese salad roll DIY dinner: fresh shiso, basil, mint and lettuce, rice noodle, dry rice paper, shredded chicken (from Costco to save time) and prawns, and Fried Egg, which is not seen commonly when you order the salad rolls in store. Our dear friend Phung made her own peanut dipping sauce (hoisin, peanut butter, water, vinegar); I haven’t had this much fun at a DIY dinner party for such a long time! My hubby came by afterwards and it was equally fun to watch him prepare his own salad rolls, I told him now we know we can purchase and use a salad roll wrapper tray (it is made of plastic, place rice paper on top), it makes it so much easier to prepare this at home! Another great tip from Phung: Dip the rice paper in hot water instead of cold to rehydrate the rice paper.
I found the rice roll wrapper tray at 88 Supermarket (in East Vancouver on Victoria Drive).
Rice Paper!All the Fixings on the Table….and Sparkling is perfect for this light summer dinnerMy first DIY salad roll loaded with vegetables and herbs (Shiso!)
Roasted potatoes, sweet beans, asparagus and BC wild stripe prawn cold salad with ponzu vinaigrette, Baked Halibut filet with toasted panko, Homemade Tartar sauce
Here’s what I have been cooking at home in August!
Since I am not professionally trained, I always love to learn and draw inspiration from others (professional or home chefs).
This month I am featuring three of my creations which you may have seen the pictures on Instagram already.
For first hand updates follow me on Instagram: @mygoldenapron
And remember, always adjust the seasoning and ingredients according to you and your loved ones dietary needs, and the most important ingredient, COOK with LOTS of LOVE and PATIENCE (OO).
Baked Halibut Filets with Homemade Tartar sauce: (Picture shown above)
I have adapted Just One Cookbook(love her cheesecake and other Japanese recipes) Ms. Namiko Chen’s toasted panko (for baked pork chop/chicken katsu) for my baked halibut filets; I actually skipped the flour and dipped the cleaned and skinned fillets in beaten egg and toasted panko only. Once the panko cooled down, add grated lemon zest (1 lemon), 1 teaspoon of sea salt and mix well, set aside.
Baked Halibut fillets: (ingredients: halibut fish fillet, panko, one lemon (for slices and lemon zest), salt and pepper)Pre-cook the panko before baking the fish fillets: For the 4 fillets, I have used 1 cup of panko and 1 Tablespoon of extra virgin olive oil. Combine the oil and panko in a frying pan, and toast the panko over medium heat, stir once in a while to ensure all panko bits are toasted until golden brown and evenly. Tremendous patience is required for this step. Let the toasted panko cool before you start coating the halibut fillets.
Preheat oven to 400F. Lined the baking sheet with parchment paper. Pre cut some lemon slices (using the same lemon which you used to get the zest) and placed them on the baking sheet.
I bought 4 filets (there were 4 of us) and total weighed approximately 1.5 lbs. Skinned the halibut filets (or you can ask your fish monger to take care of this), pat them dry.
Coat the halibut one at a time: gently dip each piece into the beaten egg mixture, make sure you get rid of excess egg mixture. Using your dry hand, coat the fillet with toasted panko. Lightly brush the flakes to cover the fish, then lightly press the panko flakes, make sure they adhere and the fillet is coated evenly. Place the coated fillet on top of lemon slices on the baking sheet. Baked fish fillets until cooked through (test using a bamboo stick or tooth pick, once it goes through the fillet easily they are done), approximately 12 to 15 minutes. Halfway through I turned the baking sheet around (for even cooking) quickly, and I checked the fillets quickly at the 10 minute mark for doneness.
Serve cooked fillets with homemade tartar sauce: I do not have any specific quantity for this recipe; I used the OJAI lemonaise (or any mayo) and Greek yogurt at 1-1.5 ratio, added some lemon zest, cooked corn niblets and takana (optional – dried radish leaves, rehydrated), sea salt and black pepper (a pinch) to taste. If you want to thin out the sauce a little, you can add a squeeze of lemon juice.
As for my bean, asparagus and prawn salad withponzu vinaigrette, I used a store-bought ponzu and add good quality extra virgin olive oil, a little rice vinegar and ground pepper for the vinaigrette (2:1 ratio oil/soy, most vinaigrettes 3:1 ratio oil/acid, I prefer less oily). I blanched the asparagus, sautéed the beans and boiled the small prawns (with lemon) quickly, then shocked them in ice and shelled them. When you are ready to eat, toss the ingredients together and lightly dress the salad (do not drench!!).
Note: Be creative with your vegetable selection, and remember always adjust your seasoning according to your dietary needs and taste !
Pork and Yamaimo (Mountain Potato) patties with apple ginger sauce, sautéed cauliflower, enoki mushroom and okra
I still cook a lot of Japanese food at home.
I adapted the patty and sauce recipe from the popular Japanese chef Masa (Masa’s ABC Cooking @masa.abc on Facebook) who resides in Taiwan. If you check his Facebook page, there are regular uploads of cooking videos with wonderful and clear instructions (for readers who can understand Chinese, it is in mandarin, Chinese subtitles on-screen). I love his idea of using yamaimo (mountain potato) with ground meats; the addition keeps the patties very moist! Chef Masa’s original is actually a chicken patty donburi recipe (with okra and eggplant), I created a dinner set and served with cauliflower, enoki mushroom and a dairy free chilled potato leek and watercress soup.
Pork Patties: organic /hormone free ground pork 250 g, 1/4 of yamaimo (mountain potato, grated), grated ginger, 1/2 teaspoon sea salt, 1 egg, 1 stalk green onion (chopped), grated ginger (1 teaspoons), 1 Tablespoon tamari****, 1 teaspoon maple syrup***, pinch of white pepper for season, 1 Tablespoon extra virgin olive oil ***tamari and maple syrup are my choices, I prefer also not to use too much oil. The original recipe
Thank you Chef Masa for such a great recipe and inspiration!
Using your clean or spatula, mix ground pork and sea salt until you achieve a “smooth and sticky” texture. Then add the egg, chopped green onion, grated ginger, maple syrup (or sugar), tamari and grated yamaimo to the meat, use the spatula in a “cutting” motion (easier to work with the mountain potato), fold and blend well. Set aside.
Apple dipping sauce: Add Tamari, mirin and sake (1-1-1), 1/4 apple, 1 clove of garlic, 1 teaspoon maple syrup and 1 small knob of ginger to blender, puree and blend. Taste and adjust your seasoning (I tend to use less soy). ***When using maple syrup you may need a little more to cut down the sharpness of the ginger.
As for the vegetables, basically anything goes. I just sautéed and lightly season them with sea salt, cover up with aluminium (another great tip from Chef Masa) to keep them warm.
Using medium heat, heat frying pan and add the extra virgin olive oil, using a Tablespoon (or small scoop), spoon the meat mixture onto the frying pan, forming small “pancake” size patties (you can always adjust). Do not crowd the pan with too many patties at once, medium size pan should fit 3 to 4 small size patties. Let it cook for a few minutes before gently “lifting” the patty to check if it is set, once they turn golden brown, it is time to flip the patties and let them cook through. When patties are almost cooked, spoon some sauce over the patties and let the flavor melt together. (**With pork it is better to cook a little longer, the yamaimo actually keeps the patties moist). I heated the remaining sauce and served it on the side.
For the original recipe and video, please check his site on Facebook or English website.
Homemade Heirloom Tomato and Kabocha Fish Soup with Rice Noodles and vegetables
Recently I am on a “chinese food mode” and I decided to make my own “Fish soup rice noodle at home”.
I go through phases from time to time; recently I have been watching a lot of Chinese cooking shows.
I must admit as I am getting older, and having lived overseas for such a long time, I have a stronger desire to get back to my “roots”.
Soup Base: 2 small size yellow croaker fish (cleaned – or any white whole fish which is great for soup making, don’t splurge on anything too expensive), 1 medium size kabocha (Japanese pumpkin seeds removed and chopped into pieces), 2 big heirloom tomatoes and 3 medium tomatoes on the vine (seeds removed and loosely chopped), 9 cups of cold filtered water, 2 croaker fish (cleaned), knob of ginger, green onion, cilantro, 1 large yellow onion, 2 to 3 stalks of celery (optional), a small knob of ginger (sliced), sea salt and white pepper for seasoning.
**This is a pretty large pot of soup, we had some for dinner the other night and used the rest for noodles. This can feed a family of 4 to 6 easily.
I actually made the soup two days ahead of time; here is a good tip for preparing the kabocha: I admit I am not strong enough to “chop” through the kabocha and honestly I don’t want to lose my hands along the way, my friend Sofei told me to put the kabocha into a pot of hot water and let it slowly simmer for a while The skin will soften and make it much easier to cut through. Once it is ready, peel the skin (I use a peeler), scoop out the seeds and chop into 1 inch pieces. Seed the tomatoes, loosely chop cilantro, celery stalks, onion and green onion (keep stalks in tact). Set aside.
Clean the fish (remove the blood line), pat dry, lightly seasoned with sea salt and white pepper Heat the frying pan over medium heat, add a little extra virgin olive oil, add and stir fry th ginger slices. Add fish to frying pan, and cooked both sides until slightly golden brown. You can always add a splash of Chinese cooking wine (Shaoxing) to eliminate the “fishy” taste, I find by using ginger and definitely be mindful about removing the bloodline (at the neck between the head and body, you can see a little “clot”), the fish is not bitter or “fishy” at all.
Fill large clay pot with cold filtered water, add tomatoes, onions and celery.
Remove the fish from frying pan and together with the ginger slices, put inside the “fish soup bag” (can be purchased at most Asian supermarkets). Tie a tight knot. Add the fish bag to the soup pot.
Bring it to a boil, skim the “scum” and turn down to medium low heat, let is slowly simmer for 1.5 hours. While the soup is simmering, check and skim the foam from time to time.
Using chopsticks or tongs, remove the celery stalks and the fish bag. Using a spatula or ladle, “squeeze” the fish bag gently , you will find a lot of soup is actually “soaked” into the bag, you don’t want to waste the liquid gold!
Add half of the kabocha chunks into the soup, and let it simmer for another half hour to 45 minutes, let the flavors melt together (I like my kabocha “melted”. Finally add the remaining kabocha chunks, cilantro and napa cabbage, simmer until vegetables are cooked through. Season with sea salt and ready to serve as soup in a regular Chinese family dinner.
To turn this into a noodle soup base:
My homemade rice noodle in fish, tomato and pumpkin soup!
Noodle and Fixings (be creative): rice noodle, mung bean noodle, shimeji mushroom, napa cabbage, bok choy, swiss chard, microgreens (for garnish), tofu fish cake, green onion, boiled egg. I am not going to list the quantity because it really depends on how many people you are feeding.
Cook all vegetables and fixings separately (all boiled) and create a noodle bar, lay out all ingredients, and chopped up more cilantro and green onions for garnish.
Have fun and be creative with your dinners…now as my friend Peter (Pastaboypeter on Instagram) always say, “now go and eat with the ones you love”.
Sources for my ingredients in Vancouver: Seafood City (Granville Island), Vancouver Farmers Market, Choices Market, the August Market, Sakuraya Japanese food store, T & T Supermarket and H-Mart.
Oh my it is almost the end of July and I have been on “hiatus” since late May! I just cannot believe three months have gone by already since I left my full-time job; particularly the past two months it has been a trying period, adjusting to changes in routines, schedules and lifestyle. While I am still contemplating and planning exactly what I will be doing next, I am very glad I took a leap of faith and go on this much needed break (OO).
How’s your summer so far? I have been enjoying my “staycation” here in Vancouver, summer time is the best season to stay here! The past two months were filled with out-of-town friends visits, which is the perfect excuse (as if I need any) to go around town searching for new attractions and good eats! I believe if you are at least 90% good most of the time with your regular diet, there is a little room for other enjoyment and occasional indulgences.
On Wednesday July 26th I will be back on Ms. Deborah Moore’s program on Fairchild Radio 1470 1030am sharp; thank you in advance for tuning in! I also want to thank my audience who take their time to send me email (goldenapron@gmail.com) with questions or suggestions, I really love to hear from you!
Brisk Walking activity at Iona Beach Regional Park (Richmond) and Pacific Regional Park Trail (Vancouver – UBC) – (Easy Trails)
Brisk walking is our favourite outdoor activity during the summer months; one of our favourite places to visit is Iona Beach regional Park (picture above); the jetty unmarked trail stretches 4 km (one way) along the mouth of Fraser River and it is a very easy walk. We love to go particularly in the evening to catch the beautiful sunset and evening breeze; during the day there are sightings of herons along the way. The jetty trail is a open area so it may get a little windy at times, so you must go prepared with proper outdoor gear and lots of sun protection.
Sunset at Iona Beach: planes flying into Vancouver Airport for Landing
Recently we decided to re-discover the UBC area and on one hot Saturday afternoon, we went for an easy hike in the forest at the Pacific Spirit Regional Park, located at the UBC Endowment Lands (5495 Chancellor Road, Vancouver, BC). The trail gate is located at West 16th next to Camosun Park, the network of trails contained in more than 750 hectares of forest. Free parking is available along West 16th Avenue, the signs inside the forest are very easy to follow and it is a very popular trail amongst local residents. It is advisable to check the map to predetermine your route and decide how far you would like to go, and mark the location of the park’s exits. We lost track of our direction and “exited” so far off , we ended adding a lot more steps to our count, trekking along 16th Avenue (lol).
Cooling down in the forest – Pacific Spirit Regional Park
Asian Cuisines and Small Eateries in Vancouver:
Delicious Pad Thai and Friendly Service: Sen Pad Thai at Granville Island (1666 Johnston Street – inside Loft, across from Public Market)
Sen pad Thai is the newest addition to award-winning Chef Angus An’s roster (Maenam, Freebird, Longtail Kitchen, Fat Mao Noodles) in Greater Vancouver. Located inside the Net Loft across from Public Market, this wonderful fast food stall opened in May 2017, the menu offer different pad thai dishes, variety of Thai small bites and drinks.
The pad thai was meticulously prepared, filled with really fresh ingredients and “Wok Hei” (breath of the wok) – a term which refers to flavors and tastes imparted by a hot wok for stir fry dishes! It was hot (fresh from the wok), tangy (from the tamarind), bright (juice from the generous slice of lime), crunchy (peanuts and fresh sprouts) and smooth ( noodles and eggs were cooked perfectly); for those who love to add more spiciness, the condiments are ready for your perusal on their counter. The staff was friendly and helpful; if you are unsure what you would like to try, just ask them for recommendations (which I did for my second visit) and they will happily oblige. Because the dishes are prepared “a la minute”, there is a little bit of a wait time and it is all worth while. Tables are located near the stand, or you may just want to bring your tasty noodle box outdoors, enjoy an authentic Thai dish and the fine Vancouver weather at the same time.
Classic pad thai with tamarind: authentic and fresh tasting
A lot of small eateries have been popping up lately in Vancouver, scattered all around our beloved city in different districts; the latest addition at the edge of Gastown is a Korean eatery named Haru Korean Kitchen (324 Cambie Street, next to the ever popular Meat and Bread (Porchetta sandwiches!).
Namul Vegetable Bibimbap and Their House special Cold noodle (with wasabi sauce) and a side order of pork belly; Special came with “ban chan” (egg, potato salad, kimchi)
Three weeks ago I paid a visit with my little friend JT who loves to eat Korean food; we shared a namul vegetable bibimbap with gochujang and their house special cold vegetarian soba set (bibim guksu) with lots of fresh vegetables in a wasabi sauce, came with a small plate of steamed pork belly . Our favourite was definitely the noodle which was so refreshing and the wasabi added a nice little “kick” to the citron soy sauce. Their menu is very home style and simple, marking very clearly the choices (vegetarian/vegetarian option/spicy) and sauce options (gochujang, gang doenjang (miso) and citron soy sauce) are available. The service was adequate (small restaurant with less help and it’s fairly new), reservations available (which is very rare these days) and I would love to return sometime to try their bingsoo and other korean family classics (japchae).
With mostly homestyle Korean eateries popping up in the Greater Vancouver area, it is quite a change to see the opening of a small authentic Korean BBQ restaurant in Richmond. Located inside the Continental Plaza shopping mall which is mostly filled with Chinese eateries, I wouldn’t have known about this little place if it is not because of Instagram; apparently Dolpan has been opened for a while! If you wish to give this place a try, go for lunch as their lunch BBQ set is great value ($15 or $20 per person), my favourite part is their servers actually help to cook the meat at your table! I had the pork set (jowl/belly) with lettuce wrap and it came with very delicious side dishes (potato, kimchi radish). Other hot plates (pre-cooked meats in kitchen) and Army Based hotpots (budae jjigae) seem to be very popular amongst the lunch diners; service was prompt and attentive, reservations are available.
Volcano egg and BBQ meat (pork set): My first visit for dinner with my friend JT
Sunday brunching at MaknMing (1629 Yew Street, Vancouver)
Chefs Makoto Ono and Amanda Cheng’s MaknMing in Kitslano is now open for brunch on Sundays till September 03rd, 2017; this “small team big heart” eatery which opened at the end of 2016 is quickly becoming my newest favourite brunch spot: I have tried their special Lobster Hollandaise Eggs Benedict which I wanted to purchase a “bucket” of the flavorful and silky smooth hollandaise to take home; on a separate visit I had their “wickedly” clever indulgence, the Krispee Challah french toast (rice krispies in the batter, served with toasted coconut blueberry compote and honeycomb)….speechless and in awe with their creativity! Their brunch menu is finely edited with a few items, I do recommend bringing a few friends and order different plates to share. The service is impeccable (Thanks Christina for your recommendations), parking could be a little bit of a challenge however it is so close to Kits beach, so park anywhere, enjoy the fabulous brunch and walk it off afterwards (OO).
Cheers! Special Ice Tea and I love how the “oversized” ice cubeLobster Hollandaise with spot prawn Eggs Benedict….Special on their menu and I want a bucket of the sauce…Krispee Challah French Toast with toasted coconut, honey comb and blueberry compote
Desserts Desserts Desserts: “Mochiffle” at Baker and Table (6414 Fraser Street) and “Little Plant” from Bubble Bear Cafe (8051 Granville Street, Vancouver)
If you have been following my blog and instagram, you will know I love savory foods and rarely eat desserts (I did bake a cheesecake with my friends over the weekend, my first!). I recently found these two desserts which I quite enjoy: Mochiffle from Baker and Table(remember the little bakery cafe which I mentioned a couple months ago?) and “Little Plant” Egg Custard pudding from Bubble Bear Cafe (Bubble Tea place on Granville opened a few months ago); the mochi-waffle combination is addictive and it is gluten free, it has a very nice chewy bite and you must add the ice-cream and the red bean! As for the egg custard pudding, I really like the texture of the soft silky pudding and oreo bits (looks like “dirt” hence the name “little plant”. Baker and Table’s owner Hitomi-san and Bubble Bear Cafe’s owners Maureen and Danny are very nice and helpful people, pay them a visit for lunch or snack and ask them for recommendations! Baker and Table also offers vegetarian curry and sandwiches (together with her famous melon pans and yuzu cheesecakes) , and Bubble Bear Cafe offers a small selection of delicious savoury bites (spicy wontons, meat floss egg rolls) and a variety of bubble teas and slushes (great for summer!) at very reasonable prices.