Mangiamo! I also made my own grilled zucchini and eggplant antipasti !
When Italian home-cooked meal pictures start popping up frequently on my Instagram ; this means my dear old friend James is back in town for a visit; we always cook together wonderful rustic Italian dishes, and share with our group of friends, now aptly named Italian Supper Club.
Two evenings of fun and laughter with our friends; wonderful food and great company, Grazie everyone (OO)
Here are some of our highlights:
Antipasti (Mortadella, Parma di prosciutto, Grilled eggplant all from Cioffi’s),
Piave Mezzano Cheese (from Les Amis Du Fromage on East Hastings, a cow’s milk cheese)
Blood Orange, Fennel and Olive Salad (Slice thinly and layered, extra virgin olive oil and sea salt)
This is honestly the best artichoke dish I’ve ever had, and peeling artichokes is not as difficult as we imagine !!
Lemon and dill Brill sole (Fresh brill sole (bone in), lemon, olive oil, fresh dill – fish from Seafood City in Granville Island)
Groceries for Dinner II:
What is that can? Salted Anchovies (Available at Cioffi’s and Bosa Foods)…ready to be transformed..
Anchovies in Sabina olive oil, garlic and red chili pepper flakes , served with French Butter and crusted bread – heavenly! Thanks to my hubby and buddy James, they did most of the cleaning – salted anchovies cleaned in white wine vinegar, de-boned (removing the tail and dorsal) and layered in sealed glass container with extra virgin olive oil (we used the Sabina DOP from Italy, you need an excellent quality oil), a little red pepper chili flakes and garlic slices)
Roast Pork Belly (Coarse salt, sage, rosemary and five peppercorn): despite the initial mix up with the temperature (Celsius and Fahrenheit Difference LOL), the roast pork belly was very succulent and skin was thin and crispy.
Day before prep – pork belly crusted in salt mixture – salt draws the excess water outThe end result : Heavenly
Pasta Ceci (Chickpeas cooked with sofrito (onion, celery and carrots) and Gnocchi Sardi Pasta) – (dried chickpeas were used – soaked overnight)
Italian Supper Club I: Here’s the very delicious Artichoke and Trofie Pasta Recipe; courtesy of my friend’s James’ Italian friend Giampiero ; Grazie and Mangiamo!
Ingredients: 2 Lemons 4 to 5 Artichokes (firm, tight, green, preferably Romanesco type)2 to 3 cloves of garlic, peeled 1 to 2 tsp Peperoncino (red chili pepper) flakes, 2 to 3 Anchovies (preserved in oil), 1-2 cups Warm Chicken soup stock (homemade or store-bought*), 1 cup dry white wine, 500 gr Trofie dry pasta, grated Parmigiano-Reggiano and Pecorino Romano cheese, 3 to 4 Tablespoons extra virgin olive oil, sea salt (for pasta cooking and seasoning).
*Vegetarian stock can replace chicken stock to make this dish vegetarian; chicken or vegetarian stock cubes can be used also. Anchovies are used to “season” the dish so adjust the salt accordingly (OO).
TIPS: This recipe serves 5 (100g pasta each as an appetizer); the usual size 500 g package of pasta is good for 5 to 6 people, depends on what is being used to go with it.
We used the same recipe, omit the pasta and turn the artichokes into antipasti; we just quartered the artichokes and serve it room temperature. The lemon water prevents oxidation; it also removed the somewhat “muddy” flavor of artichokes and add brightness to the dish. Trofie pasta is selected as the shape goes with the sliced artichokes.
Artichokes as Antipasti!
Method:
Zest the two lemons and reserve the zest in a small bowl for later use.
Prepare a large bowl with cold water. Cut the two zested lemons in half and carefully squeeze the juice into the water being careful not to include the seeds. Drop in the seedless peels in as well. The lemon water is to prevent the artichokes to oxidize.
3. Using a paring knife, carefully clean and trim the artichokes, pulling away the dark and hard outer leaves. Cut off the end of the stem, slice away the darker green outer layer of the stem. Carefully pare away any remaining dark green layer between the peeled stem and the edge of the base. Cut off about 1/3 to a half of the pointy leaf ends. Be careful when paring and not to cut yourself.
4. Slice the trimmed artichoke in half lengthwise and then into quarters and carefully remove the hairy choke, pulling out any pointy interior leaves in the process. Drop the trimmed artichoke (carciofi in Italian) in the cold lemon water and repeat the process until completed. When all of the have been properly trimmed and quartered, take each quarter and slice thinly lengthwise, returning the sliced artichokes into the acidulated water immediately.
5. Put a large pot of salted water (sea salt) on to boil.
6. Warm the chicken / vegetarian stock in the sauce pan; keep it in low simmer (this step will be omitted if you are using chicken /vegetarian stock cube and those can be added directly into the pan for flavoring).
7. Using low heat, add 2 (to 3 TBS) olive oil to a large saute pan or wok (in Italy they have a large rounded pan with a handle called a Salta pasta); gently saute the garlic and peperoncino (red pepper flakes).
8. Add the drained artichoke slices and raise the heat to medium, Stir constantly (without breaking the artichokes). After 2 to 3 minutes, add the anchovies to the side of the pan, carefully mashing them so that they completely dissolve in the oil.
9. Add the warm soup stock a little at a time (when cooking always add warm stock to avoid temperature fluctuations) and stir in the white wine. The stock will add another level of flavor to the artichokes; let hte mixture simmer in low heat. The artichokes will absorb the liquid, you don’t want the sauce to be “watery”.
10. While sauce is simmering, throw the trofie pasta in to the boiling water and cook for at least one to two minutes less than indicated on the instructions. Do not Toss the pasta water!
Trofie pasta purchased at La Grotta Del Frommaggio on Commercial Drive
11. Reduce the heat a bit lower (medium low) for the artichokes, cover and cook until the artichokes are almost tender. They should be al dente by the time the pasta is ready. Taste the artichokes and see if they need any salt, the anchovies should be enough for flavoring, otherwise add a little salt if needed.
12. Using a strainer or a spider to lift the al dente pasta out of the cooking water and toss into the pan with the artichokes. Add a ladle or two of the pasta cooking water (acqua di cottura), stir and fold gently to ensure the water mostly evaporates. The cooking water is what makes the sauce creamy!
13. Add a couple of handfuls of grated parmesan and pecorino cheese to the artichoke /pasta mix. Stir gently to integrate the cheese with pasta, then serve hot in individual bowls. Top each with some of the lemon zest, a drizzle of extra virgin olive oil and more of the grated cheese if desired. Mangiamo!
Ever run into a cooking “snag” ? I just did the other day and my sister was my life-saver.
We always have a variety of vegetables in our every day meals, usually sautéed, blanched or roasted.
We seldom make any sauce for our vegetables, usually lightly seasoned with sea salt and olive oil. Perhaps in a huge part this is related to the types of cuisine we usually have at home, and also due to our continued efforts to restrict having “processed” foods (including prepared sauces) in our household.
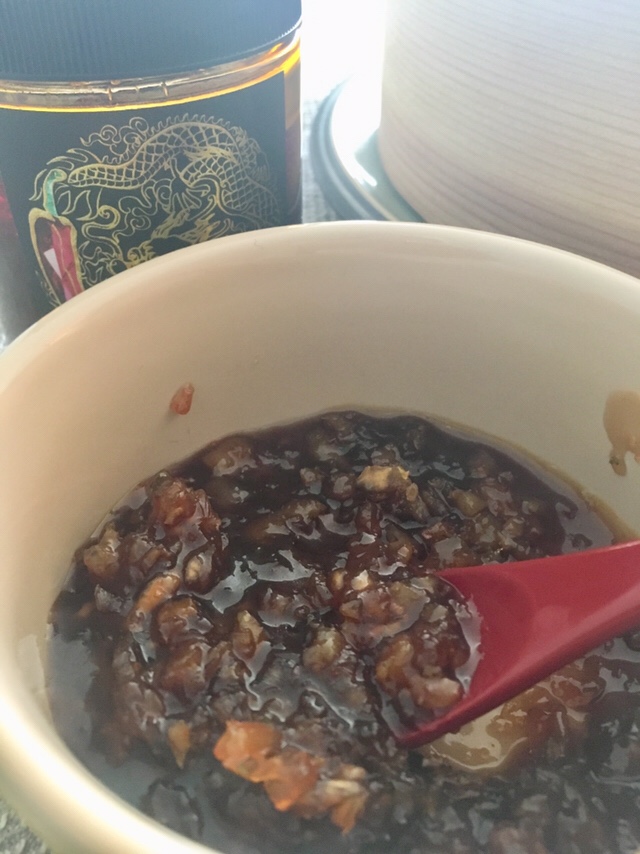
The other day when we were trying to decide what to make for dinner; my sis started to tell me about this delicious Vietnamese dipping sauce which she had with steamed vegetables in Vietnam, she sent me a recipe by Ms. Vicky Phan as reference.
I was thinking dipping sauce for vegetables? Ah I get it, something similar toBagna Caudawhich I made a few months ago for our epic Italian dinner, except there’s no butter and anchovies, replaced with shallots and fish sauce.
It is very easy to make, takes less than 20 minutes including prep time. My recipe is a modified version of Ms. Vicky Phan’sSavory Vietnamese Vegetable Dipping sauce, check out her website for delightful Vietnamese recipes.
For my recipe I use more shallots than garlic, less fish sauce and substitute with hot water to make it slightly less salty, I have also added a little twist: grated lime zest, squeeze of lime juice plus a drizzle of the King Sauce (just the chili oil) from Betty King Sauce (Available online or through Instagram – check out this awesome King sauce)
Ingredients: 3 Tablespoons Fish Sauce (I used “Red Boat”, 3 Tablespoons raw cane sugar, 1 Tablespoon olive oil, 1 large shallot (minced), 2 small cloves of garlic (minced), 2 Tablespoons of dried shrimp (rehydrated in warm water, pat dry and minced), grated zest of lime and squeeze of lime juice, hot water (a few Tablespoons). ***Vegetarians – Omit the dried shrimp and use more shallots/garlic, or add chopped lemongrass to create a fragrant sauce. For some heat, add chili (or chili oil).
In small bowl mix fish sauce, a Tablespoon of hot water and raw cane sugar well. Set aside
Using medium high heat, in a sauce pan, add olive oil (or vegetable oil of your choice).
Add garlic and shallot, lightly stir fried until fragrant. Be careful they burn very easily.
Turn heat to medium low, add dried shrimp, mix well with garlic and shallot, stir until fragrant.
Add fish sauce sugar mixture into the pot, stir gently and cook until sauce thickens. You can add hot water (by Tablespoons – optional) to adjust thickness and taste according to your liking.
Add chili oil (optional), lime zest and squeeze of lime juice
Keep watch closely and dont let the sauce burn – patience!
When sauce is cooking, steam the vegetables which should be ready in a few minutes. Serve hot.
For our meal we served the sauce with steamed Brussel sprouts, zucchini, carrots, purple kale and brocolini. I lined the steamer with “cooking steam cloth” (available at Chinese cookery stores).
I used a really great steamer which I first saw on Youtube used by home cooks/bloggers; I searched for a long time and one fine day in December when I walked byOrling and Wu …..there it was…and I bought it home..
In the last July weekend, I spent the entire Saturday cooking with my friends Jo, Phung and Rita (thank you very much for hosting).
I always learn something new from this trio and under their “supervision”, moi the novice baker completed the measuring and most of the mixing/whisking tasks, we successfully made a really fabulous Japanese cheesecake, based on Ms. Namiko Chen’s recipe from Just One Cookbook.
One important note: you must prepare and weigh all the ingredients, have everything organized and follow each step carefully. I find the most difficult part is folding the egg whites into the cream cheese mixture.
We actually skipped the glaze and the cake is still very tasty.
I posted the picture on Instagram and got a very nice reply from Ms. Nami. Thank you to my friends who supervised me through this process, and thank you Ms. Nami for sharing a wonderful recipe.
Try making it and you will love it !
For her recipe, please check Ms. Namiko Chen’s website:
We did it!! Under “supervision”, moi the novice baker managed to complete most of the complicated tasks ….Beautiful group effort, fabulous result !
Below you can see the fixings we prepared for our Vietnamese salad roll DIY dinner: fresh shiso, basil, mint and lettuce, rice noodle, dry rice paper, shredded chicken (from Costco to save time) and prawns, and Fried Egg, which is not seen commonly when you order the salad rolls in store. Our dear friend Phung made her own peanut dipping sauce (hoisin, peanut butter, water, vinegar); I haven’t had this much fun at a DIY dinner party for such a long time! My hubby came by afterwards and it was equally fun to watch him prepare his own salad rolls, I told him now we know we can purchase and use a salad roll wrapper tray (it is made of plastic, place rice paper on top), it makes it so much easier to prepare this at home! Another great tip from Phung: Dip the rice paper in hot water instead of cold to rehydrate the rice paper.
I found the rice roll wrapper tray at 88 Supermarket (in East Vancouver on Victoria Drive).
Rice Paper!All the Fixings on the Table….and Sparkling is perfect for this light summer dinnerMy first DIY salad roll loaded with vegetables and herbs (Shiso!)
Roasted potatoes, sweet beans, asparagus and BC wild stripe prawn cold salad with ponzu vinaigrette, Baked Halibut filet with toasted panko, Homemade Tartar sauce
Here’s what I have been cooking at home in August!
Since I am not professionally trained, I always love to learn and draw inspiration from others (professional or home chefs).
This month I am featuring three of my creations which you may have seen the pictures on Instagram already.
For first hand updates follow me on Instagram: @mygoldenapron
And remember, always adjust the seasoning and ingredients according to you and your loved ones dietary needs, and the most important ingredient, COOK with LOTS of LOVE and PATIENCE (OO).
Baked Halibut Filets with Homemade Tartar sauce: (Picture shown above)
I have adapted Just One Cookbook(love her cheesecake and other Japanese recipes) Ms. Namiko Chen’s toasted panko (for baked pork chop/chicken katsu) for my baked halibut filets; I actually skipped the flour and dipped the cleaned and skinned fillets in beaten egg and toasted panko only. Once the panko cooled down, add grated lemon zest (1 lemon), 1 teaspoon of sea salt and mix well, set aside.
Baked Halibut fillets: (ingredients: halibut fish fillet, panko, one lemon (for slices and lemon zest), salt and pepper)Pre-cook the panko before baking the fish fillets: For the 4 fillets, I have used 1 cup of panko and 1 Tablespoon of extra virgin olive oil. Combine the oil and panko in a frying pan, and toast the panko over medium heat, stir once in a while to ensure all panko bits are toasted until golden brown and evenly. Tremendous patience is required for this step. Let the toasted panko cool before you start coating the halibut fillets.
Preheat oven to 400F. Lined the baking sheet with parchment paper. Pre cut some lemon slices (using the same lemon which you used to get the zest) and placed them on the baking sheet.
I bought 4 filets (there were 4 of us) and total weighed approximately 1.5 lbs. Skinned the halibut filets (or you can ask your fish monger to take care of this), pat them dry.
Coat the halibut one at a time: gently dip each piece into the beaten egg mixture, make sure you get rid of excess egg mixture. Using your dry hand, coat the fillet with toasted panko. Lightly brush the flakes to cover the fish, then lightly press the panko flakes, make sure they adhere and the fillet is coated evenly. Place the coated fillet on top of lemon slices on the baking sheet. Baked fish fillets until cooked through (test using a bamboo stick or tooth pick, once it goes through the fillet easily they are done), approximately 12 to 15 minutes. Halfway through I turned the baking sheet around (for even cooking) quickly, and I checked the fillets quickly at the 10 minute mark for doneness.
Serve cooked fillets with homemade tartar sauce: I do not have any specific quantity for this recipe; I used the OJAI lemonaise (or any mayo) and Greek yogurt at 1-1.5 ratio, added some lemon zest, cooked corn niblets and takana (optional – dried radish leaves, rehydrated), sea salt and black pepper (a pinch) to taste. If you want to thin out the sauce a little, you can add a squeeze of lemon juice.
As for my bean, asparagus and prawn salad withponzu vinaigrette, I used a store-bought ponzu and add good quality extra virgin olive oil, a little rice vinegar and ground pepper for the vinaigrette (2:1 ratio oil/soy, most vinaigrettes 3:1 ratio oil/acid, I prefer less oily). I blanched the asparagus, sautéed the beans and boiled the small prawns (with lemon) quickly, then shocked them in ice and shelled them. When you are ready to eat, toss the ingredients together and lightly dress the salad (do not drench!!).
Note: Be creative with your vegetable selection, and remember always adjust your seasoning according to your dietary needs and taste !
Pork and Yamaimo (Mountain Potato) patties with apple ginger sauce, sautéed cauliflower, enoki mushroom and okra
I still cook a lot of Japanese food at home.
I adapted the patty and sauce recipe from the popular Japanese chef Masa (Masa’s ABC Cooking @masa.abc on Facebook) who resides in Taiwan. If you check his Facebook page, there are regular uploads of cooking videos with wonderful and clear instructions (for readers who can understand Chinese, it is in mandarin, Chinese subtitles on-screen). I love his idea of using yamaimo (mountain potato) with ground meats; the addition keeps the patties very moist! Chef Masa’s original is actually a chicken patty donburi recipe (with okra and eggplant), I created a dinner set and served with cauliflower, enoki mushroom and a dairy free chilled potato leek and watercress soup.
Pork Patties: organic /hormone free ground pork 250 g, 1/4 of yamaimo (mountain potato, grated), grated ginger, 1/2 teaspoon sea salt, 1 egg, 1 stalk green onion (chopped), grated ginger (1 teaspoons), 1 Tablespoon tamari****, 1 teaspoon maple syrup***, pinch of white pepper for season, 1 Tablespoon extra virgin olive oil ***tamari and maple syrup are my choices, I prefer also not to use too much oil. The original recipe
Thank you Chef Masa for such a great recipe and inspiration!
Using your clean or spatula, mix ground pork and sea salt until you achieve a “smooth and sticky” texture. Then add the egg, chopped green onion, grated ginger, maple syrup (or sugar), tamari and grated yamaimo to the meat, use the spatula in a “cutting” motion (easier to work with the mountain potato), fold and blend well. Set aside.
Apple dipping sauce: Add Tamari, mirin and sake (1-1-1), 1/4 apple, 1 clove of garlic, 1 teaspoon maple syrup and 1 small knob of ginger to blender, puree and blend. Taste and adjust your seasoning (I tend to use less soy). ***When using maple syrup you may need a little more to cut down the sharpness of the ginger.
As for the vegetables, basically anything goes. I just sautéed and lightly season them with sea salt, cover up with aluminium (another great tip from Chef Masa) to keep them warm.
Using medium heat, heat frying pan and add the extra virgin olive oil, using a Tablespoon (or small scoop), spoon the meat mixture onto the frying pan, forming small “pancake” size patties (you can always adjust). Do not crowd the pan with too many patties at once, medium size pan should fit 3 to 4 small size patties. Let it cook for a few minutes before gently “lifting” the patty to check if it is set, once they turn golden brown, it is time to flip the patties and let them cook through. When patties are almost cooked, spoon some sauce over the patties and let the flavor melt together. (**With pork it is better to cook a little longer, the yamaimo actually keeps the patties moist). I heated the remaining sauce and served it on the side.
For the original recipe and video, please check his site on Facebook or English website.
Homemade Heirloom Tomato and Kabocha Fish Soup with Rice Noodles and vegetables
Recently I am on a “chinese food mode” and I decided to make my own “Fish soup rice noodle at home”.
I go through phases from time to time; recently I have been watching a lot of Chinese cooking shows.
I must admit as I am getting older, and having lived overseas for such a long time, I have a stronger desire to get back to my “roots”.
Soup Base: 2 small size yellow croaker fish (cleaned – or any white whole fish which is great for soup making, don’t splurge on anything too expensive), 1 medium size kabocha (Japanese pumpkin seeds removed and chopped into pieces), 2 big heirloom tomatoes and 3 medium tomatoes on the vine (seeds removed and loosely chopped), 9 cups of cold filtered water, 2 croaker fish (cleaned), knob of ginger, green onion, cilantro, 1 large yellow onion, 2 to 3 stalks of celery (optional), a small knob of ginger (sliced), sea salt and white pepper for seasoning.
**This is a pretty large pot of soup, we had some for dinner the other night and used the rest for noodles. This can feed a family of 4 to 6 easily.
I actually made the soup two days ahead of time; here is a good tip for preparing the kabocha: I admit I am not strong enough to “chop” through the kabocha and honestly I don’t want to lose my hands along the way, my friend Sofei told me to put the kabocha into a pot of hot water and let it slowly simmer for a while The skin will soften and make it much easier to cut through. Once it is ready, peel the skin (I use a peeler), scoop out the seeds and chop into 1 inch pieces. Seed the tomatoes, loosely chop cilantro, celery stalks, onion and green onion (keep stalks in tact). Set aside.
Clean the fish (remove the blood line), pat dry, lightly seasoned with sea salt and white pepper Heat the frying pan over medium heat, add a little extra virgin olive oil, add and stir fry th ginger slices. Add fish to frying pan, and cooked both sides until slightly golden brown. You can always add a splash of Chinese cooking wine (Shaoxing) to eliminate the “fishy” taste, I find by using ginger and definitely be mindful about removing the bloodline (at the neck between the head and body, you can see a little “clot”), the fish is not bitter or “fishy” at all.
Fill large clay pot with cold filtered water, add tomatoes, onions and celery.
Remove the fish from frying pan and together with the ginger slices, put inside the “fish soup bag” (can be purchased at most Asian supermarkets). Tie a tight knot. Add the fish bag to the soup pot.
Bring it to a boil, skim the “scum” and turn down to medium low heat, let is slowly simmer for 1.5 hours. While the soup is simmering, check and skim the foam from time to time.
Using chopsticks or tongs, remove the celery stalks and the fish bag. Using a spatula or ladle, “squeeze” the fish bag gently , you will find a lot of soup is actually “soaked” into the bag, you don’t want to waste the liquid gold!
Add half of the kabocha chunks into the soup, and let it simmer for another half hour to 45 minutes, let the flavors melt together (I like my kabocha “melted”. Finally add the remaining kabocha chunks, cilantro and napa cabbage, simmer until vegetables are cooked through. Season with sea salt and ready to serve as soup in a regular Chinese family dinner.
To turn this into a noodle soup base:
My homemade rice noodle in fish, tomato and pumpkin soup!
Noodle and Fixings (be creative): rice noodle, mung bean noodle, shimeji mushroom, napa cabbage, bok choy, swiss chard, microgreens (for garnish), tofu fish cake, green onion, boiled egg. I am not going to list the quantity because it really depends on how many people you are feeding.
Cook all vegetables and fixings separately (all boiled) and create a noodle bar, lay out all ingredients, and chopped up more cilantro and green onions for garnish.
Have fun and be creative with your dinners…now as my friend Peter (Pastaboypeter on Instagram) always say, “now go and eat with the ones you love”.
Sources for my ingredients in Vancouver: Seafood City (Granville Island), Vancouver Farmers Market, Choices Market, the August Market, Sakuraya Japanese food store, T & T Supermarket and H-Mart.
Oven Roasted Okra: sliced each okra lengthwise into halves and toss in sea salt and extra virgin olive oil, preheat oven to 400 degrees and roast for 15 minutes – Thanks Jo!
Here’s a snapshot of what I have been cooking the past two months..For updates follow me on Instagram (@mygoldenapron) and you will know first hand what I have been cooking and where I have been dining!
Roasting OKRA: I never thought of roasting okra until my dear sweet friend Jo showed me, sometimes we are just caught in our usual habits and don’t think about the most obvious options! Since then I have been adding okras to our salads or enjoyed with our cooked fish, like the kasu-shio marinated halibut in shiitake, edamame, daikon and mustard leaves dashi broth… As for garnish, I have prepared some roasted kale (in place of seaweed) and pancetta bits.
Experiment at home: Shio Kasu Halibut, shiitake dashi with edamame, mustard green leaves, roasted okra and green onion, finished with roasted kale and pancetta bits
Remember sake kasu? It’s the remaining lees from sake making and they have been available for sale at Japanese grocery stores (Fujiya in Vancouver) or Artisan Sake (at Granville Island, this is the one I use all the time). For this dish, I added some salt and a little water to approximately 2 Tablespoons of kasu (water for slight thinning of mixture), pat dry (really dry) the halibut filets and submerge them in the marinade for at least a day. Before cooking, wipe the fish clean with paper towel to ensure there’s no kasu left (otherwise it will burn). I baked my fish at 400F and finished with broiling the final two minutes (the cooking time varies pending on thickness of fish fillet).
Dashi broth: prepared with bonito flakes and kelp as base (search my archives for recipe), I added the shiitake mushroom stems, a couple of celery leaves (I kept them frozen and add to broth/stock making), a spoonful of sake kasu and a small chunk of daikon and let it cook for half an hour. I strain the broth then add shiitake mushrooms, mustard green leaves, edamame beans (parboiled already) and season with sodium reduced soy, mirin and a little maple syrup (sugar for most of you), adjust accordingly to your taste and dietary needs always! I prepared the pancetta and kale bits while broth is cooking, okra also roasted before and add-on together with green onion as garnish. The cooked fish is lightly finished with fleur de sel.
The broth can be prepared ahead of time, when fish is about ready, reheat the broth and to serve, plate vegetables and fish in a regular or soup bowl, pour the broth, add the okra and green onions, kale and pancetta garnish last. Enjoy!
Sakuraya: Last month I mentioned there is a Japanese grocery located on East Broadway (close to Fraser), they carry the organic dried mustard leaves and daikon leaves from a small village in Japan. I re-hydrated the leaves and add to my dashi broth and they added so much flavor! It has some glucose so remember to adjust your seasoning.
Soy Dijon Mustard glaze chinook salmon with potato salad, green bean snow peas micro greens sea asparagus in ponzu vinaigrette:
Prepare glaze : sodium reduced soy sauce (2 Tablespoons), Dijon mustard (1 Tablespoon), olive oil (1-2 Tablespoons) and a little maple syrup. Clean and pat dry the salmon filet and let it marinade for at least 30 minutes. Remove the fish from marinade, scrape lightly so not much marinade will cling to the fillets (unless you like real browning action), and bake salmon in oven preheated in 350 F until desired doneness. When you see any white spot appearing on the seams of the salmon filet, that means it should be done and well on its way to being very cooked. While salmon is cooking, use a sauce pan and sautéed chopped shallots, add the marinade and cook until sauce boils and slightly thicken.
I used a store-bought ponzu and add good quality extra virgin olive oil, a little rice vinegar and ground pepper for the vinaigrette (2:1 ratio oil/soy, most vinaigrettes 3:1 ratio oil/acid, I prefer less oily).
As for the salad, basically anything goes! I added the most delicious microgreens (West End Blend from Grown here farms purchased at August Market on Main Street in Vancouver), sea asparagus (In season for a short time in Vancouver, soaked overnight to get rid of the salt then blanched and shocked in ice, green beans and snow peas (also blanched and shocked in ice) . I choose to use mostly organic products, use your imagination and add your favourite in season salad greens and vegetables to load more nutritious greens into your dish.
My potato salad is made of red potatoes, green onions, homemade relish mixed with half mayo (Lemon Ojai mayonnaise) and half greek yogurt, if you want to make it very Japanese, add kewpie mayonnaise.
Tomato and Egg Udon: simple eats and tomatoes are in season!
One of my favourite all time Chinese family dish is converted into a soup base for udon; apparently tomato and egg noodle soup is a very popular dish in parts of China. Taiwanese Chef James, well-known for his interpretation of Japanese cuisine, is now featured in cooking show filmed in China, I found on YouTube accidentally. I modified his recipe and method by changing a couple of ingredients: The ingredient are simple : heirloom tomatoes, shallots, grated ginger (lots), green onion, filtered water, white pepper and a little maple syrup (you can use sugar) I used Japanese udon, omit cornstarch and tomato paste (it was used for thickening, instead I let the soup cook down to thicken). The beaten egg is added in the end; if you have time, follow Chef James and make the eggs two ways. Usually the noodles are eaten as “late night snack”, I had it for dinner and I find it perfect as a summer light supper.
Tomato Miso Nduja Bolognese with Udon
Remember a few months ago I talked about Nduja, the Italian spreadable spicy sausage? I changed things up a little – I mixed a little nduja and red miso into my own pork/turkey Bolognese sauce and had it with udon, garnish with roasted kale (salted and crushed to mimic seaweed) and it was a winner at my recent dinner gathering with my cooking buddies Jo, Phung and Rita. The dish is a perfect marriage of Japanese and Italian ingredients; remember nduja and miso are both a little salty, you do not need to use much for seasoning. The miso makes the sauce very hearty and meaty; if you have a good tomato sauce base, you can add the miso and serve it as a vegetarian dish with grilled eggplant. The nduja sausage spread adds a little spiciness, it is completely optional. Experiment with your favourite meat sauce recipe and add these flavor profiles to your repertoire.
For both tomato udon dishes, the really thin udon noodles will not work as well. I found this perfectly wonderful hand-cut dry udon at our local Fujiya Japanese food store.
Love the texture and thickness is perfect! It has a very good “bite”
Miso and Sake Kasu Sable fish, mixed vegetables (lotus root, burdock, broccoli and turnip leave) rice
Here are the snapshots of what I have been cooking at home this past month! Recipes coming very soon.
For the time being you can find my other updates and pictures with description posted on Instagram (@mygoldenapron).
I would also love to hear your feedback so feel free to send me an email (goldenapron@gmail.com) or drop me a line through Instagram (OO).
Picture above: Sake Kasu Miso Sable Fish with Mixed vegetable (burdock, turnip leaves, lotus root and broccoli) rice: the dried burdock, turnip and lotus root are from Japan, I found them at a local Japanese store).
Nduja spaghetti Bolognese (with basil sausage from Oyama sausage and Co) : Remember Nduja, the spicy sausage spread ? I added to my Bolognese recipe to spice things up a bit !
When Japanese meets Italian: Roast shio koji organic chicken, cauliflower broccoli penne pasta in lemon parsley herb drizzle, garnish with crispy kale bits and lemon zest. It is very easy to make the herb drizzle: chives, parsley, lemon juice, grated lemon zest, extra virgin olive oil, drizzle of honey and pinch of sea salt.
Pan fried spot prawn with Thai red curry (store-bought paste, added fish sauce, lemongrass, kaffir lime leaves) served with lentil quinoa turmeric rice: since spot prawn season is over, you can substitute with other prawns/shrimp available for this dish).
Faux Unagi Donburi (Rice bowl): Orange roughy turned into unagi; baked and glazed with homemade unagi sauce, scrambled dashi egg with green onions, on a bed of turmeric (just a touch) fresh peas and carrot rice, garnish with crispy kale bits (my current favourite garnish in place of seaweed)
Disclaimer: All ingredients are non-sponsored purchased at some of my preferred vendors in Vancouver, BC. Pictures are my own and dishes are my creations based on what I have learned through cooking classes, reading cookbooks and research.
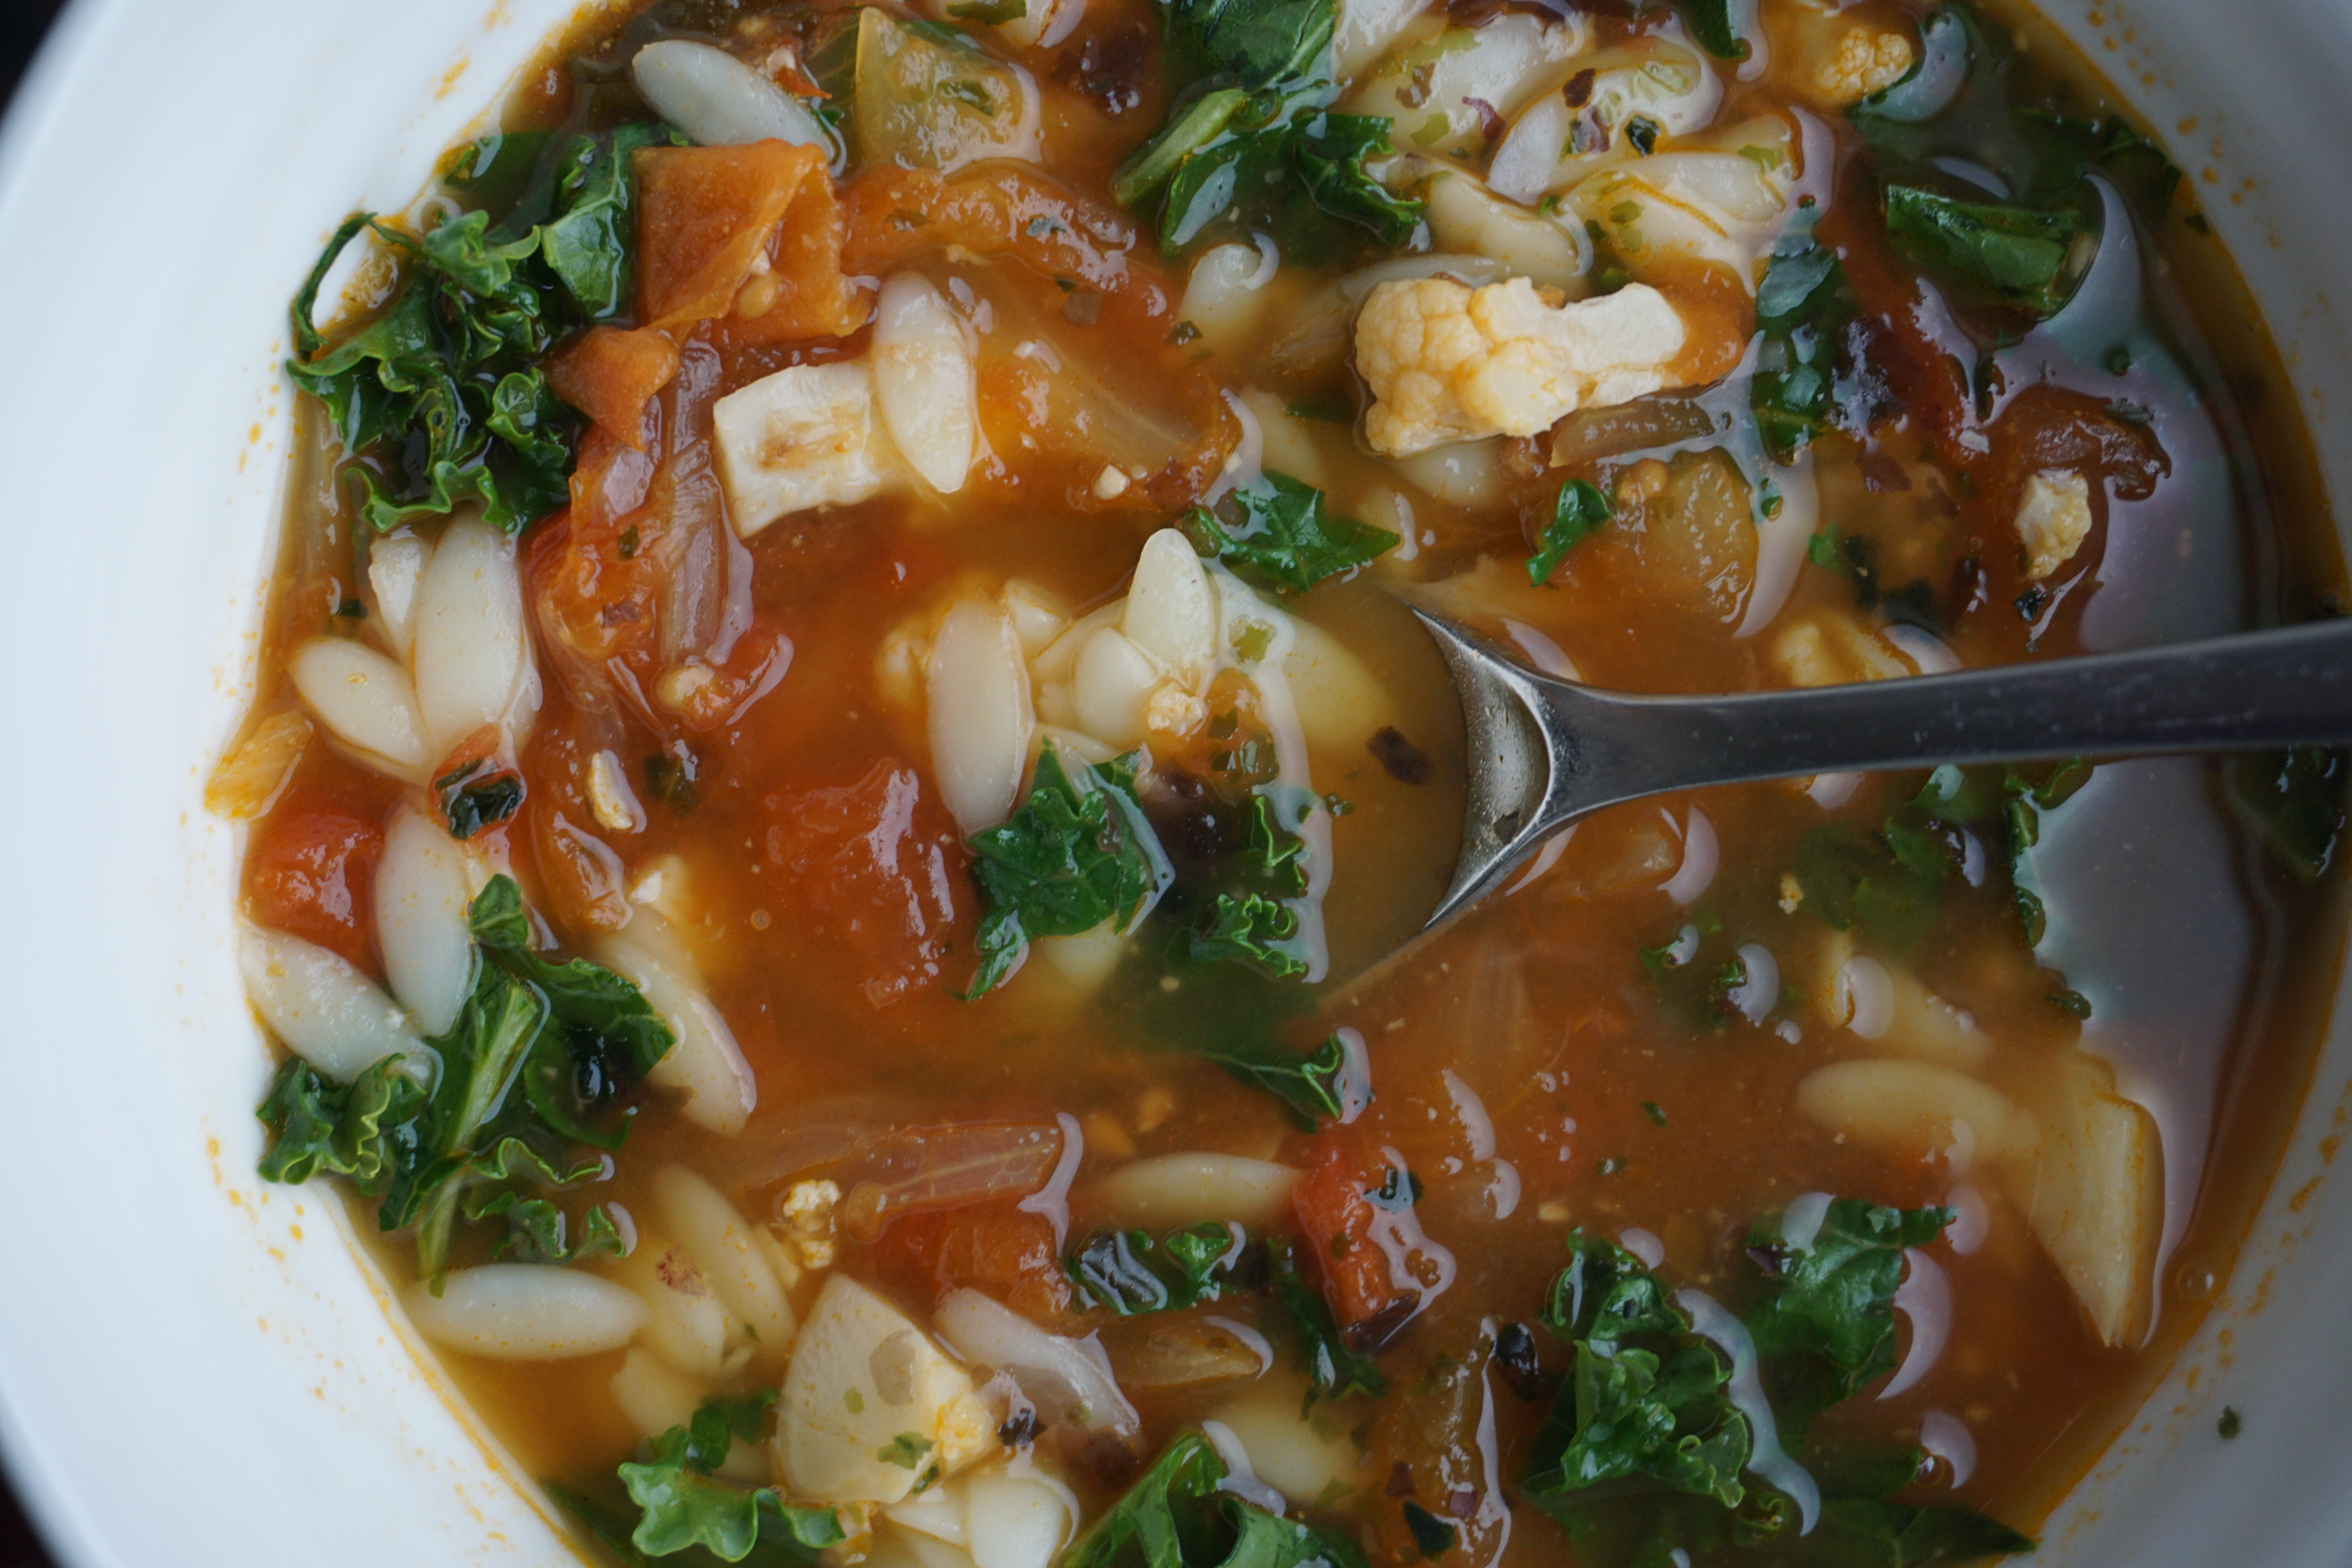
Post holiday season “cleanse” at home with lots of soup and vegetables….I have used this tomato soup base for different dishes (seafood pot, hot-pot base, just to name a couple); today I add orzo and kale, it turns into a healthy wholesome meal… Enjoy (OO)!
Serves 2-4
Ingredients: 8 medium tomatoes (vine tomatoes for this recipe), 1 clove of garlic (peeled and finely minced), 1 large onion (thinly sliced), 2 Tablespoon Extra virgin olive oil, 4 cups of katsuobushi dashi, 1/2 cup of orzo (or pasta of your choice), 1-2 Tablespoon white miso, 2 Tablespoons of kaeshi (see recipe under “Vegetable Curry Udon), kosher salt (to season tomatoes for roasting), kale (handful, stalks removed and finely chopped), savoury seaweed flakes (for garnish).
Preparation:
Pre-heat oven to 350 degrees F.
Prepare the tomatoes: wash, core and cut them into halves, toss in 1 Tablespoon of extra virgin olive oil, lightly seasoned with kosher salt, lay them evenly on baking tray, roast them for 25 to 35 minutes, or until caramelized. Remove from oven, set aside and let them cool.
Prepare the onions (thinly sliced) and garlic (peeled and finely minced).
Prepare katsuobushi dashi broth (can be done 1 to 2 days ahead, reheat refrigerated broth and keep it warm for later use, use kombu broth only to make it entirely vegetarian).
In large pot, using medium high heat, heat remaining Tablespoon of extra virgin olive oil, saute onions, stirring constantly, until onions become soft and turn translucent. Add the 1 Tablespoon of miso to the onions, continue to cook, stirring constantly and mix well, do not burn the miso.
Add the roasted tomatoes to mixture, stir and cook for 2 to 3 minutes.
Add warm dashi broth and 2 Tablespoons of kaeshi to the pot, scrape the bottom, cook for 2 to 3 minutes and bring to a boil. Skim off any fat or scum from the mixture, reduce heat to medium low and simmer for 25 – 30 minutes.
Prepare the kale for garnish.
When soup is almost ready, boil water in a different pot to cook the pasta (usually 100 grams of pasta to 1 litre of water), add kosher salt to boiling water, then add the orzo and cook according to instructions.
Taste and adjust the seasoning of the soup (if necessary), put orzo pasta into bowl, ladle the soup, garnish with chopped kale and seaweed flakes, now ready to serve and enjoy!
Note:
I have used the Rustichella d’Abruzzo’s orzo pasta for my recipe (available at Gourmet Warehouse on East Hastings, Vancouver, BC), the savory seaweed flakes is from Cornish Sea Salt Co (also available at Gourmet Warehouse).
See “Vegetable curry udon” for kaeshi recipe – I have used the kaeshi (instead of just soy sauce and mirin) which I made for the curry udon as seasoning; you can even add a dash of sake when cooking the onions and tomatoes, add red chili pepper flakes to make it spicy, be creative!
Katsuobushi dashi broth – made with kelp and dried bonito flakes
I added leftover cauliflower to the soup and use less orzo, it is always a great idea to have more vegetables.
A bowl of savory and mouth-watering curry noodle soup on a cold Vancouver winter day!
My recipe is loosely based and adapted from Japanese Soul Cooking (By Tadashi Ono and Harris Salat), one of my great recent cookbook finds! They use soba broth (it’s called kake soba broth) to enhance the flavor of curry; I added turmeric (when sautéed the onions and vegetables), diced apple and fukujinzuke, commonly used to serve with Japanese curry rice, are used as garnish (in addition to green onion) to a hint of sweetness and add “crunch” to the dish, the end result is much more flavorful. Leftover curry taste even better the next day, add more vegetables or meat then serve with rice as a donburi (you can always add crispy fried pork cutlet (tonkatsu), or simply freeze it ready for use anytime for quick ready-to-go weeknight dinner; Enjoy (OO).
Serves 2-4:
Ingredients:4 bricks of fresh-frozen sanuki udon, 1 large onion (thinly sliced), 1 small head of cauliflower (florets roughly chopped), 1 medium zucchini (diced), 4 small bunched carrots (peeled and chopped), 3 Tablespoons of ground turmeric, 1 Tablespoon of mirin, 1 Tablespoon extra virgin olive oil, 1 package (110g) Japanese curry roux (I used Glico Medium Premium), 6 cups of katsuobushi dashi, green scallions (white part only, thinly sliced on an angle), kosher salt (light seasoning when cooking vegetables).
Note:
To make the dish completely vegetarian, simply substitute the katsuobushi dashi with kombu dashi broth
For Meat Lovers: Thinly sliced pork or minced pork goes very well with the curry, I used the a bit of ground ginger and apple, turmeric powder and kaeshi to marinade the pork (minced or thinly sliced) night before if I am adding protein to the curry.
You can use curry powder and potato starch instead of the instant curry roux.
Check out Ms. Namiko Chen’s Just One Cookbook, she has a great pork curry udon recipe.
Here’s a picture of the fukujinzuke!
*Recipe for kaeshi (makes 2 1/2 cups) – from Japanese Soul Cooking
Prepare 2 to 3 days in advance this recipe : Add 2 cups Japanese soy sauce (I used only 1 1/2 cups + 1/2 cup katsuobushi dashi to make it less salty), 1/2 cup mirin, 3 Tablespoons sugar (I used coconut nectar instead, adjust the sweetness accordingly) – Add all ingredients into saucepan and bring to boil over high heat. Turn off the heat and allow mixture to cool off to room temperature. Refrigerate for 2-3 days to allow the flavors time to mingle, store in glass bottle and refrigerate up to a month.
**In Japanese Soul Cooking – they prepare the kake soba broth (combining the kaeshi and dashi and a lot of mirin) ahead of time, I did not combine the katsuobushi dashi broth and kaeshi, I add them separately into the curry and use a lot less mirin. Check out their book, it’s filled with wonderful recipes, thank you very much for your inspiration.
Preparation:
2 to 3 days before – prepare kaeshi (see recipe above, refrigerate in glass container ready for use)
Prepare dashi broth (can be done 1 to 2 days ahead, refrigerate in glass container ready for use)
Prep all the vegetables
In a large saucepan, reheat the dashi broth (if you did not make from scratch the same day) and keep it warm
In a different large heavy pot, heat 1/2 tablespoon olive oil using medium high heat, add cauliflower and cook for 2 minutes, then add carrot (cook for another 2 minutes) and zucchini, lightly seasoned with kosher salt and 1 Tablespoon ground turmeric, saute in total 5 to 6 minutes then remove from pot, set aside.
In the same pot, heat another 1/2 Tablespoon olive oil (medium high heat), add sliced onion and 1 Tablespoon of mirin and saute, stirring constantly for 2-3 minutes, until onion becomes soft and turn translucent (I let it caramelize a little). Add the remaining 2 Tablespoons ground turmeric and cook, stirring constantly and mix well, be careful not to burn the turmeric!
Add the warm dashi broth and 1/2 cup of kaeshi to the pot , scrape the bottom of the pot, cook for 2-3 minutes and bring to a boil. Skim off any scum and fat from the broth. Reduce heat then let the flavors mix and cook for another 10 minutes.
Turn off the heat, add the curry roux, using a strainer or chopsticks, melt the roux and blend nicely with broth mixture.
Turn on the heat to medium high, heat the curry, stir occasionally, making sure it will not stick and burnt on the bottom. Using small fine mesh strainer, remove any scum.
Add cauliflower, carrot and zucchini mixture to curry, using medium low heat, let it simmer for another 15 to 20 minutes, gently stir occasionally to prevent sticking and don’t break the vegetables. Keep it warm using low heat (and it will not burn), taste the curry and add seasoning (using kaeshi) if necessary.
Prepare garnish – diced apples (squeeze a bit of lemon juice to prevent it from turning “brown”) and scallions
Meanwhile using a separate pot, boil water to cook the sanuki udon (according to instructions approximately 1 to 2 minutes) – I prepare each serving individually
Turn off the heat, put udon into bowl, ladle the curry over noodles, garnish with diced apples, scallions and fukujinzuke, now ready to serve and enjoy!
If you are adding ground or sliced pork to this dish, lightly saute the pork in the beginning and set it aside, add the meat last when vegetables are cooked, bring curry to boil and turn off heat immediately, the meat will cook through and remain juicy!
Where to shop for ingredients in Vancouver: Fujiya (Japanese groceries, fukujinzuke is available – 912 Clark Drive, Vancouver, BC), Nikuya (11220 Voyageur Way, Richmond, BC – for sliced pork), T and T Supermarket (Various locations – for Sakura Farms ground pork), Japanese Soul Cooking (Available at Indigo, Amazon, I purchased mine from Crate and Barrel at Oakridge Centre).
I have always enjoyed cooking for my extended family; whether it’s New Year’s, Thanksgiving or birthdays, there are many fond memories of good times and delicious meals prepared together at Andy’s parents’ house.
This year Barb and Nick hosted Father’s Day dinner at their place and we had a “seafood and vegetable” extravaganza:
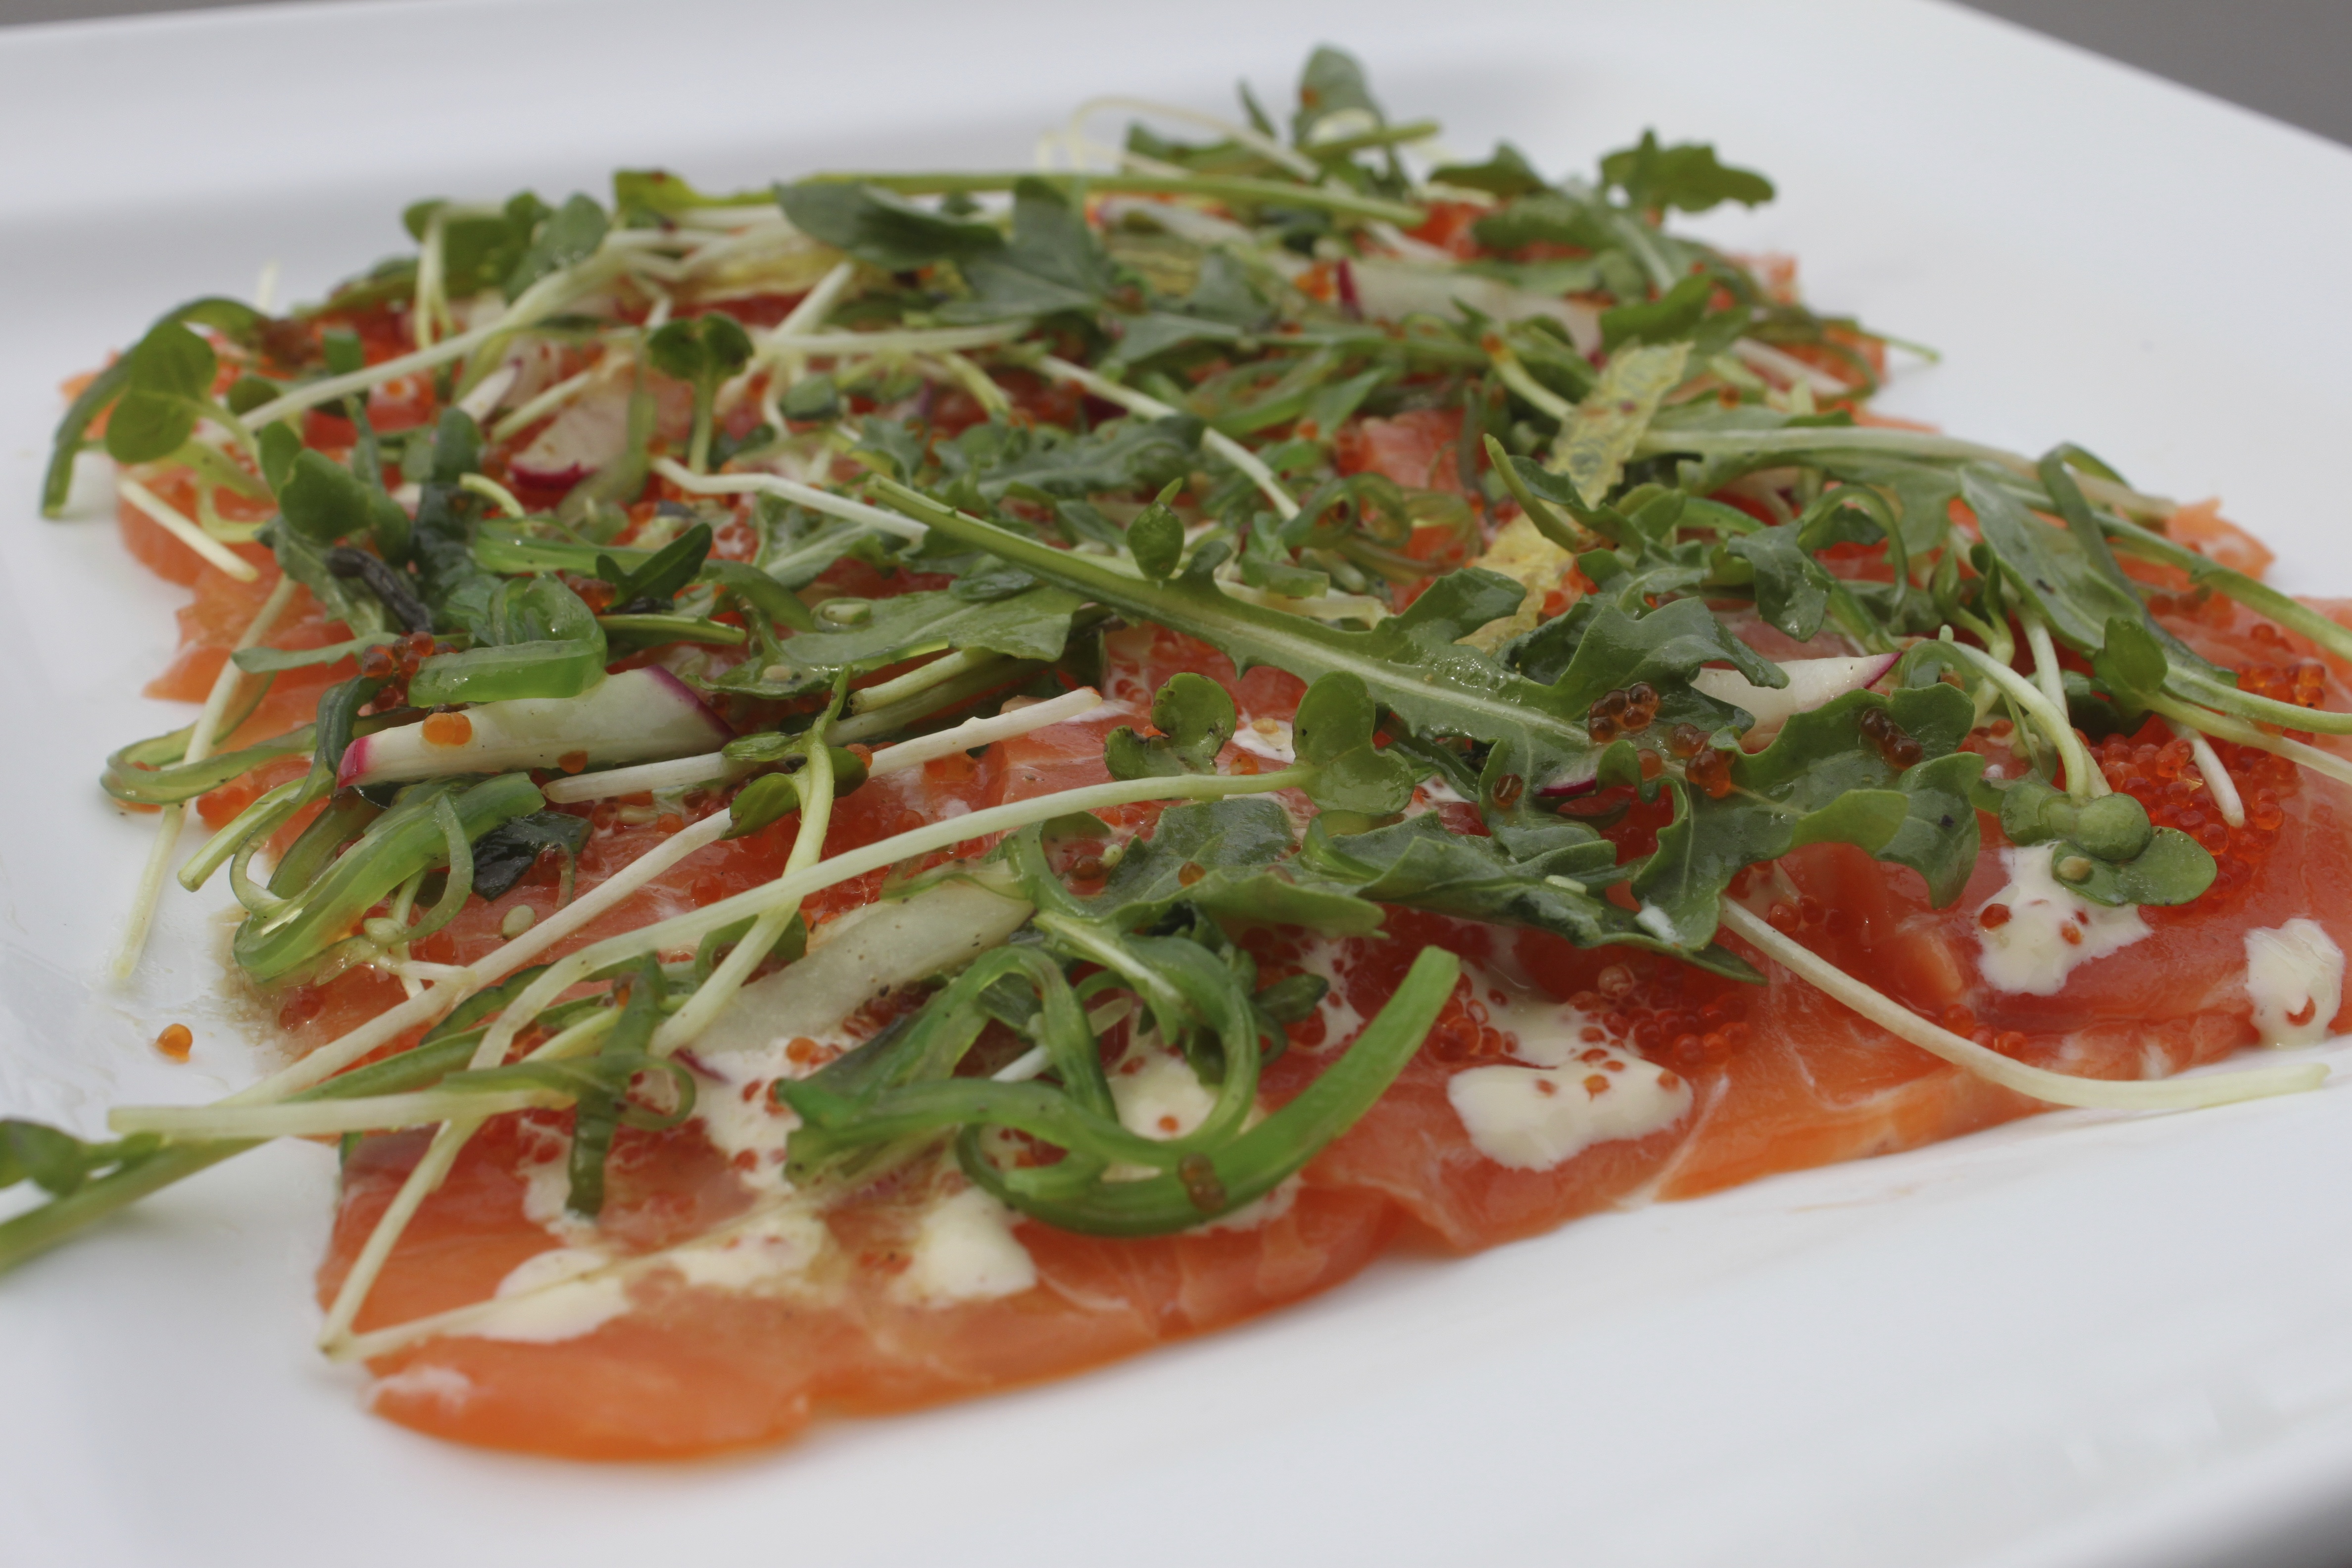
I spent the Saturday shopping and prepping most the ingredients at my home; the next day “Golden Apron mobile kitchen” (my nickname) transferred everything to the hosts’ kitchen and cooked three dishes for dinner: My own version of salmon carpaccio (inspired by a dish I’ve had at Suika (Japanese Izakaya on West Broadway and Fir in Vancouver ( http://www.suika-snackbar.com/)); salmon sashimi thinly sliced (easier to sliced when slightly frozen, sharp knife required!), drizzled lemon juice and wasabi mayo, then garnished with arugula, kaiware (sprouted daikon radish seeds) lightly tossed in yuzu dressing (grape seed oil/soy/yuzu juice/minced shallot/salt and pepper to taste) mixed with prepared seaweed (purchased from local Japanese deli)and flying fish roe (tobiko).
Salmon carpaccio with arugula and kaiware in yuzu dressing, seaweed, flying fish roe with wasabi mayo.
Steamed clams and prawns in sake(butter, garlic, mirin, dashi stock) with dipping sauce (light soy, lemon juice, shichimi (japanese spice mixture), mirin and green onions)
Steamed clams and prawns: From stove to table as is!Ready for the oven; pacific halibut purchased at Granville Island market; I skinned and portioned the fish myself at home the night before, then marinade two hours prior to cooking..
Roasted halibut fillet with seasonal vegetables purée , an improvised dish based on a recipe which I’ve learnt not too long ago from the halibut cooking class at Northwest Culinary Academy(http://www.nwcav.com/): Instead of halibut cheeks, I used halibut fillet and served family style; fish portioned and marinaded in olive oil blend (2 parts olive oil, 1 part canola oil), salt, white pepper, thyme, lemon zest), roasted in oven at 375 degrees until opaque; finished with mushroom purée and seasonal vegetables(see original halibut cheek recipe).
Marcia’s heavenly chocolate meringue!
What about dessert? That’s not really my department; Marcia made these absolutely delicious Chocolate Meringue; Barb and Nick served vanilla ice-cream with freshly picked strawberries from a local farm in Ladner, BC.
It was fun evening filled with lots of interesting stories and laughter; I have always told Andy he’s very fortunate his parents and siblings all live here in Vancouver! I miss my own family dearly, especially my Dad, who had a stroke in March 2012 and fortunately recovered. Although I just went to see him recently; somewhere between tossing the vegetables and roasting the fish, my mind drifted back to last year’s Fathers Day, when I made a special trip back home just to celebrate with my Dad, the first time in many years. Can’t wait until the end of this year when I will see my family again..(OO)