AUGUST 2017: Homecooking Snapshots (Baked Halibut/Pork Yamaimo Patties and Fish Soup)

Roasted potatoes, sweet beans, asparagus and BC wild stripe prawn cold salad with ponzu vinaigrette, Baked Halibut filet with toasted panko, Homemade Tartar sauce

Here’s what I have been cooking at home in August!

Since I am not professionally trained, I always love to learn and draw inspiration from others (professional or home chefs).

This month I am featuring three of my creations which you may have seen the pictures on Instagram already.

For first hand updates follow me on Instagram: @mygoldenapron

And remember, always adjust the seasoning and ingredients according to you and your loved ones dietary needs, and the most important ingredient, COOK with LOTS of LOVE and PATIENCE (OO).

Baked Halibut Filets with Homemade Tartar sauce: (Picture shown above)

I have adapted Just One Cookbook  (love her cheesecake and other Japanese recipes) Ms. Namiko Chen’s toasted panko (for baked pork chop/chicken katsu) for my baked halibut filets; I actually skipped the flour and dipped the cleaned and skinned fillets in beaten egg and toasted panko only.   Once the panko cooled down, add grated lemon zest (1 lemon), 1 teaspoon of sea salt  and mix well, set aside.

Baked Halibut fillets: (ingredients: halibut fish fillet, panko, one lemon (for slices and lemon zest), salt and pepper)Pre-cook the panko before baking the fish fillets: For the 4 fillets, I have used 1 cup of panko and 1 Tablespoon of extra virgin olive oil. Combine the oil and panko in a frying pan, and toast the panko over medium heat, stir once in a while to ensure all panko bits are toasted until golden brown and evenly. Tremendous patience is required for this step.  Let the toasted panko cool before you start coating the halibut fillets.

Preheat oven to 400F.  Lined the baking sheet with parchment paper.  Pre cut some lemon slices (using the same lemon which you used to get the zest) and placed them on the baking sheet.

I bought 4 filets (there were 4 of us) and total weighed approximately 1.5 lbs.  Skinned the halibut filets (or you can ask your fish monger to take care of this), pat them dry.

Coat the halibut one at a time: gently dip each piece into the beaten egg mixture,  make sure you get rid of excess egg mixture.  Using your dry hand, coat the fillet with toasted panko.  Lightly brush the flakes to cover the fish, then lightly press the panko flakes, make sure they adhere and the fillet is coated evenly.  Place the coated fillet on top of lemon slices on the baking sheet.  Baked fish fillets until cooked through (test using a bamboo stick or tooth pick, once it goes through the fillet easily they are done), approximately 12 to 15 minutes.  Halfway through I turned the baking sheet around (for even cooking) quickly, and I checked the fillets quickly at the 10 minute mark for doneness.

Serve cooked fillets with homemade tartar sauce: I do not have any specific quantity for this recipe; I used the OJAI lemonaise (or any mayo) and Greek yogurt at 1-1.5 ratio, added some lemon zest, cooked corn niblets and takana (optional – dried radish leaves, rehydrated), sea salt and black pepper (a pinch) to taste.  If you want to thin out the sauce a little, you can add a squeeze of lemon juice.

As for my bean, asparagus and prawn salad with ponzu vinaigrette,  I used a store-bought ponzu and add good quality extra virgin olive oil, a little rice vinegar and ground pepper for the vinaigrette (2:1 ratio oil/soy, most vinaigrettes 3:1 ratio oil/acid, I prefer less oily).   I blanched the asparagus, sautéed the beans and boiled the small prawns (with lemon) quickly, then shocked them in ice and shelled them.   When you are ready to eat, toss the ingredients together and lightly dress the salad (do not drench!!).

Note: Be creative with your vegetable selection,  and remember always adjust your seasoning according to your dietary needs and taste !

Pork and Yamaimo (Mountain Potato) patties with apple ginger sauce, sautéed cauliflower, enoki mushroom and okra

I still cook a lot of Japanese food at home.

I adapted the patty and sauce recipe from the popular Japanese chef Masa (Masa’s ABC Cooking @masa.abc on Facebook) who resides in Taiwan. If you check his Facebook page, there are regular uploads of cooking videos with wonderful and clear instructions (for readers who can understand Chinese, it is in mandarin,  Chinese subtitles on-screen).  I love his idea of using yamaimo (mountain potato) with ground meats;  the addition keeps the patties very moist!  Chef Masa’s original is actually a chicken patty donburi recipe (with okra and eggplant), I created a dinner set and served with cauliflower, enoki mushroom and a dairy free chilled potato leek and watercress soup.

Pork Patties: organic /hormone free ground pork 250 g, 1/4 of yamaimo (mountain potato, grated),  grated ginger, 1/2 teaspoon sea salt, 1 egg, 1 stalk green onion (chopped), grated ginger (1 teaspoons), 1 Tablespoon tamari****, 1 teaspoon maple syrup***, pinch of white pepper for season, 1 Tablespoon extra virgin olive oil  ***tamari and maple syrup are my choices, I prefer also not to use too much oil.   The original recipe

Thank you Chef Masa for such a great recipe and inspiration!

Using your clean or spatula, mix ground pork and sea salt until you achieve a “smooth and sticky” texture.   Then add the egg, chopped green onion, grated ginger, maple syrup (or sugar), tamari and grated yamaimo to the meat, use the spatula in a “cutting” motion (easier to work with the mountain potato), fold and blend well.   Set aside.

Apple dipping sauce:  Add Tamari, mirin and sake (1-1-1), 1/4 apple, 1 clove of garlic, 1 teaspoon maple syrup and 1 small knob of ginger to blender, puree and blend.   Taste and adjust your seasoning (I tend to use less soy).  ***When using maple syrup you may need a little more to cut down the sharpness of the ginger.

As for the vegetables, basically anything goes.  I just sautéed and lightly season them with sea salt, cover up with aluminium (another great tip from Chef Masa) to keep them warm.

Using medium heat, heat frying pan and add the extra virgin olive oil, using a Tablespoon (or small scoop), spoon the meat mixture onto the frying pan, forming small “pancake” size patties (you can always adjust).  Do not crowd the pan with too many patties at once, medium size pan should fit 3 to 4 small size patties.  Let it cook for a few minutes before gently “lifting” the patty to check if it is set, once they turn golden brown, it is time to flip the patties and let them cook through.  When patties are almost cooked, spoon some sauce over the patties and let the flavor melt together.  (**With pork it is better to cook a little longer, the yamaimo actually keeps the patties moist).  I heated the remaining sauce and served it on the side.

For the original recipe and video, please check his site on Facebook or English website.

https://www.facebook.com/masa.abc/

https://masaabc.com/

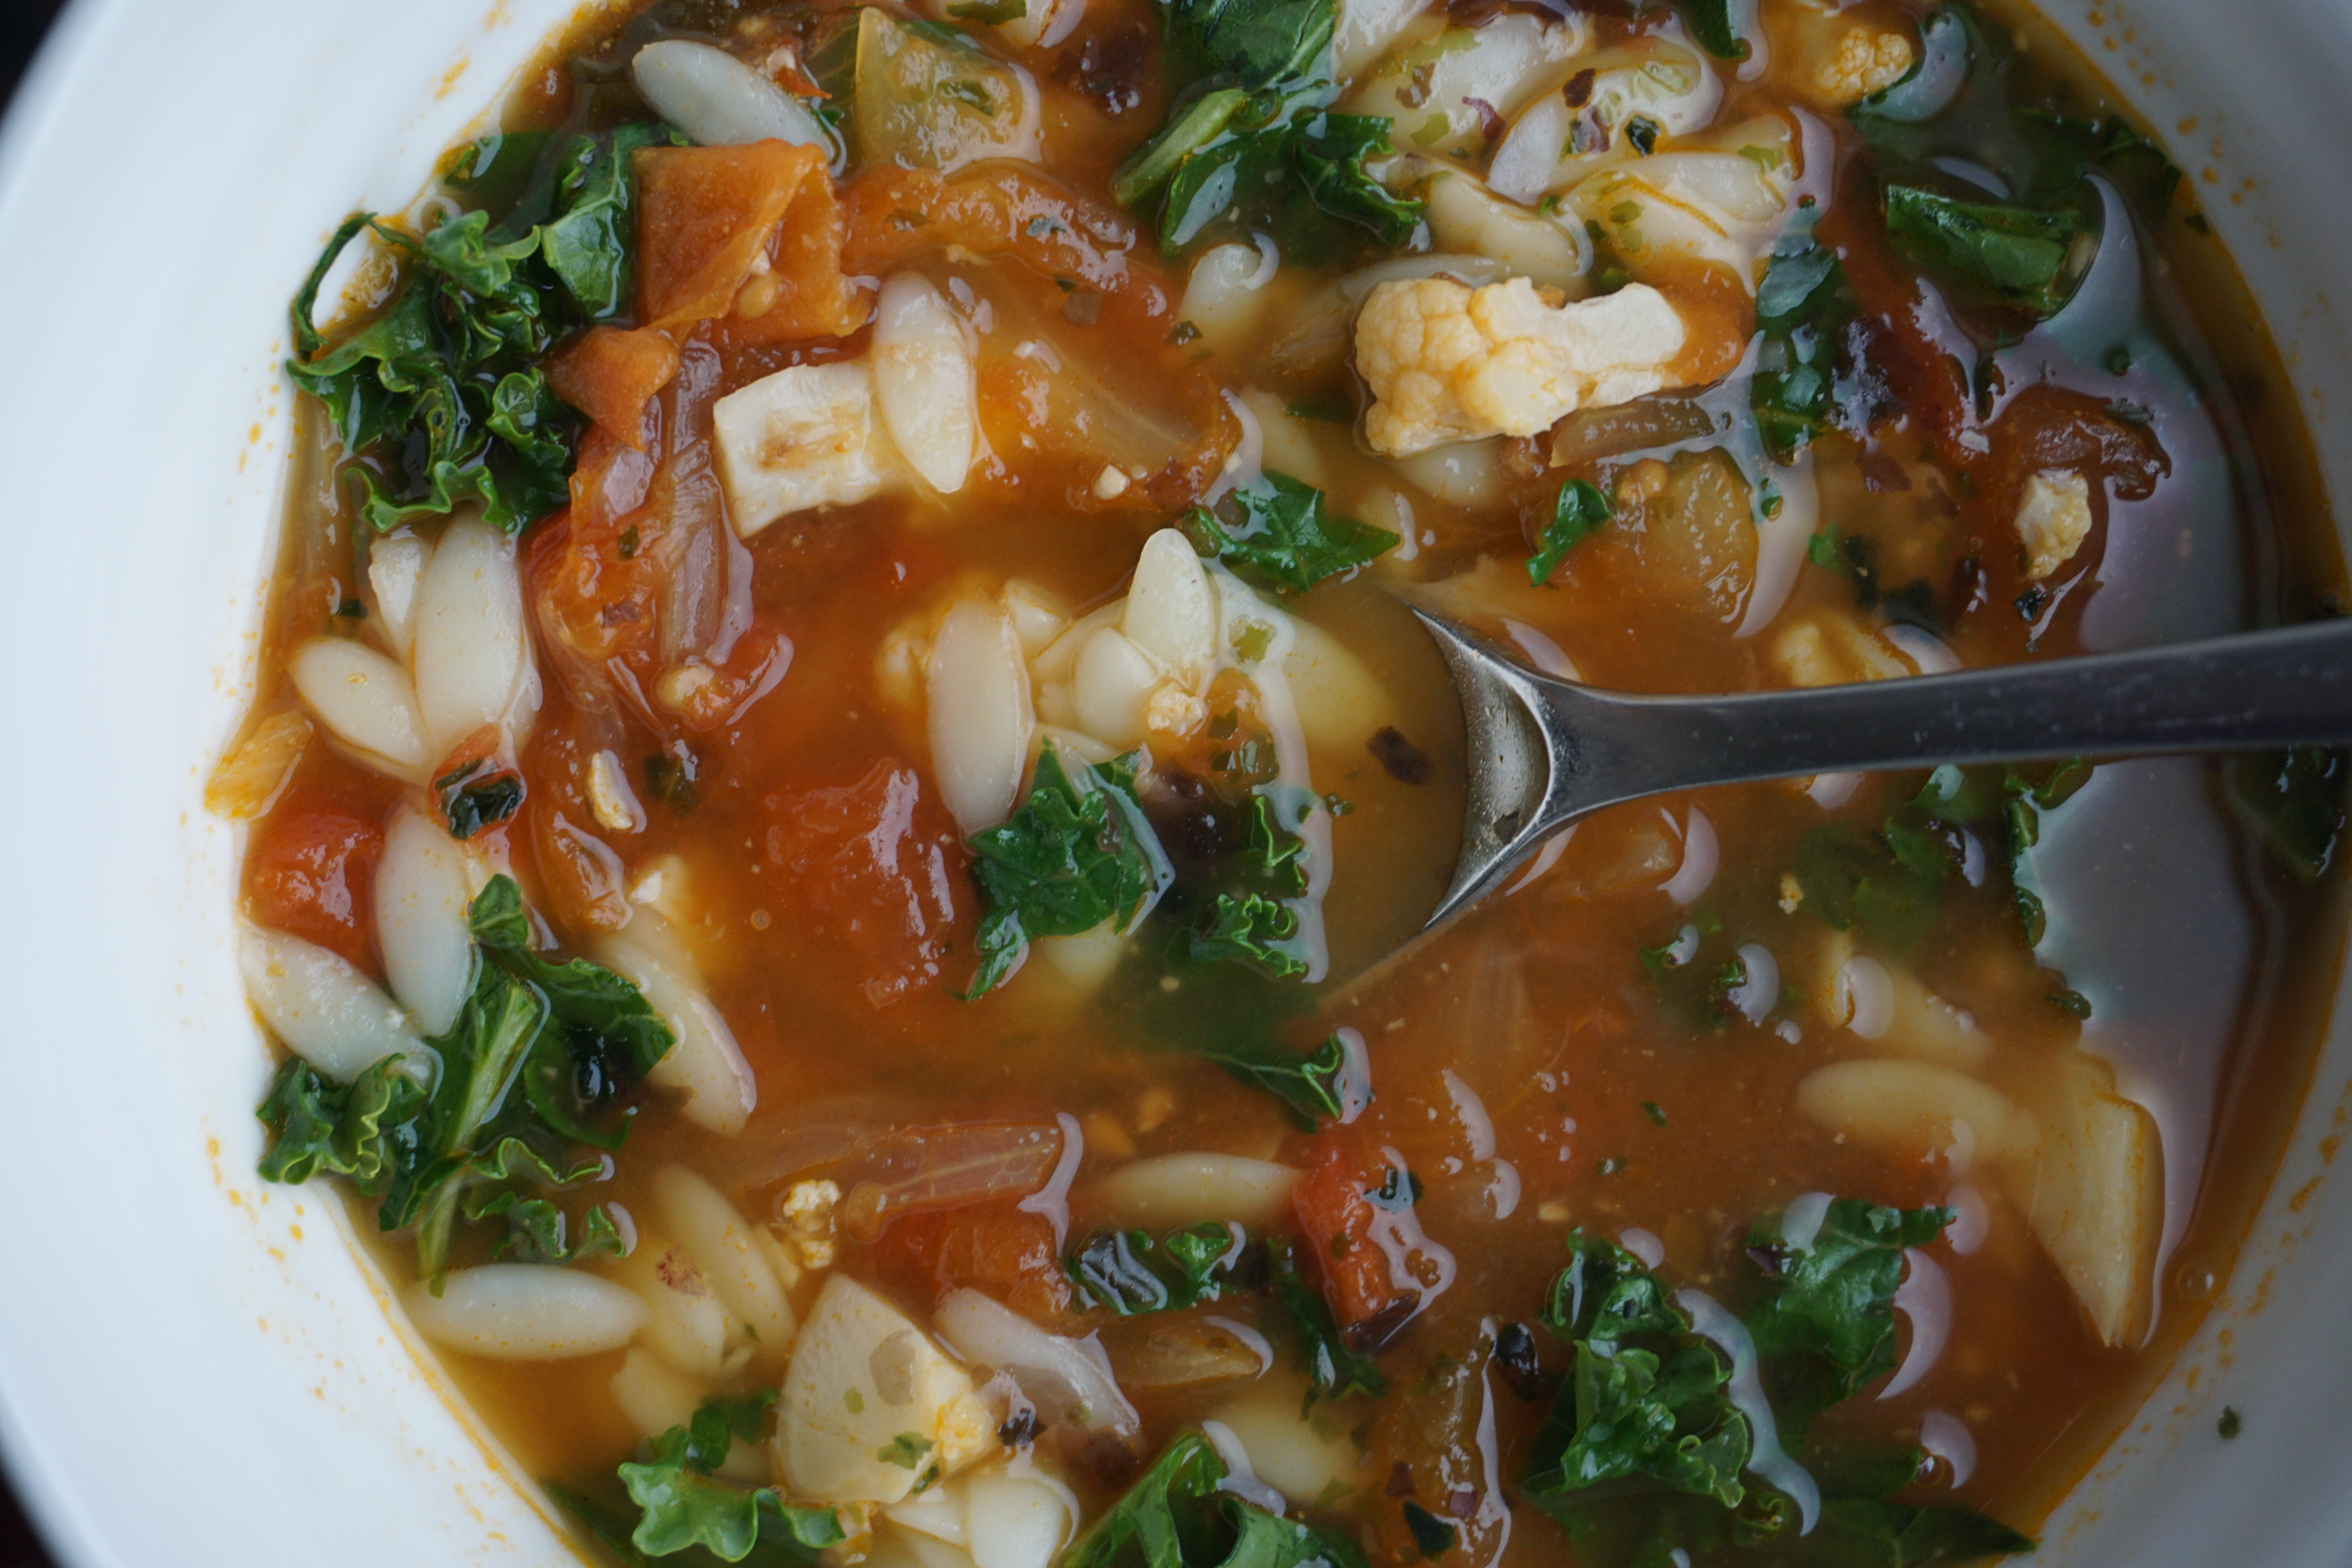
Homemade Heirloom Tomato and Kabocha Fish Soup with Rice Noodles and vegetables

Recently I am on a “chinese food mode” and I decided to make my own “Fish soup rice noodle at home”.

I go through phases from time to time; recently I have been watching a lot of Chinese cooking shows.

I must admit as I am getting older, and having lived overseas for such a long time, I have a stronger desire to get back to my “roots”.

Soup Base: 2 small size yellow croaker fish (cleaned – or any white whole fish which is great for soup making, don’t splurge on anything too expensive), 1 medium size kabocha (Japanese pumpkin seeds removed and chopped into pieces), 2 big heirloom tomatoes and 3 medium tomatoes on the vine (seeds removed and loosely chopped), 9 cups of cold filtered water, 2 croaker fish (cleaned), knob of ginger, green onion, cilantro, 1 large yellow onion, 2 to 3 stalks of celery (optional), a small knob of ginger (sliced), sea salt and white pepper for seasoning.

**This is a pretty large pot of soup,  we had some for dinner the other night and used the rest for noodles.  This can feed a family of 4 to 6 easily.

I actually made the soup two days ahead of time; here is a good tip for preparing the kabocha:  I admit I am not strong enough to “chop” through the kabocha and honestly I don’t want to lose my hands along the way, my friend Sofei told me to put the kabocha into a pot of hot water and let it slowly simmer for a while  The skin will soften and make it much easier to cut through.  Once it is ready, peel the skin (I use a peeler), scoop out the seeds and chop into 1 inch pieces.  Seed the tomatoes, loosely chop cilantro, celery stalks,  onion and green onion (keep stalks in tact).  Set aside.

Clean the fish (remove the blood line), pat dry, lightly seasoned with sea salt and white pepper  Heat  the frying pan over medium heat, add a little extra virgin olive oil, add and stir fry th ginger slices.   Add fish to frying pan, and cooked both sides until slightly golden brown.  You can always add a splash of Chinese cooking wine (Shaoxing) to eliminate the “fishy” taste, I find by using ginger and definitely be mindful about removing the bloodline (at the neck between the head and body, you can see a little “clot”), the fish is not bitter or “fishy” at all.

Fill large clay pot with cold filtered water, add tomatoes, onions and celery.

Remove the fish from frying pan and together with the ginger slices, put inside the “fish soup bag” (can be purchased at most Asian supermarkets). Tie a tight knot. Add the fish bag to the soup pot.

Bring it to a boil, skim the “scum” and turn down to medium low heat, let is slowly simmer for 1.5 hours.  While the soup is simmering, check and skim the foam from time to time.

Using chopsticks or tongs, remove the celery stalks and the fish bag.  Using a spatula or ladle, “squeeze” the fish bag gently , you will find a lot of soup is actually “soaked” into the bag, you don’t want to waste the liquid gold!

Add half of the kabocha chunks into the soup, and let it simmer for another half hour to 45 minutes, let the flavors melt together (I like my kabocha “melted”.  Finally add the remaining kabocha chunks, cilantro and napa cabbage, simmer until vegetables are cooked through.  Season with sea salt and ready to serve as soup in a regular Chinese family dinner.

To turn this into a noodle soup base:

My homemade rice noodle in fish, tomato and pumpkin soup!

Noodle and Fixings (be creative):   rice noodle, mung bean noodle, shimeji mushroom, napa cabbage, bok choy, swiss chard, microgreens (for garnish), tofu fish cake, green onion, boiled egg.   I am not going to list the quantity because it really depends on how many people you are feeding.

Cook all vegetables and fixings separately (all boiled) and create a noodle bar, lay out all ingredients, and chopped up more cilantro and green onions for garnish.

Have fun and be creative with your dinners…now as my friend Peter (Pastaboypeter on Instagram) always say, “now go and eat with the ones you love”.

Sources for my ingredients in Vancouver: Seafood City (Granville Island), Vancouver Farmers Market, Choices Market, the August Market, Sakuraya Japanese food store, T & T Supermarket and H-Mart.


Summer Time…Chilin’ and Cooking


IMG_2332
Chilin’ on Fourth – Yuzu Lemonade @ Raisu

Summer Time: Chillin’ and Cooking….A snapshot of my July in Vancouver..

On Wednesday July 27 I will be on Ms. Deborah Moore’s radio show on Fairchild Radio 1470 at 10:30am sharp!  ‘If you have any feedback or recommendations, I would love to hear from you!  Drop me a line anytime at goldenapron@gmail.com

Keep Chilin’ and Cooking (OO)


Modern Chinese Cooking Class @ Nourish Cafe (3742 West 10th Avenue, Vancouver, BC)

Last week my “cooking buddy” Jo and I took a ‘Modern Chinese Cooking Class” at the newly opened Nourish Cafe; owner and instructor Dan taught us how to make a simple version of “baos” (steamed buns) and “Dan Dan Noodles” – it was a fun and refreshing take on some old Chinese classics!  I went with no expectation and left with great ideas; in fact Dan has solved one of my recent cooking dilemmas!  Nourish’s food philosophy and practices are actually very close to what I’ve been learning over the past few years since we made some significant lifestyle changes; Thank you Dan and Lisa, it was great pleasure meeting you both and I shall return sometime!  Check their website for class schedules.

http://www.nourishvancouver.ca

IMG_2115
Brunching at Nourish – Sriracha hummus and potato cakes and Eggs Benny; they offer delicious and nutritious options for Vegetarians and Vegans

IMG_2392

IMG_2402
Dan’s Dan Dan – here’s what we assembled and devoured in class ; the tahini and almond butter base “dan dan” sauce was absolutely delicious! Thanks Dan for the inspiration, you actually just solved one of my cooking dilemmas!
IMG_2487
Deb’s experimental Dan Dan – inspired by Dan’s recipe, I’ve changed things up a bit by adding sea kelp noodles (50% kelp/50% regular noodle), sesame tahini (omit sesame oil) and balsamic vinegar. Recipe coming soon.

French cooking classes: Tartine and Maple

http://www.tartineandmaple.com

French cooking is always very close my heart; Jo and I attended two demo-cooking (French cooking and later Brioche) classes learning from the lovely Valentine at Uncommon Cafe, she definitely made everything so easy!   Check her website for class schedule!

IMG_2028


Below is the picture of the asparagus and cheese tart which I created at home, following her recipe (from her other french cooking class); I think I may have conquered my fear in working puff pastry…one step at a time!


IMG_1266

Shrimp croquettes @ Raisu in Kitslano

The latest “sister” restaurant to Kingyo (Davie), Rajio (west 10th) and Suika (West Broadway); Raisu opened recently on West 4th Avenue (2340 West 4th Avenue, Vancouver, BC),  a big thank you to Brian (Seafood City) who told me about this new venue!  There’s no storefront on the street level, look for a small entrance which leads you to an open space with patio on the second floor!

The shrimp croquette was so delicious and resembled the fluffy crab claws at a Chinese banquet; the vegetarian udon was packed with flavor! A cool open space with good vibe, where else would you be listening to Billy Joel and watching old-time Bruce Lee’s movies while enjoying some delicious bites?  Reservations recommended (by phone only).

IMG_2334
We usually associate croquettes with potatoes; this is completely different and I think they have hit a home run with this dish! Now I’m curious and want to “dissect” this at home..
IMG_2338
We waited for 45 minutes for a table at another drinking place; so we didn’t try their Teishoku! Vegetarian udon was light and packed with flavor (miso)…Love it!

An old favorite revisited: Secret Garden Tea Company

My buddy DP and I paid a visit to this established and timeless favourite in Kerrisdale, they will be moving this summer!   We had their High Tea set and I think their lemon tarts is still my favourite…They will be moving to a new location (on West 40th, still in the neighbourhood) sometime this summer.

http://www.secretgardentea.com

IMG_2223

It’s never too hot to cook: check out my noodle recipes (new and old postings)

I’m making more “mixed” noodle dishes this summer, experimenting with the spiralizer (yes finally new toy!) and new products (kelp noodle); meanwhile check out my old recipes (Type in the keywords in the “search” box (left column) above “RECENT POSTS”.  My favourite recent posting is last month’s Sake Kasu sablefish (OO)

  • Sea Kelp “noodle” – available at Whole Foods – experimenting and recipe coming soon!  Check out my instagram!

IMG_2237

  • My Lazy Phnom Penh Noodle (July 2014) – it’s still one of my favourite things to make)

IMG_2008

  • Mushroom Soba Salad (February 2014)
  • Vegetarian Soba with Lemon Vinaigrette (March 2016)


RECIPE: Sake Kasu and Miso Sable Fish

IMG_2137 (1)

We love Sable fish!!

A simple marinade recipe for sable fish (black cod); sake kasu is the “lees” that remain after the fermented rice mash has been processed during the sake making process. It is a natural flavor enhancer for meats, fish and soups, available at Japanese food stores (see sources below).

Ingredients (enough for 4 servings (almost two pounds) of black cod (each fillet 1 inch in thickness) : 1/2 cup of sake kasu (sake lees – you can find it available at Japanese food store in the refrigerated section*), 1/4 cup water, 1/4 cup mirin, 1 to 2 Tablespoons coconut brown sugar (my preference), 2 Table organic white miso paste, sea salt for seasoning

Preparation:

  • Using paper towel, pat the fish dry completely.
  • In a large mixing bowl, combine sake kasu, miso, water, mirin and sugar, slowly whisk and blend until the mixture is smooth.
  • Fill a large zip lock bag with the marinade, carefully place the fish and make sure they are completely covered with marinade. Put the bag and lay it flat on a prep tray (I used stainless prep trays, available at Japanese stores).  Seal and refrigerate for 1 (minimum) to 2 days.

When you are ready to cook the fish:

  • Preheat the broiler.
  • Remove sable fish from marinade, using paper towel, carefully wipe the fillets dry without breaking them.  Do not rinse with water!
  • Lined a rimmed baking sheet with aluminium foil
  • Place the fish skin side down, lightly season with sea salt
  • Broil until the surface is nicely browned and fish begins to flake, about 5 minutes.  Keep an eye closely and make sure you don’t burn the fish!
  • Turn the fish gently to brown the skin, 2 to 3 minutes.
  • To test if the fish is done, I used Japanese metal chopsticks (thin skewers will do) to poke the fish gently. If it slides in smoothly, it’s done.
  • Remove the bones before serving.

***Instead of broiling, I baked the sable fish (parchment paper lined rimmed baking tray) at 400 degrees,  it took 10- 12 minutes to cook through. Sear the fish first if you want the “browning” effect.

FYI:   I served the cod with a shiitake and shimeji mushroom dashi “jus” with sea asparagus and Shanghai bok choy, seaweed flakes and green onion (recipe will be posted at later date).

Resources:

*Osake Artisan Sake Maker sake kasu, available directly from their store in Granville Island (Vancouver) or online, It is also available at Fujiya (912 Clark Drive, Vancouver, BC)

IMG_2140
Sake Kasu – Umami!

http://www.artisansakemaker.com

For sea salt: I met the wonderful team from Vancouver Island Salt Company a couple of months ago through Dinner Party YVR; my personal favourite is their smoked sea salt.  Their products are available at finer food stores, check out their website, eat and shop local!

http://www.visaltco.com

For sable fish: My go to place in Granville Island, Seafood City; owner Brian and his crew will take good care of you!  They carry condiments also which go well with seafood; I got a bottle of Jonny Hetherington’s Habanero pineapple hot sauce which I used for my spicy sweet and sour sauce, something very tasty to try and “think outside of the box”.

     http://www.seafoodcitygi.com


RECIPE: WAFU Tomato Orzo Soup


DSC00868


Post holiday season “cleanse” at home with lots of soup and vegetables….I have used this tomato soup base for different dishes (seafood pot, hot-pot base, just to name a couple); today I add orzo and kale, it turns into a healthy wholesome meal… Enjoy (OO)!

Serves 2-4

Ingredients: 8 medium tomatoes (vine tomatoes for this recipe), 1 clove of garlic (peeled and finely minced), 1 large onion (thinly sliced), 2 Tablespoon Extra virgin olive oil, 4 cups of katsuobushi dashi, 1/2 cup of orzo (or pasta of your choice), 1-2 Tablespoon white miso, 2 Tablespoons of kaeshi (see recipe under “Vegetable Curry Udon), kosher salt (to season tomatoes for roasting), kale (handful, stalks removed and  finely chopped), savoury seaweed flakes (for garnish).

Preparation:

  • Pre-heat oven to 350 degrees F.
  • Prepare the tomatoes: wash, core and cut them into halves, toss in 1 Tablespoon of extra virgin olive oil, lightly seasoned with kosher salt, lay them evenly on baking tray, roast them for 25 to 35 minutes, or until caramelized.  Remove from oven, set aside and let them cool.
  • Prepare the onions (thinly sliced) and garlic (peeled and finely minced).
  • Prepare katsuobushi dashi broth (can be done 1 to 2 days ahead, reheat refrigerated broth and keep it warm for later use, use kombu broth only to make it entirely vegetarian).
  • In large pot, using medium high heat, heat remaining Tablespoon of extra virgin olive oil, saute onions, stirring constantly, until onions become soft and turn translucent. Add the 1 Tablespoon of miso to the onions, continue to cook, stirring constantly and mix well, do not burn the miso.
  • Add the roasted tomatoes to mixture, stir and cook for 2 to 3 minutes.
  • Add warm dashi broth and 2 Tablespoons of kaeshi to the pot, scrape the bottom, cook for 2 to 3 minutes and bring to a boil.  Skim off any fat or scum from the mixture, reduce heat to medium low and simmer for 25 – 30 minutes.
  • Prepare the kale for garnish.
  • When soup is almost ready, boil water in a different pot to cook the pasta (usually 100 grams of pasta to 1 litre of water), add kosher salt to boiling water,  then add the orzo and cook according to instructions.
  • Taste and adjust the seasoning of the soup (if necessary), put orzo pasta into bowl, ladle the soup, garnish with chopped kale and seaweed flakes, now ready to serve and enjoy!

Note:

I have used the Rustichella d’Abruzzo’s orzo pasta for my recipe (available at Gourmet Warehouse on East Hastings, Vancouver, BC), the savory seaweed flakes is from Cornish Sea Salt Co (also available at Gourmet Warehouse).

See “Vegetable curry udon” for kaeshi recipe – I have used the kaeshi (instead of just soy sauce and mirin) which I made for the curry udon as seasoning; you can even add a dash of sake when cooking the onions and tomatoes, add red chili pepper flakes to make it spicy, be creative!

Katsuobushi dashi broth – made with kelp and dried bonito flakes

I added leftover cauliflower to the soup and use less orzo, it is always a great idea to have more vegetables.

http://www.gourmetwarehouse.ca

http://www.rustichella.it


Duck Breast Lettuce Wrap

IMG_2173
My lettuce wrap platter – “Pinkish” tone achieved!

The idea for this recipe spawned from three years ago when my friend “VG” brought back a bag of really delicious perilla flavored tea plums from her hometown (Kaohsiung); the moment I tasted the plums I immediately thought of using them for cooking and pair with duck, green tea and lychee to create an entree.

This was a work in progress and went through a few different versions, the idea of serving as lettuce wrap came this summer when I had a “Asian Food Fest ” gathering with some of my friends! I think by far it’s the best way to serve this duck breast and let it be the star with the perfect “supporting casts”. As I am  only an amateur home chef, the measurements are approximate and cooking methods are based on the knowledge I acquired through my home cooking experiments and the few cooking classes which I’ve attended.  Feel free to “tweak” it any way you think works best, and let me know if you have other suggestions.  Enjoy (OO)!

Ingredients: (Serves two as main course)

2 duck breast (small to medium size), 1 English cucumber, Bunch of green scallions, Head of butter lettuce 

Ingredients for the brine (which will be used to braise the duck breast and create the dipping sauce): 8 cups of cold water, 8 Tablespoons Organic Soy Sauce, 1 small knob of ginger (grated), 2 green scallions (roughly chopped), 1 green tea bag, 1 Tablespoon brown sugar (I’ve used rock sugar),I  8-10 lychee (fresh or canned, roughly chopped), 10-12 Taiwanese tea plums (remove seed, roughly chopped), 1-2 Tablespoons whole black peppercorn, juice and zest (grated) of 1 lemon,1-2 Tablespoons Japanese rice wine (sake), sea salt (for seasoning as required), 1-2 Tablespoons Taiwanese plum juice (optional)

IMG_1821
Left: Taiwanese Tea Plums (I found this at the Taiwanese supermarket in Richmond BC); Right: Taiwanese Tea Plum Concentrate (optional as it is difficult to find)

Preparation:

The day before: 

– Prepare the brine: With the exception of the green tea bag, put all brining ingredients into a 6 quart sauce pan. Using medium high heat, bring mixture to a boil.  Reduce to medium low heat, let the mixture simmer and reduce for at least 45 minutes to an hour, it will become more concentrated.

– Turn off the heat, add the green tea bag and let it steep for 10 to 15 minutes.  Remove from heat, remove tea bag, stir the mixture and let it cool down completely.

– Prepare the duck breast for brining: Place the duck breast on the chopping board skin side up, using a sharp knife, score the skin in a diagonal direction (45 degree angle), be careful not to cut into the flesh. Turn the duck breast around and score in the opposite direction.  Pat skin and flesh side dry and set aside.

This is a very important step as scoring the duck breast for cooking helps to render out the fat from the skin more effectively. It is best to score the skin of the duck breast when cold, as it becomes more difficult once the skin warms up.

– Pour cooled down liquid (including all ingredients) into a non-reactive container (BPA free plastic or glass with lid). Submerge the duck breasts into brining liquid, cover with lid and refrigerate overnight.

 Cooking Day:

In the morning:

– Remove the duck breasts from brining liquid, pat dry thoroughly (It must be completely dry) with paper towel, cover and refrigerate.

– Strain the liquid through a fine strainer, press hard on the solids to ensure you get every bit of the liquid.  Run it through a few times to remove any small bits.

– Sauce preparation: Pour liquid into 4 quart sauce pan, using medium high heat, bring liquid to a boil, reduce to medium low heat, and let it simmer and further reduce to approximately 2 cups, the consistency should only be a little “syrupy”.

When ready to cook and serve:

– Take the duck breasts from the refrigerator and let them come towards room temperature prior to searing.

– Wash all vegetables thoroughly: Pull of pieces of butter lettuce gently, wash thoroughly and pat dry with paper towel. Julienne the cucumbers (cut in thin slices) and shred the green scallions.

– Reheat the sauce, keep in low simmer (don’t let it burn).

– On different stove top, place duck breasts skin side down on cold dry skillet, do not add any cooking oil. Place the pan over medium to medium low heat, and slowly render down the fat, it will take approximately 6 to 8 minutes, using a spatula (be careful not to burn yourself), gently flip over and check if skin is browned evenly. Using a spoon, remove the duck fat.

IMG_2143
Duck breast skin side down on cold dry pan

– When duck breast is ready, flip over (skin side up) and remove from skillet, finish cooking by “braising” in the sauce (as shown in picture below), skin side up.  Adjust to medium low heat, Using a spoon, “spoon” the sauce constantly over the breast (this will help to cook the breast evenly), the liquid should be gently boiling (you can see bubbles).

IMG_2146

– Let them cook for approximately 5 to 6 minutes (depends on the thickness of the duck breasts), flip them over skin side down and cook for another 2 to 3 minutes. To test its doneness, the breasts should feel firm but tender, or you can should a

– Remove from heat, set aside and let them “rest” for at least 10 minutes prior to slicing.

– To finish the sauce, add a little duck fat (which you rendered earlier when browning the skin), Japanese sake and lemon juice, stir and mix well, taste and adjust the seasoning if required, finish off with a few grinds of black pepper. Strain the sauce one more time for a smoother texture.

– Slice the duck breasts thinly, it should be “pinkish” in colour.

– Assemble the platter and serve immediately.

Notes:

– I purchased the duck breasts from Armando’s at Granville Island.  The smaller ones are not as thick and easier to cook.

– This website has lots of good duck recipes and references:

http://www.greatbritishchefs.com/