September 2017: Mangiamo bene in Settembre (We Eat Well in September)


Mangiamo Bene! Prosciutto di Parma, Mortadella and figs, homemade salmon pate and bagna cauda, just a few of the dishes we enjoyed on our “Italian Night”

Over the Labour Day long weekend, I spent a wonderful Sunday evening with my pal James, hosting a group of our friends together at my home to our famous “Italian Night”.

For the past three years I always look forward to March and September when my dear friend James returns from Italy to Canada for a short visit; we have a semi-annual standing ” Italian cooking date”, a tradition which has a very special place in my heart.

Sweet and Special Delivery with love from Sabina, Casperia, Italy

Cooking and sharing with family and friends is the most beautiful way to celebrate relationships and bring people together.

That night we talked, we laughed, we cooked, we learnt and we shared; the memories we created together are priceless…

To my friends who joined us this time (you know who you are),  it was great seeing you all and catch up, Grazie!  And to our dear friends who missed the gathering this time (you also know who you are), we missed you.

To my dear friend and teacher James, I look forward to our next “date” in March, hope to continue this wonderful tradition for many years to come and one day we will be able to cook together in Italy…Alla Prossima…xxxooo

Remember the most important ingredients you will need to create a beautiful meal….Patience + Love + Kindness + Gratitude

Bagna Cauda: an aromatic “hot bath” for fresh vegetables and bread 

Have you ever had Bagna Cauda?  It is a dish originally from Piedmont, Italy.

Fresh market vegetables, both cooked and raw, are dipped into a flavourful warm sauce,  made of anchovies, olive oil, garlic and butter, enjoyed with scrumptious chunks of bread; this makes a wonderful sharing and wine-pairing dish for any dinner gathering, particularly during Fall Harvest Season.

I’ve only had this dish in restaurants twice here in Vancouver, once a few years ago enjoyed a Japanese “miso” version at Rajio (Izakaya on West 10th Avenue in beautiful Vancouver), and most recently a beautiful rendition at Osteria Savio Volpe.

Bagna Cauda (right) at Osteria Savio Volpe : my inspiration

It sounds very good already right?   The even better part, it is not difficult to make.

The key to make a beautiful bagna cauda is having the freshest ingredients and you are already halfway there; the rest involves a lot of meticulous cleaning and chopping! Oh one more thing… a fondue pot will be handy to keep the sauce warm.  I actually didn’t have the pot, so I just heated up the sauce right before dinner starts so it was ready to go when we were ready to eat!

I have roughly based the sauce recipe on Epicurious;  for my version I have reduced the quantity of the butter and anchovies (trying to be more health conscious by reducing the fat and salt intake).  Once you type in “Bagna Cauda”, you will be able to find many different versions for this classic Italian recipe (see also Food52  detailed write-up on its background and recipe).

Ingredients for dipping sauce: 1/2 cup – 3/4 cup of extra virgin olive oil, 4 Tablespoons unsalted butter (room temperature), 6 – 8 cloves of garlic (chopped), 8 – 10 anchovies fillets.

Preparation: Blend the anchovies, garlic and olive oil in the blender until smooth.

Pour mixture into a medium saucepan and over medium low heat, cook the sauce for 15 minutes, stirring occasionally.  Cook until the garlic becomes fragrant, you must pay lots of attention garlic burns easily, you don’t want to brown it.  Before removing from the heat, stir in the butter until blended nicely.

Taste and season with pepper (if you like) and sea salt (if necessary, remember anchovies are quite salty).

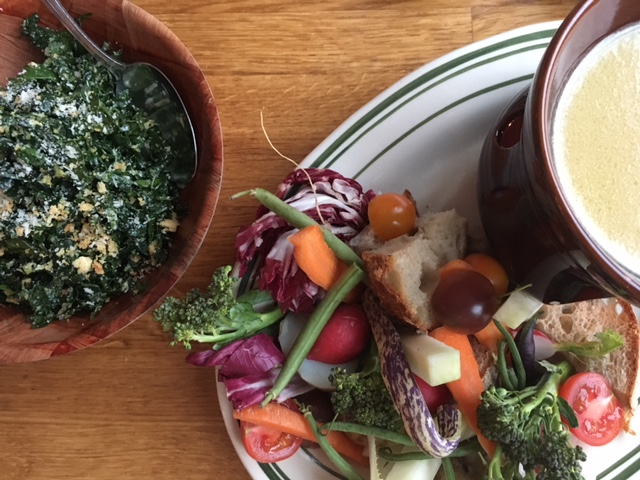
Serve raw or cooked vegetables and bread; I prepared a tray of fresh vegetables (picture below) purchased from the farmer’s market: a selection of beans, tomatoes, cucumber, carrots, cauliflower and peppers.

My version of Bagna Cauda: All the goodness in a Huge bowl – Fresh in season vegetables purchased at the Farmers Market

Stringozzi with Peas, Pistachios and mint sauce 

We put all our friends hard at work this time making Stringozzi together!

Stringozzi is an Italian “peasant” pasta,  the shape of the noodles resemble shoelaces; all you need is water and some finest Italian “00” flour (we used “Caputo 00 flour” – see Saveur’s magazine article) 

The noodle making process involves everyone’s participation; our “pasta master” James mixed  the flour and water and we help a little to knead the dough.  The dough is then put in the refrigerator to rest (wrapped in plastic wrap tightly, rest for about 30 minutes to an hour).   We then take turns pulling the dough until it smooth (this is the most physically demanding part) and you can feel the “elasticity”.     When the dough is ready, we cut into small pieces and divided it amongst our group to “roll” out the pasta by hand.   We have to sprinkle a little flour on the noodles when we gather them together to keep them from sticking together.  The noodles are actually quite delicate and a bit chewy, my friends said they resemble a little like ‘handmade’ udon.

Prepare a large pot of salted boiling water to cook the pasta, the noodles actually cook quickly (just a few minutes) and you have to stir a little while cooking.  Do not “crowd” the pot by putting too much noodles all at once.

When the noodles are cooked 3/4s of the way through, transfer to the large pan already filled with the sauce of your choice, toss gently together and let the noodles to finish cooking through.  Please DO NOT toss out the pasta water, you will need to use it to adjust the thickness of the sauce.

Kneading, pulling, rolling and now ready to cook!

My friend James created a “pesto” sauce – a mixture of sweet gorgonzola, peas (we used frozen), basil and pistachios, all blended together smoothly in the food processor.  The sauce was transferred and cooked in a very large pan, use the pasta water to adjust the thickness of the sauce, when pasta was almost ready toss them into the pan and mix well, let the noodles cook through.

In the past we have created Stringozzi all’amatriciana (click to see recipe on Serious Eats – Tomatoes (preferred San Marzano), guanciale, red pepper flakes, wine and pecorino romano cheese ) which is one of my all time favourite.

Peas, mint, sweet gorgonzola and pistachio “Pesto” with Stringozzi – Ricotta cheese can also be used for this pasta sauce.

Notes:

Unfortunately I don’t have a specific quantity for this pasta recipe; I came across a general recipe which is very similar to what we have created on this blog:  Madonnadelpiatto 

If you are ever interested in learning how to make pasta, my dear Italian friend Peter (Pastaboy) is a wonderful teacher, click on his name for more details.

Some of my go-to shopping places for Italian foods/ingredients in Vancouver: Cioffi’s, Bianca Maria (2469 E. Hastings, Vancouver), Les Amis Du Fromage and Oyama Sausage Co. 


May 2017: Home cooking Snapshots


Miso and Sake Kasu Sable fish, mixed vegetables (lotus root, burdock, broccoli and turnip leave) rice

Here are the snapshots of what I have been cooking at home this past month!  Recipes coming very soon.

For the time being you can find my other updates and pictures with description posted on Instagram (@mygoldenapron).

I would also love to hear your feedback so feel free to send me an email (goldenapron@gmail.com) or drop me a line through Instagram (OO).

Picture above: Sake Kasu Miso Sable Fish with Mixed vegetable (burdock, turnip leaves, lotus root and broccoli) rice:  the dried burdock, turnip and lotus root are from Japan, I found them at a local Japanese store).

Nduja spaghetti Bolognese (with basil sausage from Oyama sausage and Co) : Remember Nduja, the spicy sausage spread ? I added to my Bolognese recipe to spice things up a bit !

When Japanese meets Italian: Roast shio koji organic chicken, cauliflower broccoli penne pasta in lemon parsley herb drizzle, garnish with crispy kale bits and lemon zest.  It is very easy to make the herb drizzle: chives, parsley, lemon juice, grated lemon zest, extra virgin olive oil, drizzle of honey and pinch of sea salt.

Pan fried spot prawn with Thai red curry (store-bought paste, added fish sauce, lemongrass, kaffir lime leaves)  served with lentil quinoa turmeric rice: since spot prawn season is over, you can substitute with other prawns/shrimp available for this dish).

Faux Unagi Donburi (Rice bowl): Orange roughy turned into unagi;  baked and glazed with homemade unagi sauce, scrambled dashi egg with green onions, on a bed of turmeric (just a touch) fresh peas and carrot rice, garnish with crispy kale bits (my current favourite garnish in place of seaweed)


Disclaimer: All ingredients are non-sponsored purchased at some of my preferred vendors in Vancouver, BC.  Pictures are my own and dishes are my creations based on what I have learned through cooking classes, reading cookbooks and research.

http://www.seafoodcitygi.com

http://www.petes-meat.com

http://www.artisansakemaker.com

http://www.visaltco.com

http://www.vankoji.com

http://www.oyamasauage.ca

http://www.cioffisgroup.com

Sakuraya Japanese Market (517 East Broadway, Vancouver, BC)

Bianca Maria Italian Foods (Nduja! – 2469 East Hastings, Vancouver, BC)


RECIPE: Vegetable Curry Udon

DSC00843

A bowl of savory and mouth-watering curry noodle soup on a cold Vancouver winter day!

My recipe is loosely based and adapted from Japanese Soul Cooking (By Tadashi Ono and Harris Salat), one of my great recent cookbook finds!  They use soba broth (it’s called kake soba broth) to enhance the flavor of curry;  I added turmeric (when sautéed the onions and vegetables), diced apple and fukujinzuke, commonly used to serve with Japanese curry rice, are used as garnish (in addition to green onion) to a hint of sweetness and add “crunch” to the dish, the end result is much more flavorful.  Leftover curry taste even better the next day, add more vegetables or meat then serve with rice as a donburi (you can always add crispy fried pork cutlet (tonkatsu),  or simply freeze it ready for use anytime for quick ready-to-go weeknight dinner; Enjoy (OO).

Serves 2-4:

Ingredients:  4 bricks of fresh-frozen sanuki udon, 1 large onion (thinly sliced), 1 small head of cauliflower (florets roughly chopped), 1 medium zucchini (diced), 4 small bunched carrots (peeled and chopped), 3 Tablespoons of ground turmeric, 1 Tablespoon of mirin, 1 Tablespoon extra virgin olive oil, 1 package (110g) Japanese curry roux (I used Glico Medium Premium),  6 cups of katsuobushi dashi, green scallions (white part only, thinly sliced on an angle), kosher salt (light seasoning when cooking vegetables).

Note:

To make the dish completely vegetarian, simply substitute the katsuobushi dashi with kombu dashi broth

For Meat Lovers: Thinly sliced pork or minced pork goes very well with the curry,  I used the a bit of ground ginger and apple, turmeric powder and kaeshi to marinade the pork (minced or thinly sliced) night before if I am adding protein to the curry.

You can use curry powder and potato starch instead of the instant curry roux.

Check out Ms. Namiko Chen’s  Just One Cookbook, she has a great pork curry udon recipe.

Here’s a picture of the fukujinzuke!

IMG_0252

*Recipe for kaeshi (makes 2 1/2 cups) – from Japanese Soul Cooking

Prepare 2 to 3 days in advance this recipe : Add 2 cups Japanese soy sauce (I used only 1 1/2 cups + 1/2 cup katsuobushi dashi to make it less salty), 1/2 cup mirin, 3 Tablespoons sugar (I used coconut nectar instead, adjust the sweetness accordingly) – Add all ingredients into saucepan and bring to boil over high heat.  Turn off the heat and allow mixture to cool off to room temperature.  Refrigerate for 2-3 days to allow the flavors time to mingle, store in glass bottle and refrigerate up to a month.

**In Japanese Soul Cooking – they prepare the kake soba broth (combining the kaeshi and dashi and a lot of mirin) ahead of time, I did not combine the katsuobushi dashi broth and kaeshi, I add them separately into the curry and use a lot less mirin.  Check out their book, it’s filled with wonderful recipes, thank you very much for your inspiration.

Preparation:

  • 2 to 3 days before – prepare kaeshi (see recipe above, refrigerate in glass container ready for use)
  • Prepare dashi broth (can be done 1 to 2 days ahead, refrigerate in glass container ready for use)
  • Prep all the vegetables
  • In a large saucepan, reheat the dashi broth (if you did not make from scratch the same day) and keep it warm
  • In a different large heavy pot, heat 1/2 tablespoon olive oil using medium high heat, add cauliflower and cook for 2 minutes, then add carrot (cook for another 2 minutes) and zucchini, lightly seasoned with kosher salt and 1 Tablespoon ground turmeric, saute in total 5 to 6 minutes then remove from pot, set aside.
  • In the same pot, heat another 1/2 Tablespoon olive oil (medium high heat), add sliced onion and 1 Tablespoon of mirin and saute, stirring constantly for 2-3 minutes, until onion becomes soft and turn translucent (I let it caramelize a little).  Add the remaining 2 Tablespoons ground turmeric and cook, stirring constantly and mix well, be careful not to burn the turmeric!
  • Add the warm dashi broth and 1/2 cup of kaeshi to the pot , scrape the bottom of the pot,  cook for 2-3 minutes and bring to a boil.  Skim off any scum and fat from the broth.  Reduce heat then let the flavors mix and cook for another 10 minutes.
  • Turn off the heat, add the curry roux, using a strainer or chopsticks, melt the roux and blend nicely with broth mixture.
  • Turn on the heat to medium high, heat the curry, stir occasionally, making sure it will not stick and burnt on the bottom.  Using small fine mesh strainer, remove any scum.
  • Add cauliflower, carrot and zucchini mixture to curry, using medium low heat, let it simmer for another 15 to 20 minutes, gently stir occasionally to prevent sticking and don’t break the vegetables.  Keep it warm using low heat (and it will not burn), taste the curry and add seasoning (using kaeshi) if necessary.
  • Prepare garnish – diced apples (squeeze a bit of lemon juice to prevent it from turning “brown”) and scallions
  • Meanwhile using a separate pot, boil water to cook the sanuki udon (according to instructions approximately 1 to 2 minutes) – I prepare each serving individually
  • Turn off the heat, put udon into bowl, ladle the curry over noodles, garnish with diced apples, scallions and fukujinzuke, now ready to serve and enjoy!
  • If you are adding ground or sliced pork to this dish, lightly saute the pork in the beginning and set it aside, add the meat last when vegetables are cooked, bring curry to boil and turn off heat immediately, the meat will cook through and remain juicy!

Where to shop for ingredients in Vancouver: Fujiya (Japanese groceries, fukujinzuke is available – 912 Clark Drive, Vancouver, BC), Nikuya (11220 Voyageur Way, Richmond, BC – for sliced pork), T and T Supermarket (Various locations – for Sakura Farms ground pork), Japanese Soul Cooking (Available at Indigo, Amazon, I purchased mine from Crate and Barrel at Oakridge Centre).

RECIPE: Faux-Omurice (Japanese Omelet Rice “Omurice” -)

IMG_2505

You must wonder what’s with the faux “Omurice” and Tomato Caramelized Onion “Jam-chup” (see other posting)?

Last month’s cauliflower “fried rice” was a food “jackpot”; I decided to continue to run with the idea and see what other variations I can come up with…

Over a dinner gathering with friends, we were talking about childhood comfort foods and our favours we love..my hubby Andy mentioned “Omelet Rice”….and voila!

I must give him full credit for coming up with this idea; It’s not a surprise at all as the Japanese “yoshoku” omelet is one of his all time favourite comfort foods! As an adult his tastes may have evolved in many ways but some things just never change – wonderful food memories and tastes just stay with us forever, we all have our own short list of “go-to” comfort foods.

As for the choice of vegetables: I picked carrots, corn and zucchini for their crunchy texture!  Although we are treating the cauliflower as “fried rice”, overall the texture is still a bit soft, it needs the “crunch” to add textural interest. The onions adds a sweet flavour and the Canadian back bacon lends a subtle smoky flavor, it is also leaner and I added just enough to satisfy a meat lover’s (like my husband) craving.

Canadian back bacon is also one of Andy’s favourites; this dish actually celebrates who he is, and pays homage to both his Japanese and Canadian roots.

The Tomato caramelized onion jam “jam-chup” (Andy calls it as it’s a replacement for ketchup, just a play on words) is a very lucky find (Serious Eats), I’m so happy and proud that I “tweaked” the original recipe and made it work for my dish.

You may wonder how I came up with this Deconstructed version in a bowl? Aesthetically this works beautifully; it’s practical and easy to serve. The cauliflower “rice” is actually quite filling and since it’s in small bits, you need to put a lot to “stuff’ the omelet to make it “full”, I think the serving will become too big.

Besides…It’s time for me to practice flipping omelets!! Enjoy (OO)

Ingredients: (serves 2-4)

1 small head of organic cauliflower, 3-4 teaspoons grapeseed oil, 1 medium yellow onion (finely diced), 1 large carrot (peeled and finely diced), 2 ears of fresh corn (husked and kernels removed), 1 large zucchini (finely diced), 2 slices of Canadian back bacon (diced), organic eggs (1 for each serving), unsweetened almond milk (1 Tablespoon for each portion), 2 Tablespoons of stock (I’ve used homemade Japanese dashi stock, you can substitute with chicken broth or vegetable broth), organic Japanese soy sauce (season to taste), sea salt and ground black pepper, chives for garnish (optional).

**For a vegetarian version – omit the Canadian bacon, substitute the Japanese dashi stock (from kelp and bonito flakes) vegetable broth.  I find the dashi adds a very nice flavor to this dish.

Preparation:

– Clean the cauliflower,core and trim the florets off the stems, cut off any blemishes (sometimes there are brown spots!).  Process florets in the food processor until they resemble the texture and size of rice grains.

– Chop the onion finely, dice carrot and zucchini finely, husked and removed corn kernels, set aside.

– Slice and dice the Canadian back bacon into small bits separately, set aside.

– In a large pot (I used a 5 quart pot with lid) or wok/saute pan, using high heat, heat 2 teaspoons of grape seed oil; add 1/2 the diced onion and cook until they become soft and translucent.  Add carrots, saute for 2 minutes; add corn and saute for another 2 minutes; add zucchini and 1 Tablespoon of dashi stock (you will hear a “sizzling” sound), saute and mix the vegetables well (takes approximately 2-3 minutes).  The entire process takes less than 10 minutes; vegetables should be cooked yet crunchy in texture.  Remove from pan and set aside.

– Using the same pot, adjust to medium low heat, add another teaspoon of oil, add the remaining diced onion, again cook until they become soft and translucent.  Add cauliflower, stirring gently for 5 minutes until the oil is evenly distributed and each “grain” is coated.

– Add 1 Tablespoon of dashi stock, put the lid on, adjust to low heat (to avoid burning) and “steam” the cauliflower for 3 to 4 minutes.  If you like it softer, cook a little longer.

– Remove the lid, readjust to medium high heat, add Canadian back bacon bits, saute for 2 minutes; return carrot/corn/zucchini mixture to pot. Using spatula, gently fold and stir fry ingredients until mixture is slightly browned, taste and season with soy sauce and black ground pepper, Turn off heat and set cooked mixture aside.

IMG_3348
Filling ready to go!

– Whisk the egg, add a pinch of sea salt and almond milk (1 Tablespoon to 1 egg) together in small bowl, you are preparing each portion individually.

– Lightly greased a small frying pan (I’ve used an 8 inch), coat the surface with a thin coat of grape seed oil.

– Heat the pan over medium high heat, when pan gets hot, pour the egg mixture and tilt to cover the pan evenly; once the egg has set, turn off and remove from heat.

– Gently remove “omelet” from frying pan and lay in a round bowl (find one that fits the omelet perfectly!), ladle the filling on top of “omelet”. (At this time you can decide whether you would like to make this version or a real omelet**).

– Garnish with chives (optional) and serve immediately with tomato caramelized onion jam “jam-up” (see separate recipe).

Notes:

Namiko Chen’s website “Just One Cookbook” has an excellent “traditional” Japanese Omelet Rice Recipe with very clear instructions and excellent demonstration on how to assemble the omelet.

http://www.justonecookbook.com/recipes/omurice-japanese-omelette-rice/

– I always try to keep oil usage to minimum; you can always add a little more to adjust.

– In a regular omelet rice recipe, ketchup is added to rice directly.  It’s my humble opinion that it will not work and make the cauliflower soggy and taste funny, besides we don’t use ketchup much these days and decided to look for a healthier option.

– This is an anything goes recipe; You can choose whatever vegetables you have or to your liking to substitute the corn, zucchini or carrots. I chose them because they add a crunchy texture. Feel free to use chicken (in regular recipe) instead of back bacon. Be creative!

– To all Moms: this may be a great option to encourage (or “fool”) your kids into eating more vegetables (OO). It makes a great bento box lunch and a wonderful one-dish dinner.

– I choose Canadian back bacon as it is leaner. If you are using regular bacon, render the fat and use it to saute the vegetables to add more flavor.  As bacon is salty, adjust the seasoning as required.

– As always, remember to taste and season according to your liking and dietary needs!


Lemongrass Pork Meatball with Thai Green Curry

IMG_2092

Fall is in “full swing” here in Vancouver and it’s the season when we crave for scrumptious and hearty meals; I decided to combine two of our favourite foods together: Meatballs and Thai Green Curry with Zucchini and eggplant.

Almost two years ago I took a cooking class at the Blue Elephant Cooking School in Bangkok, the green curry recipe is a combination of what I’ve learnt at Blue Elephant and a partial adaptation from Andy Ricker’s Green curry with fish and eggplant recipe (from POK POK, see also blogger “Lady and Pup”‘s great adaptation (also pork meatball), it’s a great interpretation and I love the photos!).

Instead of jasmine rice, I decided to serve this dish with a cauliflower “fried” rice, a wonderful recipe (see separate posting) from my friend “PPQ”; it is a great way to include more vegetables into your meals and a very good option for “carb” conscious individuals; the flavors all worked wonderfully together. Enjoy (OO)!

Ingredients for the Lemongrass Meatball:

500 grams organic lean ground pork, 2 garlic cloves (finely minced), 1 stalk finely chopped lemongrass, 1 Tablespoon fresh galangal (or ginger, peeled and finely grated), 3 green scallions (white and green part finely chopped), 1/4 cup chopped cilantro (roughly chopped), 1/4 (up to 1/2 cup) of Japanese panko (as required), unsweetened almond or coconut milk (as required, approximately 1/4 cup), 1 large egg, 2 Tablespoon fish sauce, 1 Tablespoon coconut nectar (optional), 1 teaspoon sea salt and 1 teaspoon white ground pepper (seasoning can be adjusted own taste).

Ingredients for the Green Curry: 

1 Tablespoon olive oil, 1/2 cup Thai green curry paste (store-bought or you can prepare your own), 1/4 teaspoon cumin seeds (roasted and grounded), 1/4 teaspoon coriander seeds (ground roasted), 1 1/2 cup coconut milk, 1/2 cup unsweetened almond milk** , 1 medium Japanese eggplant (cut into 1 inch pieces), 2 medium zucchini (cut into 1 inch pieces), 1 (or 2) fresh Thai red chillies (sliced, seeds removed), 6 kaffir lime leaves (slightly torn by hand), sweet Thai basil leaves (1/4 – 1/2 cup for garnish), 1 Tablespoon fish sauce (more to adjust taste and seasoning) and 1 – 2 teaspoon grated palm sugar (for seasoning), coconut cream (for garnish), lime juice, chopped cilantro (for garnish).

**Almond milk is my own preference as I do not want the curry to be overly creamy. Andy Ricker’s recipe calls for 1/2 cup coconut cream and the preparation method is different.

To prepare the meatballs:

– In a large mixing bowl, using your hand, combine and gently mix ingredients (except panko and almond milk). Cover with wrap, marinade and refrigerate for at least one hour.

– Pre-heat oven to 375 degrees F.

– When ready to cook meatballs, add panko and almond milk (adjust the quantity pending the

– Lightly oil your hands, shape into 1 inch balls

– (**This step is optional – I “soaked” the meatballs in coconut milk for 20 minutes first, pat them dry then bake in the oven – see picture below).

– Lined your baking tray with foil and space them so they are not touching. Bake for approximately 20 to 25 minutes; then change to “broil” and “brown” for approximately 5 minutes, remove from the oven and set aside.

– Proceed to prepare the green curry once you place the meatballs in the oven.

IMG_2040

To prepare the zucchini and eggplant green curry:

– In large 6 quart pan, heat olive oil over medium. Add the green curry paste, ground roasted coriander and cumin seeds, stir-fry until an aroma develops and ingredients are slightly browned.

– Add 1/2 cup of the coconut milk, cook and stir occasionally, allow it to simmer until oil is extracted

– Add the rest of coconut milk and almond milk.  Bring to a boil, add eggplant then reduce the heat to medium low.  Cook for 10 minutes, stirring occasionally, then add zucchini and pork meatballs, cook until all vegetables are tender. Adjust the thickness of curry with water if necessary.

– Stir in fish sauce, palm sugar, kaffir lime leaves and chillies.  Taste the curry and adjust the seasoning if necessary.

– Remove from heat, stir in the basil leaves and a squeeze of fresh lime juice.

– Garnish with a drizzle of coconut cream, fresh sliced chillies (add more if you want more “heat”) and chopped cilantro. Serve immediately with rice on the side.

Additional notes:

– Omit the pork meatball and this becomes a great vegetarian dish.

***Here’s the recipe for Green Curry Paste from Blue Elephant Cooking School; the class was fun and informative, it’s worthwhile to attend if you happen to visit Bangkok.

10 pieces green birds eye chillies, 1 big green Serrano chilli, 1 coriander (or cilantro) root (omit if you are unable to find, use chopped coriander stems/leaf instead, approximately 1-2 tablespoon), 1/2 tablespoon kaffir lime zest (can use regular lime), 1/2 tablespoon finely sliced galangal (use ginger if you are unable to find), 1 Tablespoon lemon grass (finely sliced), 4 cloves of garlic (peeled), 3 shallots (peeled), 1 teaspoon salt, 1 teaspoon ground roasted cumin seed, 1/2 teaspoon ground roasted coriander seeds, 1/2 teaspoon white ground pepper, 1/2 teaspoon shrimp paste, 10 sweet Thai basil leaves.

To prepare the green curry paste: Dry roast the cumin seed and coriander seed in skillet until seeds begin to pop, let cool slightly and place them in spice grinder and grind finely. Using the mortar, apply a “pushing” motion and pound kaffir lime zest, coriander root, lemongrass, galangal (1/2 and all chillies together. Add the remaining ingredients (add basil leaves last) and continue to pound until everything is blended into a smooth paste. **If you find this too labour intensive, ready-made Thai green curry paste are available almost everywhere. Unused paste can be kept in an airtight container for two weeks in the refrigerator or last up to 1 month in the freezer.


Cauliflower Fried Rice

IMG_2070

More than two weeks ago, my friend “PPQ” was over at our place for mid-Autumn Festival Dinner and she made her simple version of cauliflower fried “rice” which paired surprisingly well with our semi traditional (Chinese steamed fish, roast pork belly, sautéed pea sprouts, sake steamed clams, duck breast lettuce wrap) dinner. She actually has modified the recipe based on the original posted on the award-winning site Nom Nom Paleo!  

We added garlic stems (I’ve seen them at our local Farmer’s market during early Fall season and readily available at most Asian Supermarkets); it adds a very delicate flavour and a nice crunch to the fried “rice”.

I made this again the other day and added shallots to the recipe. “PPQ”, thank you very much for your garlic stem idea! I’ve served the “rice” with Thai Green Curry, we didn’t miss the jasmine rice at all!  Basically anything goes with this excellent low carb option, same as any other recipes, feel free to modify and make it your own, Enjoy (OO)!

Ingredients:

1 small head of organic cauliflower, 1-2 Tablespoons olive oil, 1 small yellow onion (finely diced), 2 small shallots (finely diced), bunch of garlic stems – 1/2 to 1 cup (finely chopped), kosher salt and fresh ground pepper.

Preparation:

– Clean the cauliflower, core and trim the florets off the stems, cut off any blemishes (sometimes you see little brown spots). Place florets in the food processor and process until they resemble the texture and size of rice grains.

– Prepare garlic stems: wash thoroughly in cold water, pat dry, cut off end of stems and chop them finely

– In a large skillet, heat 1/2 Tablespoon of olive oil over medium high heat, add onions and cook until they become soft and translucent, add shallots and garlic stems; mix ingredients well and cook for another 3-4 minutes to bring out the flavours and aroma. Remove mixture from skillet and set aside.

– Adjust to medium low heat, using the same pan heat remaining olive oil, add cauliflower, season lightly with salt and pepper, stirring gently for approximately 5 to 10 minutes until the oil is evenly distributed and each “grain” is coated.

– Put the lid on the skillet, adjust to low heat (to avoid burning) and cook the cauliflower “covered” for another 5 minutes (to 10 minutes) until they become tender.

– Remove the lid, readjust to medium high heat, return onion/garlic stem/shallot mixture to skillet, using a spatula, gently stir fry all ingredients until mixture is slightly browned.

IMG_2050

– Taste and season with salt and pepper as required.


RECIPE: Roasted Cauliflower and Cremini Mushrooms with garlic and rosemary

IMG_0802

This is an idea and recipe which I’ve adapted loosely from the December 2013 issue of Fine Cooking; instead of cooking the vegetables in a skillet, I opted to roast everything together and served as a side dish with our roast prime rib dinner; I will try the slow saute method next time.

Ingredients: (serves 4 to 6)

1 Tablespoon of Red Wine Vinegar, 1 Tablespoon Pure Maple syrup, 1 teaspoon freshly squeezed lemon juice (more to taste), kosher, salt, 1/4 cup extra virgin olive oil, 1 Head of cauliflower (medium), 1/2 pound of Cremini mushrooms (trimmed, halved if small, quartered if large – approximately 3 cups), 8 large cloves of garlic (peeled and halved lengthwise), 3 rosemary sprigs, 1 Tablespoon unsalted butter (optional).

Preparation:

– Pre-heat oven to 350 F, lined roasting pan with parchment paper or aluminum foil.

– Prepare the cauliflower and mushrooms; for the cauliflower, cut off the stems and leaves (discard); Cut the cauliflower into half, then slice florets and stalks into bite size, cut the florets so they have a flat side.

– Combine red wine vinegar, maple syrup and lemon juice in a small bowl, set aside.

– Toss cauliflower, mushrooms and garlic in olive oil, season with kosher salt and pepper.  Spread evenly on baking dish.

– Bake uncovered 40 to 45 minutes, stirring occasionally, until vegetables are tender and golden brown.

– Remove from oven and gently stir in vinegar mixture and butter (optional). Discard the rosemary sprigs and season to taste with more lemon juice and salt (if necessary).  Serve immediately.